You can deploy fast, secure, and trusted MySQL database instances on Alibaba Cloud. Alibaba has an advanced network of cloud-based technologies and their breaking performance and flexible billing have enabled cloud without borders for its over one million paid customers.
Alibaba Cloud has continued to show enormous contribution to the open-source communities and has empowered developers worldwide. Alibaba Cloud was the winner of the prestigious 2018 MySQL Corporate Contributor Award and is also a platinum sponsor of the MariaDB foundation.
In this guide, we will take you through the steps of optimizing SQL queries and databases on your Alibaba Cloud Elastic Compute Service (ECS) instance. This will guarantee stability, scalability, reliability and speed of applications and websites running on your Alibaba Cloud instance.
A server running your favorite operating system that can support MySQL (e.g. Ubuntu, Centos, Debian).
MySQL database server.
A MySQL user capable of running root commands.
Tip #1: Index All Columns Used in ‘where’, ‘order by’, and ‘group by’ Clauses
Apart from guaranteeing uniquely identifiable records, an index allows MySQL server to fetch results faster from a database. An index is also very useful when it comes to sorting records.
MySQL indexes may take up more space and decrease performance on inserts, deletes, and updates. However, if your table has more than 10 rows, they can considerably reduce select query execution time.
It is always advisable to test MySQL queries with a “worst case scenario” sample amount of data to get a clearer picture of how the query will behave on production.
Consider a case where you are running the following SQL query from a database with 500 rows without an index:
mysql> select customer_id, customer_name from customers where customer_id='140385';
The above query will force MySQL server to conduct a full table scan (start to finish) to retrieve the record that we are searching.
Luckily, MySQL has a special ‘EXPLAIN‘ statement that you can use alongside select, delete, insert, replace and update statements to analyze your queries.
Once you append the query before an SQL statement, MySQL displays information from the optimizer about the intended execution plan.
If we run the above SQL one more time with the explain statement, we will get a full picture of what MySQL will do to execute the query:
mysql> explain select customer_id, customer_name from customers where customer_id='140385';
+----+-------------+-----------+------------+------+---------------+------+---------+------+------+----------+-------------+
| id | select_type | table     | partitions | type | possible_keys | key  | key_len | ref  | rows | filtered | Extra       |
+----+-------------+-----------+------------+------+---------------+------+---------+------+------+----------+-------------+
|  1 | SIMPLE      | customers | NULL       | ALL  | NULL          | NULL | NULL    | NULL |  500 |    10.00 | Using where |
+----+-------------+-----------+------------+------+---------------+------+---------+------+------+----------+-------------+
As you can see, the optimizer has displayed very important information that can help us to fine-tune our database table. First, it is clear that MySQL will conduct a full table scan because key column is ‘NULL‘. Second, MySQL server has clearly indicated that it’s going to conduct a full scan on the 500 rows in our database.
To optimize the above query, we can just add an index to the ‘customer_id‘ field using the below syntax:
mysql> Create index customer_id ON customers (customer_Id);
Query OK, 0 rows affected (0.02 sec)
Records: 0 Duplicates: 0 Warnings: 0
If we run the explain statement one more time, we will get the below results:
mysql> Explain select customer_id, customer_name from customers where customer_id='140385';
From the above explain output, it’s clear that MySQL server will use our index (customer_Id) to search the table. You can clearly see that the number of rows to scan will be 1. Although I run the above query in a table with 500 records, indexes can be very useful when you are querying a large dataset (e.g. a table with 1 million rows).
Tip 2: Optimize Like Statements With Union Clause
Sometimes, you may want to run queries using the comparison operator ‘or‘ on different fields or columns in a particular table. When the ‘or‘ keyword is used too much in where clause, it might make the MySQL optimizer to incorrectly choose a full table scan to retrieve a record.
A union clause can make the query run faster especially if you have an index that can optimize one side of the query and a different index to optimize the other side.
Example, consider a case where you are running the below query with the ‘first_name‘ and ‘last_name‘ indexed:
mysql> select * from students where first_name like 'Ade%' or last_name like 'Ade%' ;
The query above can run far much slower compared to the below query which uses a union operator merge the results of 2 separate fast queries that takes advantage of the indexes.
mysql> select from students where first_name like 'Ade%' union all select from students where last_name like 'Ade%' ;
Tip 3: Avoid Like Expressions With Leading Wildcards
MySQL is not able to utilize indexes when there is a leading wildcard in a query. If we take our example above on the students table, a search like this will cause MySQL to perform full table scan even if you have indexed the ‘first_name‘ field on the students table.
mysql> select * from students where first_name like '%Ade' ;
We can prove this using the explain keyword:
mysql> explain select * from students where first_name like '%Ade' ;
As you can see above, MySQL is going to scan all the 500 rows in our students table and make will make the query extremely slow.
Tip 4: Take Advantage of MySQL Full-Text Searches
If you are faced with a situation where you need to search data using wildcards and you don’t want your database to underperform, you should consider using MySQL full-text search (FTS) because it is far much faster than queries using wildcard characters.
Furthermore, FTS can also bring better and relevant results when you are searching a huge database.
To add a full-text search index to the students sample table, we can use the below MySQL command:
mysql>Alter table students ADD FULLTEXT (first_name, last_name);
mysql>Select * from students where match(first_name, last_name) AGAINST ('Ade');
In the above example, we have specified the columns that we want to be matched (first_name and last_name) against our search keyword (‘Ade’).
If we query the optimizer about the execution plan of the above query, we will get the following results:
mysql> explain Select * from students where match(first_name, last_name) AGAINST ('Ade');
It’s clear that only a single row will be scanned even if our student’s database has 500 rows and this will speed up the database.
Tip 6: Optimize Your Database Schema
Even if you optimize your MySQL queries and fail to come up with a good database structure, your database performance can still halt when your data increases.
Normalize Tables
First, normalize all database tables even if it will involve some trade-offs. For instance, if you are creating two tables to hold customers data and orders, you should reference the customer on the orders table using the customer id as opposed to repeating the customer’s name on the orders table. The latter will cause your database to bloat.
The image below refers to a database schema that is designed for performance without any data redundancy. In MySQL database normalization, you should represent a fact only once in the entire database. Don’t repeat the customer name in every table; instead just use the customer_Id for reference in other tables.
Also, always use the same data type for storing similar values even if they are on different tables, for instance, the schema above uses ‘INT‘ data type to store ‘customer_id‘ both in the customers and orders table.
Use Optimal Data Types
MySQL supports different data types including integer, float, double, date, date_time, Varchar, and text, among others. When designing your tables, you should know that “shorter is always better.”
For instances, if you are designing a system user’s table which will hold less than 100 users, you should use ‘TINYINT‘ data type for the ‘user_id‘ field because it will accommodate all your values from -128 to 128.
Also, if a field expects a date value (e.g. sales_order_date), using a date_time data type will be ideal because you don’t have to run complicated functions to convert the field to date when retrieving records using SQL.
Use integer values if you expect all values to be numbers (e.g. in a student_id or a payment_id field). Remember, when it comes to computation, MySQL can do better with integer values as compared to text data types such as Varchar
Avoid Null Values
Null is the absence of any value in a column. You should avoid this kind of values whenever possible because they can harm your database results. For instance, if you want to get the sum of all orders in a database but a particular order record has a null amount, the expected result might misbehave unless you use MySQL ‘ifnull‘ statement to return alternative value if a record is null.
In some cases, you might need to define a default value for a field if records don’t have to include a mandatory value for that particular column/field.
Avoid Too Many Columns
Wide tables can be extremely expensive and require more CPU time to process. If possible, don’t go above a hundred unless your business logic specifically calls for this.
Instead of creating one wide table, consider splitting it apart in to logical structures. For instance, if you are creating a customer table but you realize a customer can have multiple addresses, it is better to create a separate table for holding customers addresses that refer back to the customers table using the ‘customer_id‘ field.
Optimize Joins
Always include fewer tables in your join statements. An SQL statement with poorly designed pattern that involves a lot of joins may not work well. A rule of thumb is to have utmost a dozen joins for each query.
Tip 7: MySQL Query Caching
If your website or application performs a lot of select queries (e.g. WordPress), you should take advantage of MySQL query caching feature. This will speed up performance when read operations are conducted.
The technology works by caching the select query alongside the resulting data set. This makes the query run faster since they are fetched from memory if they are executed more than once. However, if your application updates the table frequently, this will invalidate any cached query and result set.
You can check if your MySQL server has query cache enabled by running the command below:
You can set the MySQL query cache values by editing the configuration file (‘/etc/mysql/my.cnf‘ or ‘/etc/mysql/mysql.conf.d/mysqld.cnf‘). This will depend on your MySQL installation. Don’t set a very large query cache size value because this will degrade the MySQL server due to cached overhead and locking. Values in the range of tens of megabytes are recommended.
To check the current value, use the command below:
mysql> show variables like 'query_cache_%' ;
+------------------------------+----------+
| Variable_name | Value |
+------------------------------+----------+
| query_cache_limit | 1048576 |
| query_cache_min_res_unit | 4096 |
| query_cache_size | 16777216 |
| query_cache_type | OFF |
| query_cache_wlock_invalidate | OFF |
+------------------------------+----------+
5 rows in <b>set</b> (0.00 sec)
Then to adjust the values, include the following on the MySQL configuration file:
query_cache_type=1
query_cache_size = 10M
query_cache_limit=256k
You can adjust the above values according to your server needs.
The directive ‘query_cache_type=1‘ turns MySQL caching on if it was turned off by default.
The default ‘query_cache_size‘ is 1MB and like we said above a value a range of around 10 MB is recommended. Also, the value must be over 40 KB otherwise MySQL server will throw a warning, “Query cache failed to set size“.
The default ‘query_cache_limit‘ is also 1MB. This value controls the amount of individual query result that can be can be cached.
When it comes to your WordPress site, speed is important. This a fact. Why? First off, website speed is a significant factor in Google’s algorithm. Fast-loading websites can expect to rank higher in the SERPs and attract more visitors. Second, there are all the user experience considerations. If a site loads quickly, visitors are more likely to stick around, read your content, and ultimately convert. In other words, a lightning-quick website unlocks all the good things that webmasters crave.
However, we’re not here today to talk about how to make your website faster. We’ve already covered that extensively in our speed up WordPress guide and article on page speed. We’re here to discuss another common problem we see WordPress users making on a daily basis, and that is running a website speed test incorrectly.
You might not think this is that big of a problem. But in reality, it is when you’re trying to gauge improvements. If you run a website speed test the wrong way, it might appear that your site is slower, when actually it’s faster. Boost your WordPress site’s speed up to 200% just by moving to Kinsta.
So below, we’ll dive into the proper way to run a website speed test along with some tools you can use to tangibly measure your site’s speed and track any improvements. Table of Contents
If you don’t know, check with your web developer or hosting provider. And if you’re launching a brand new site, make sure to set these things up first, and then run your speed tests.
1. Configure Caching
If you’re a Kinsta client, our server-level page cache will already be running on your live WordPress site. So there is nothing you need to configure. However, remember that caching is disabled on our staging environments for development and debugging purposes.
If you’re hosting elsewhere, make sure to check out their documentation to ensure caching is enabled. If you’re using a shared host or VPS, this might mean you need to install a WordPress caching plugin.
2. Enable Content Delivery Network (CDN)
If you don’t know what a content delivery network is, you should first read our in-depth post on why you should be using a WordPress CDN. In 99.9% of scenarios, it will have a huge impact on the speed of your site. Depending on the location of the data center your site is hosted on, and the location of your visitors, we’ve seen a CDN decrease load times by over 50%!
If you’re a Kinsta client, we include free CDN bandwidth on all of our hosting plans. You can enable the Kinsta CDN in two simple steps.
Step 1
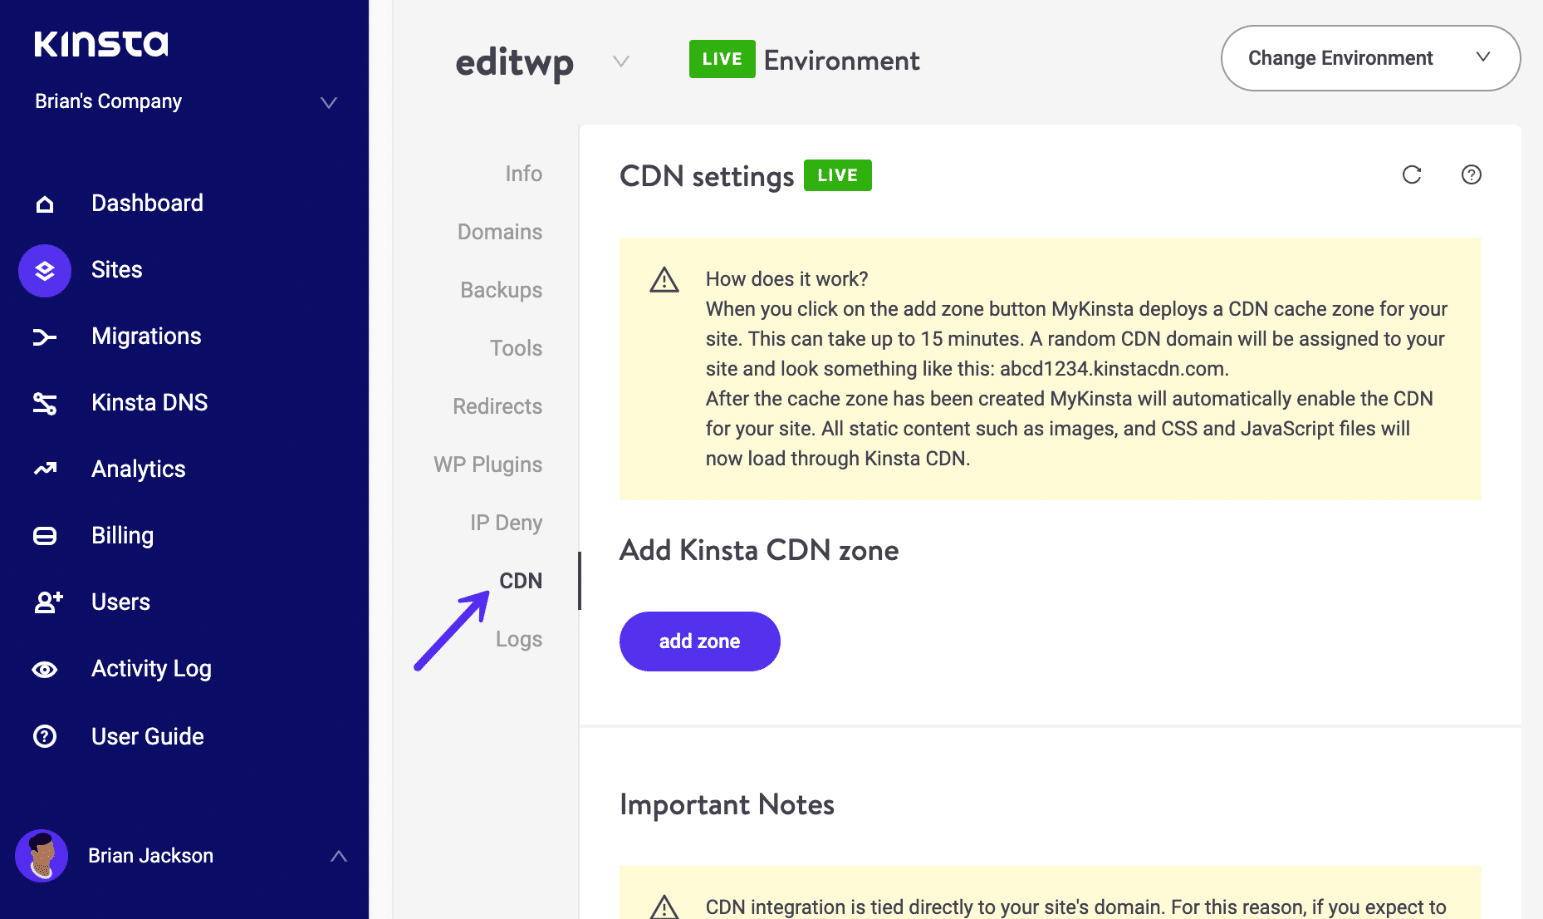
First, log in to your MyKinsta dashboard. Click on your site and then on the CDN tab.
Kinsta CDN
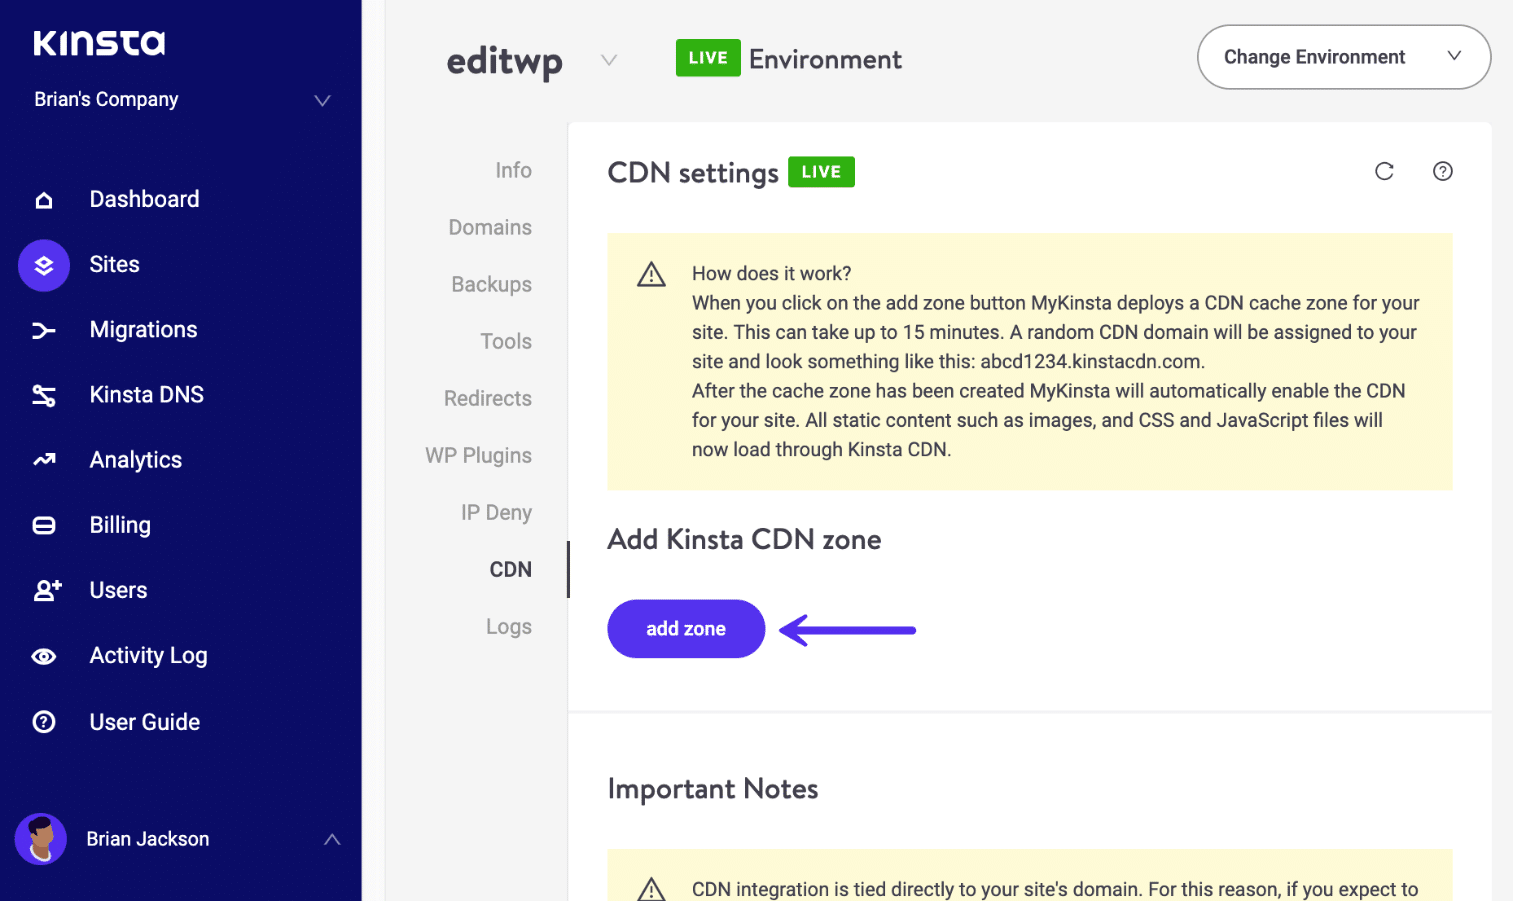
Step 2
Then click on “Add Zone.” After a few minutes, the CDN is automatically deployed, and your assets will be serving from cache around the globe. That’s all there is to it.
Enable Kinsta CDN
If you are using or interested in Cloudflare, we have an in-depth tutorial on how to install Cloudflare on your WordPress site. We also recommend checking out our comparison of the Kinsta CDN vs Cloudflare.
Third-party CDN providers should have the documentation you can follow to set up their CDN on your WordPress site. You can then use a free plugin like CDN Enabler.
How to Properly Run a Website Speed Test
Now that you have caching configured and a CDN enabled, it’s now time to dive into how to properly speed test your WordPress site. There are a lot of different tools you can use to measure the performance of your site. You can check out a full list further below. For this example, we are going to using Pingdom, one of the most popular and commonly used tools.
Speed Test Location Matters
Almost every speed test tool allows you to choose from different testing locations around the globe, and this matters quite a bit. The reason is that this is all relative to the data center where your WordPress site is hosted. TTFB, network latency, all come into play. If you’re a Kinsta client, we have 20 different data centers you can choose from for your sites.
So it’s important to speed test your site both from a location that is close to your data center and one that is far away. This will also help you see how much of an impact the CDN has on your WordPress site. You can also disable your CDN temporarily and re-test again without to really see the difference.
Whatever you do, be consistent with the location you choose.
You Have to Test Multiple Times
We won’t go too deep into caching in this article, but just remember that this is what makes your WordPress site load super fast (both caching from your WordPress host or plugin and your CDN).
The big problem is that many users tend to only run a speed test once, the content isn’t cached on the WordPress host or CDN yet, and then it appears that the site is actually slower. This can also happen if you just cleared your WordPress site or CDN’s cache.
How can you tell that your content or media isn’t serving from cache? It’s easy. Every speed test tool shows you what are called HTTP headers (also known as response headers). These contain important information about each request.
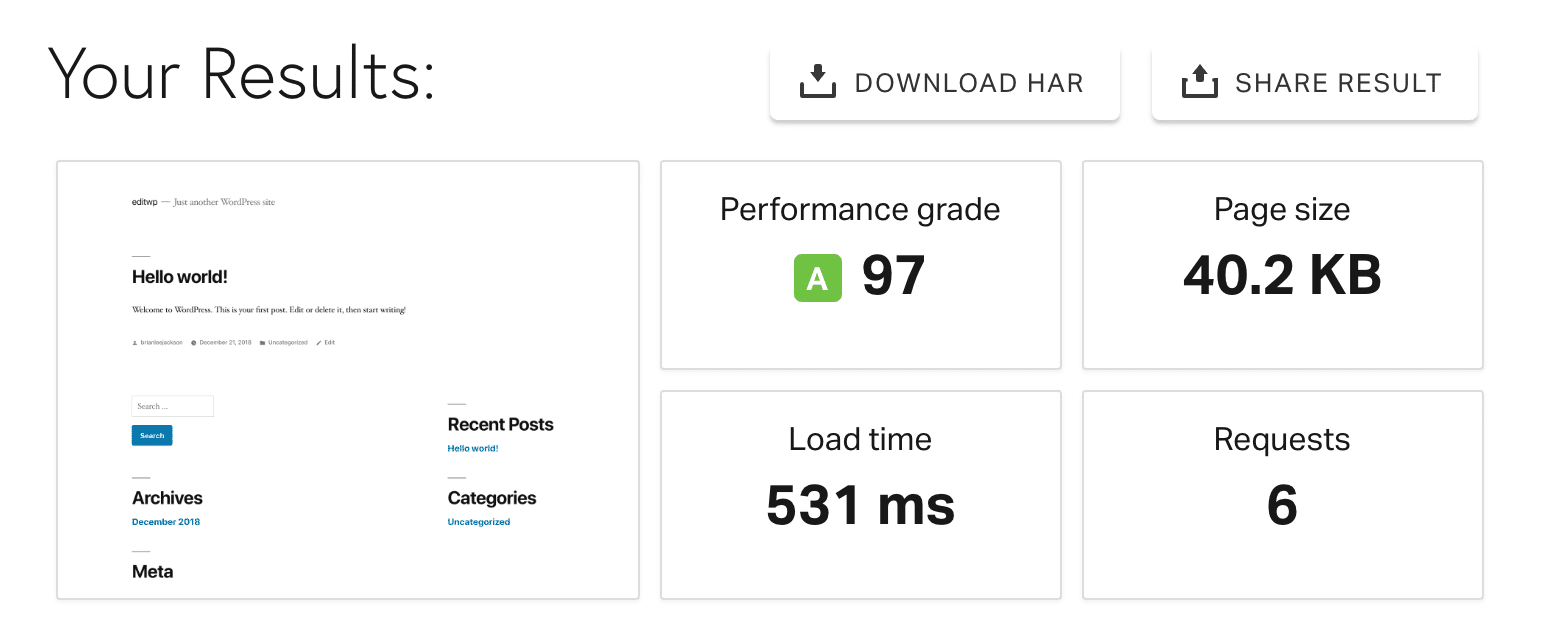
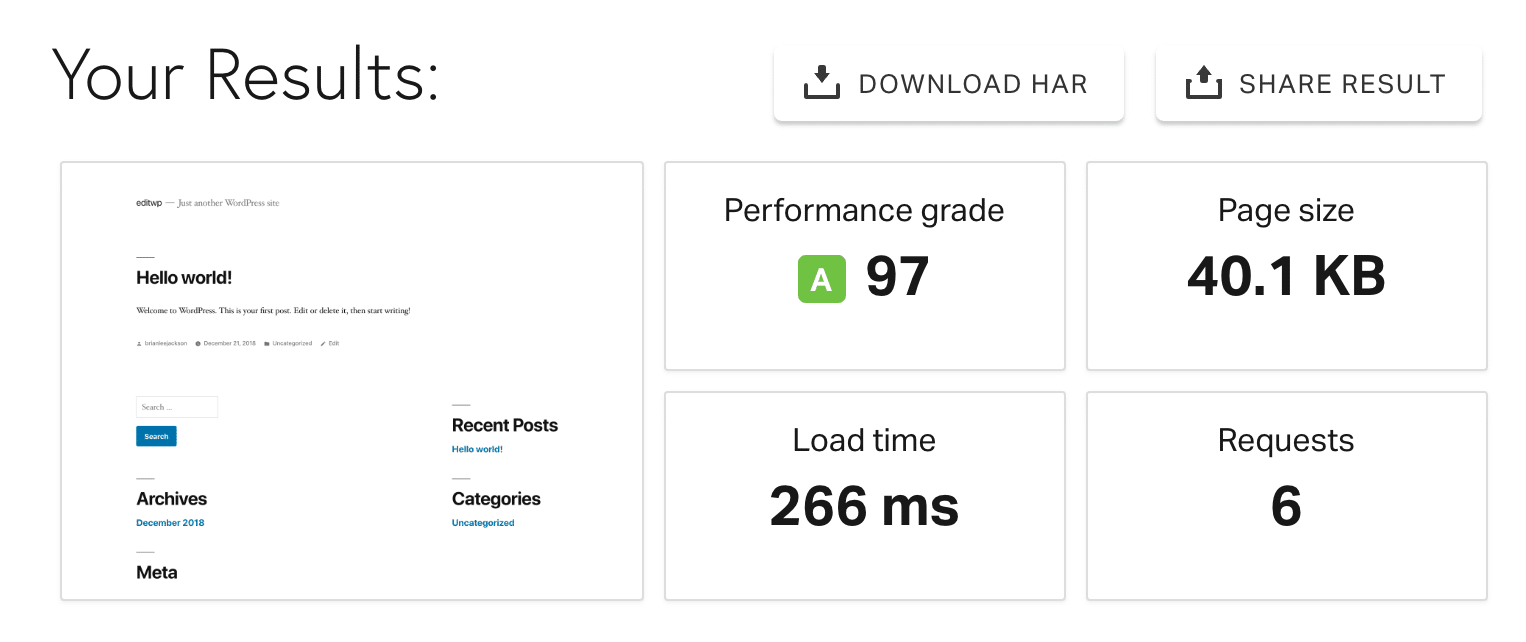
We have a development site set up at Kinsta with the Kinsta CDN enabled. We first tested it through Pingdom and get the following result.
Speed test
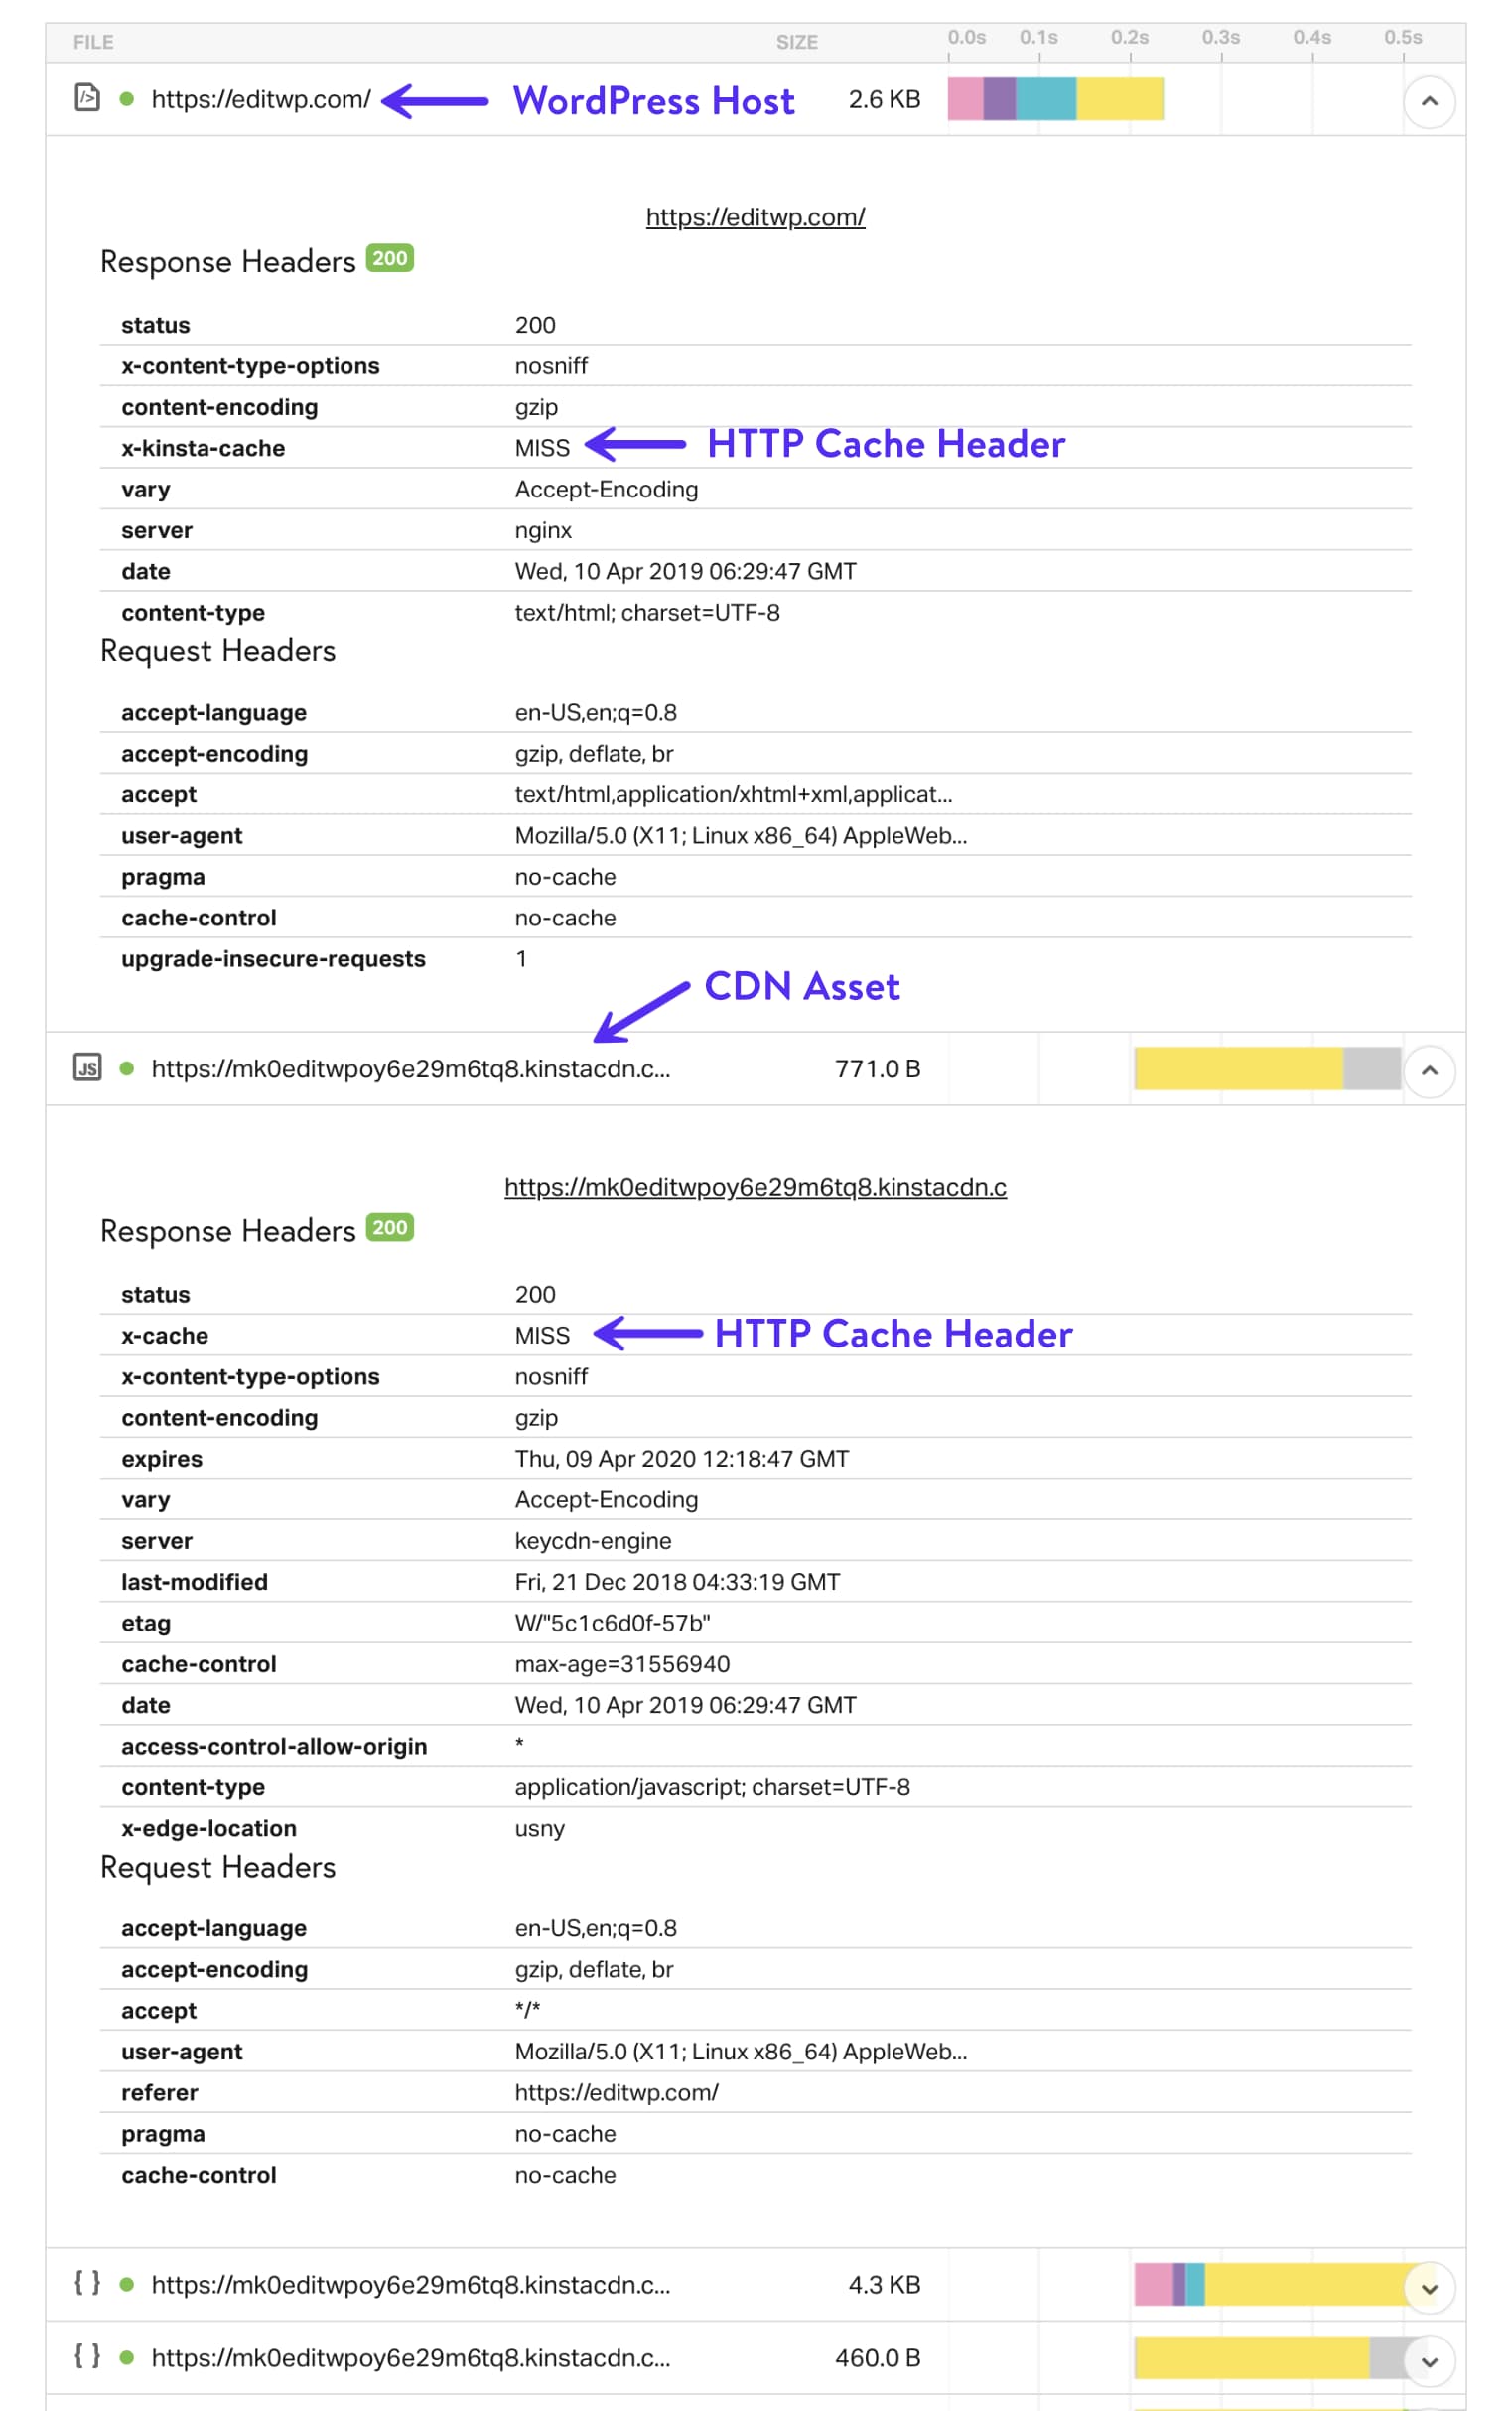
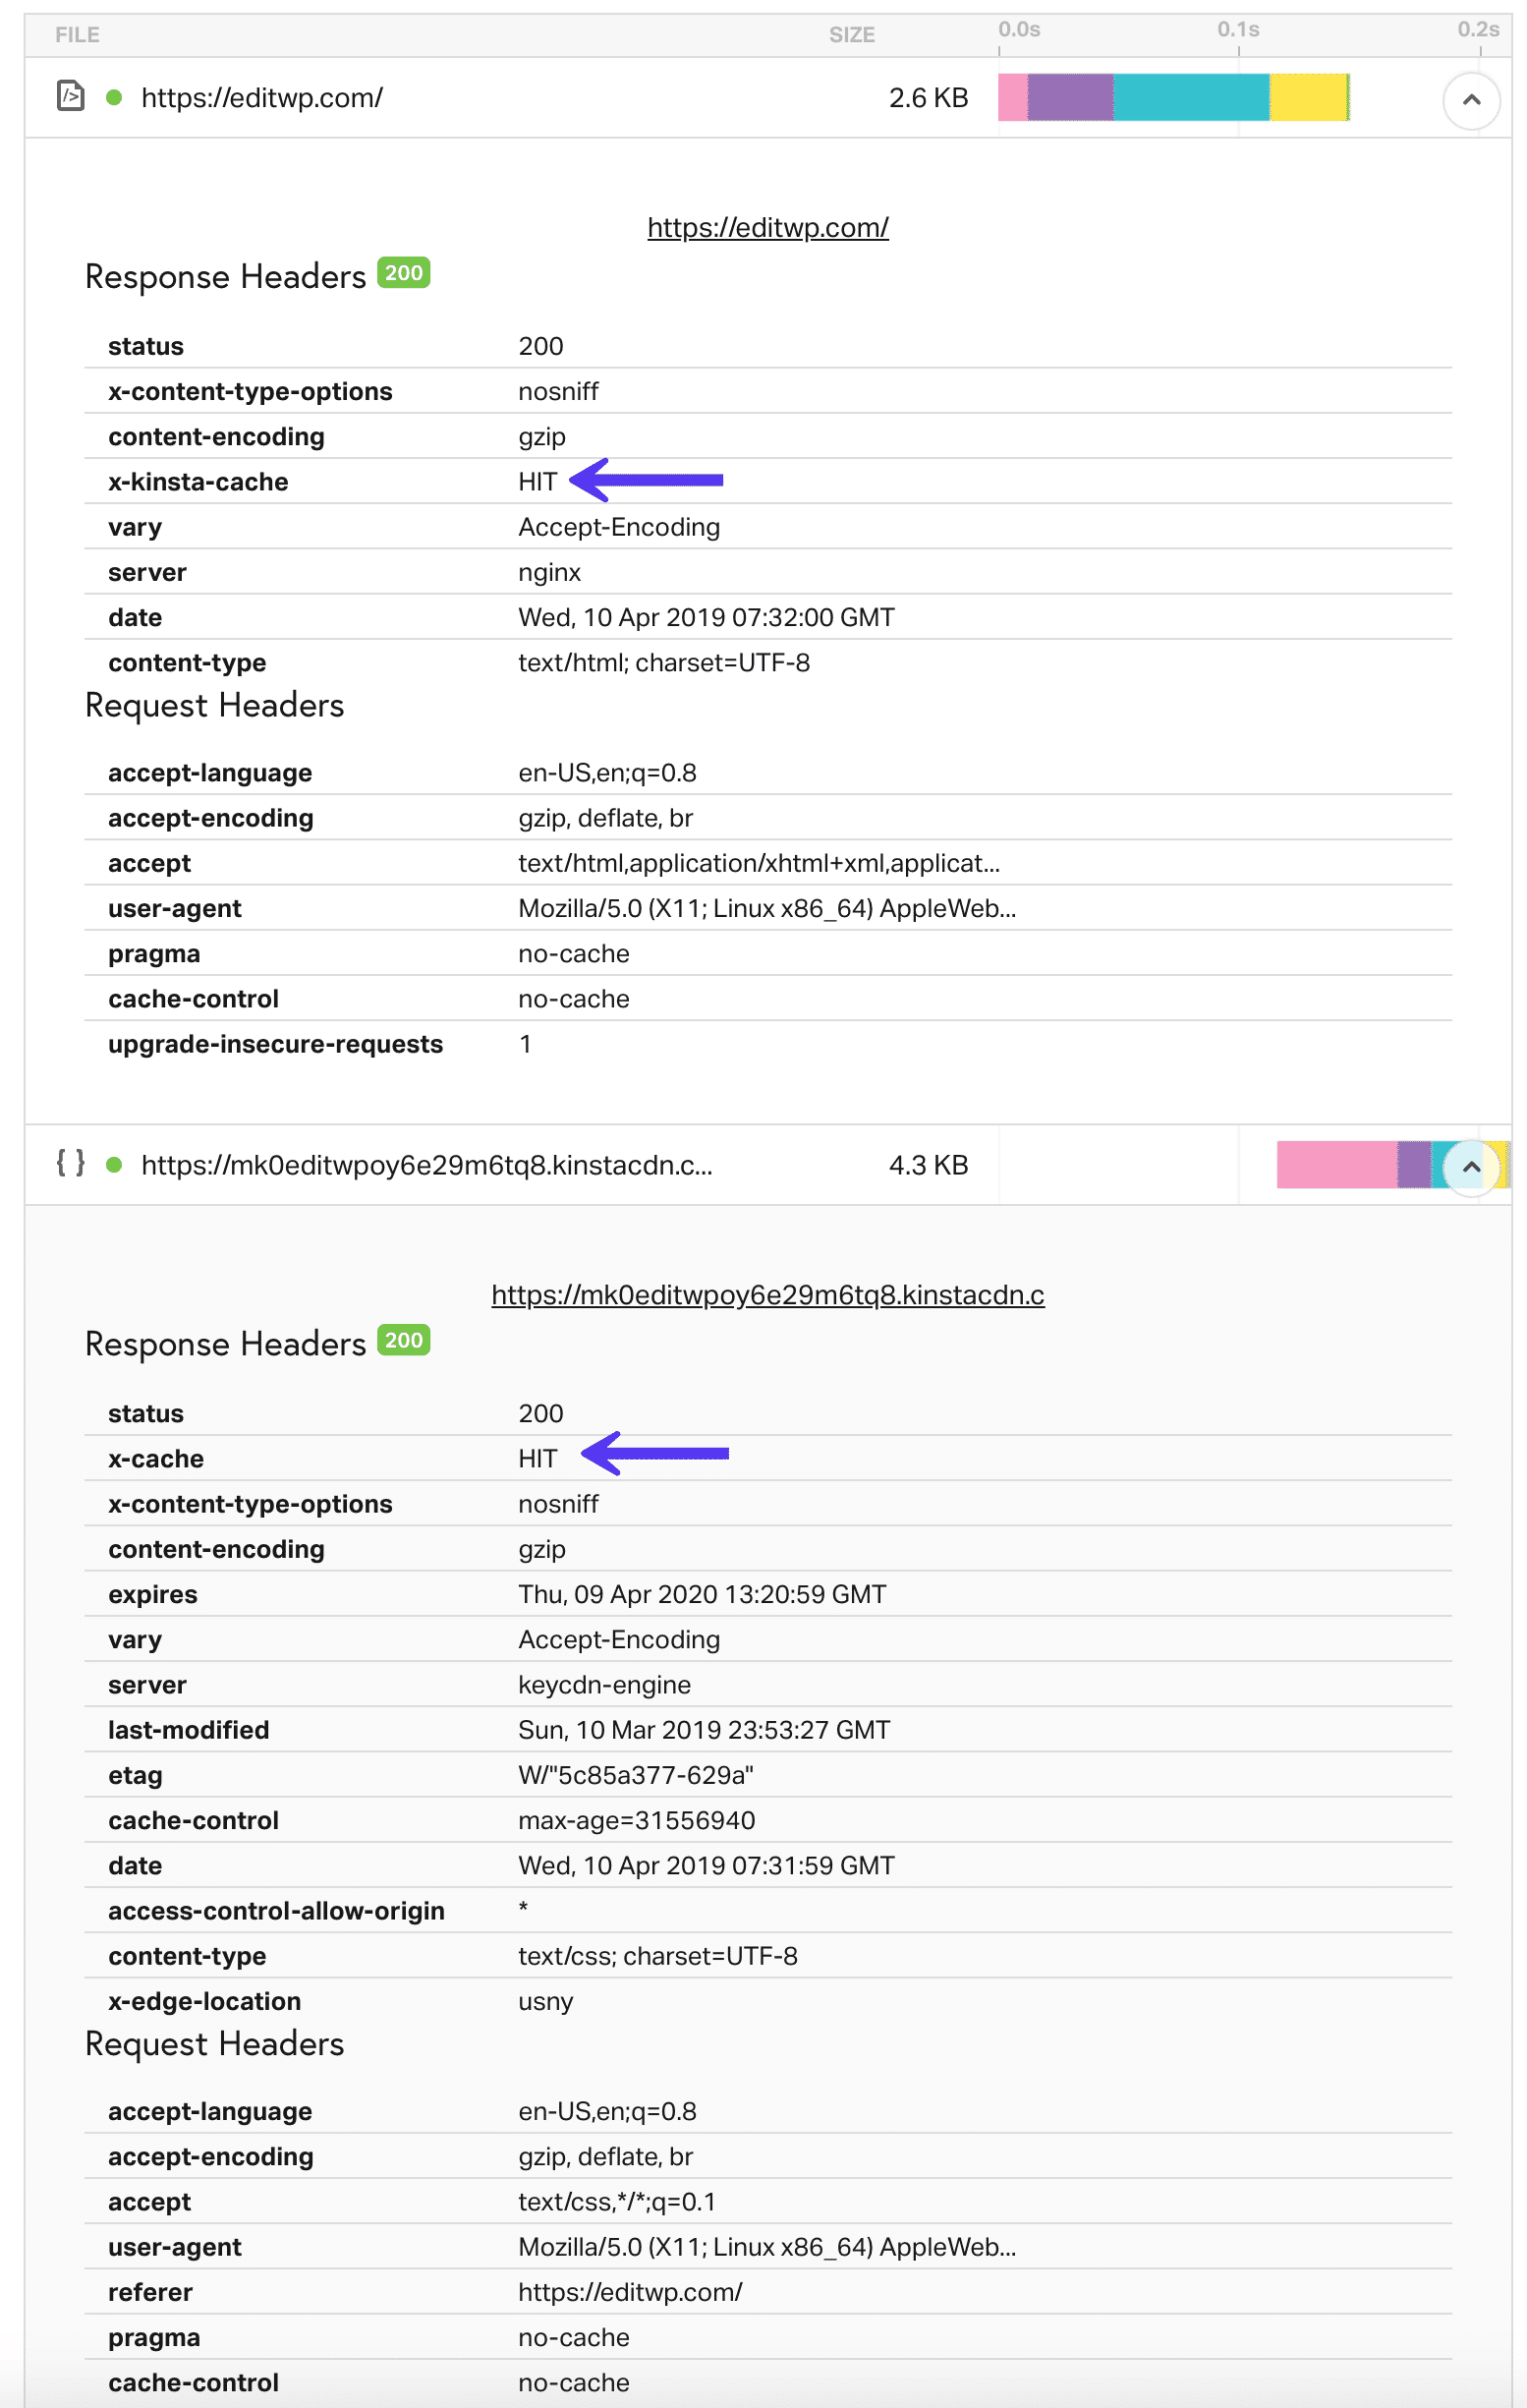
If you take a look at the example below, the first request is to the primary domain and this is loading directly from the Kinsta server. Below that, you can see the rest of the requests are loading from the Kinsta CDN (xxxx.kinstacdn.com).
If you look at the request to the Kinsta server, you will see a header called x-kinsta-cache. When it’s not serving from cache yet it will register a MISS. The name of this header might vary slightly based on your hosting provider.
The Kinsta CDN requests below that are the same way. Look for the header called x-cache. When it’s not serving from cache yet it will register a MISS. Again, the name of the header might vary slightly based on your CDN provider. For example, when you’re using Cloudflare, the HTTP header is called cf-cache-status.
Website speed test breakdown
To properly speed test, you need to see everything load from cache (both from your WordPress host and CDN). When it is, the x-kinsta-cache and x-cache headers will register a HIT (as seen below). This usually requires running your speed test multiple times. We have found that two or three is usually the magic number. Some speed test tools like Pingdom also limit the time between each test (usually a couple minutes). So you might have to run your speed test, come back later, run it again, etc.
WordPress host and CDN cache
It is also possible that your WordPress host will register a HIT with cache before your CDN. You can quickly scan down the test and look for the large yellow bar. This indicates TTFB (wait time), which is what spikes really high when a page or asset isn’t delivered from cache.
Why does this matter so much? Because if you look at our speed test before and after, the site that loaded entirely from cache was over 50% faster. And this was on our small development site. On larger sites, the percentage will be even bigger. This is why it’s vital that you understand how to speed test your website properly.
Now it’s time to dive into all the different website speed test tools you can use. What’s the optimal load time that you should be aiming for? Well, the faster the better, but most experts suggest that around two seconds or less is a good target. Remember too that there is a difference between perceived performance and actual performance.
One of the most important things when it comes to website speed testing is to pick one tool and stick with it. Each has its own set of different metrics and therefore you can’t compare one tool’s test results to another. There is no right or wrong tool, you should simply focus on making improvements. Gary Illyes, Webmaster Trends Analyst from Google, sums it up well.
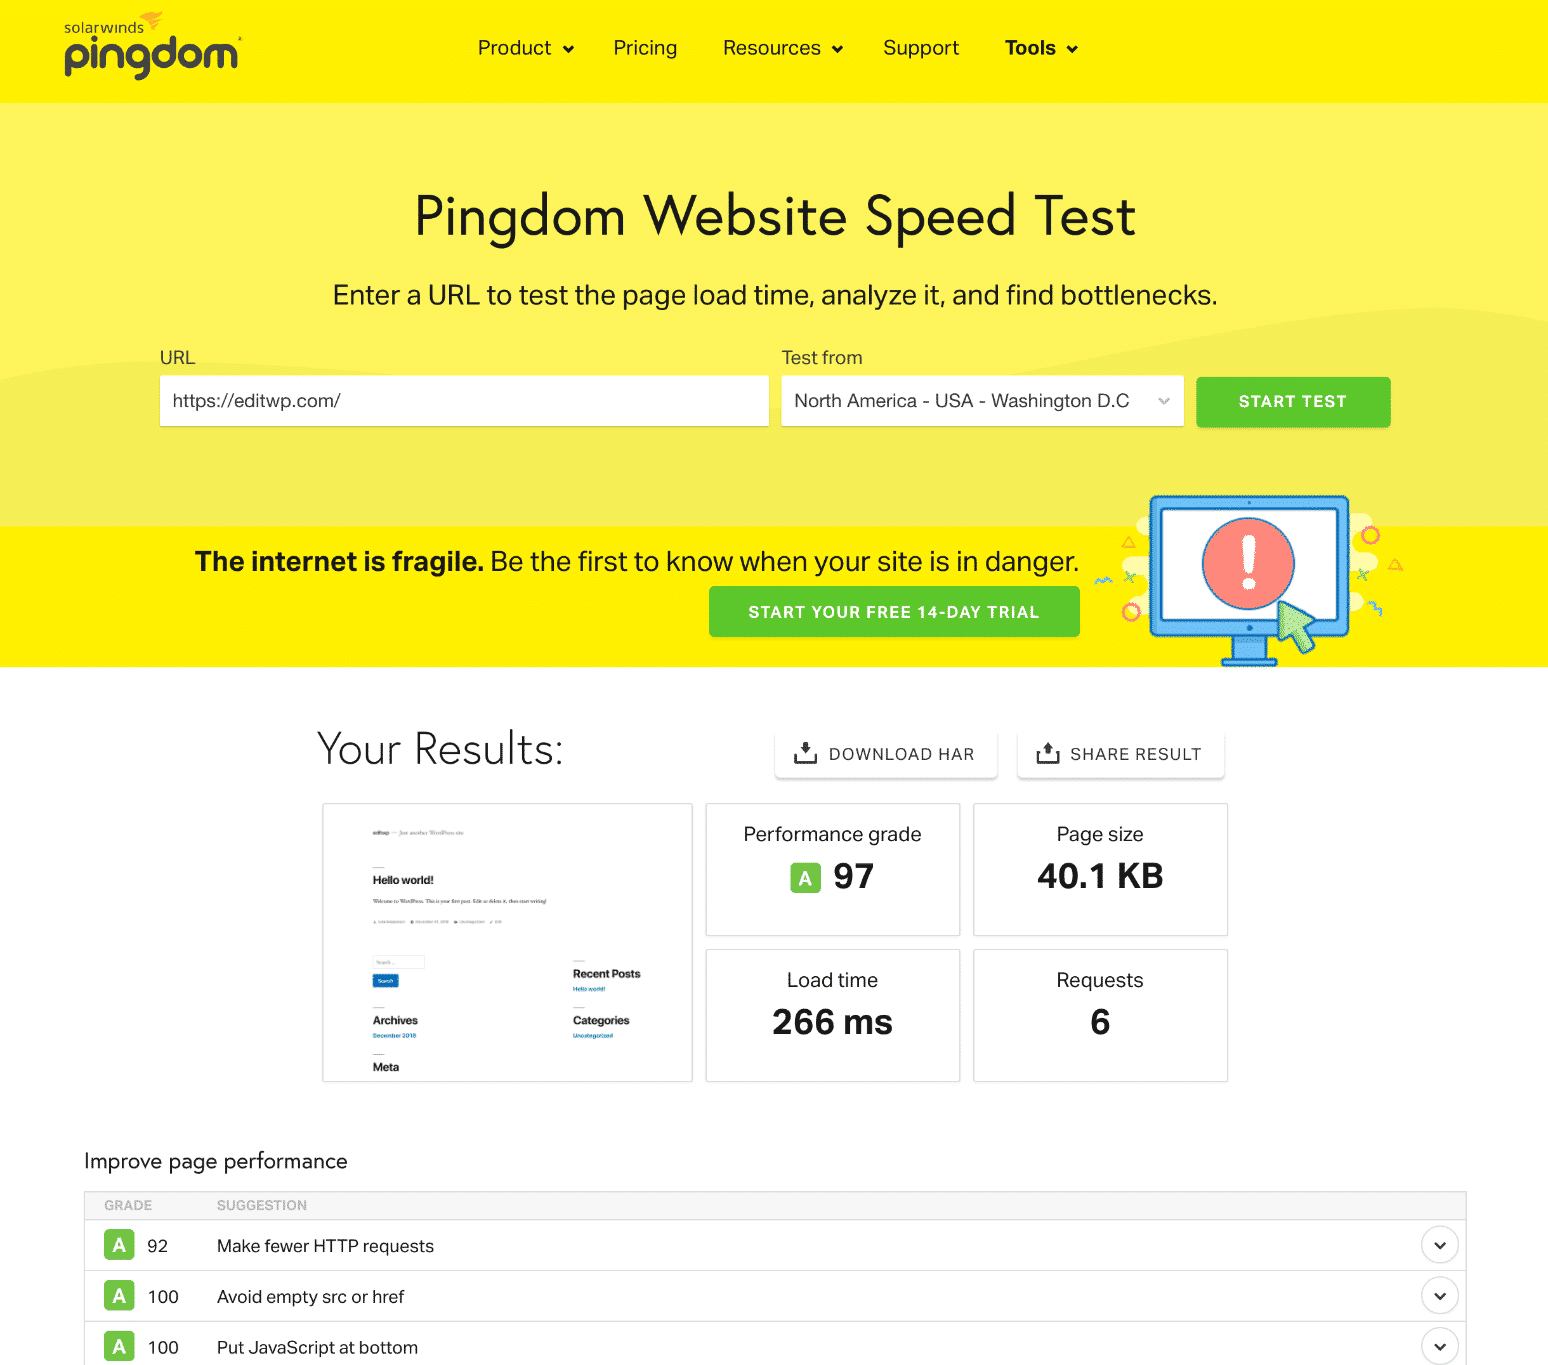
Pingdom is a market-leading website monitoring service, best known for its free website speed testing tool. The speed testing tool displays all of your site’s requests in a waterfall view. You can filter by load order, file size, and load times, giving you different perspectives for identifying potential improvements – it also lists total requests, load time, and page size.
It has gained popularity over the years due to the fact that it is super easy to use, especially when compared to similar speed test tools. For beginners, Pingdom can be a great way to start.
Pingdom website speed test tool
Pingdom also gives you a speed performance rating, scored out of 100. This rating is broken down into twelve criteria, with each given an individual score. Again, this is helpful for identifying the “quick wins” you can target to make instant, tangible improvements to your site’s speed. It is possible to score a 100 score. However, don’t obsess too much over scores, as they don’t matter as much as simply making improvements on your site to speed it up.
Pingdom stores the results of all tests performed on your website, allowing you to historically track speed improvements over time.
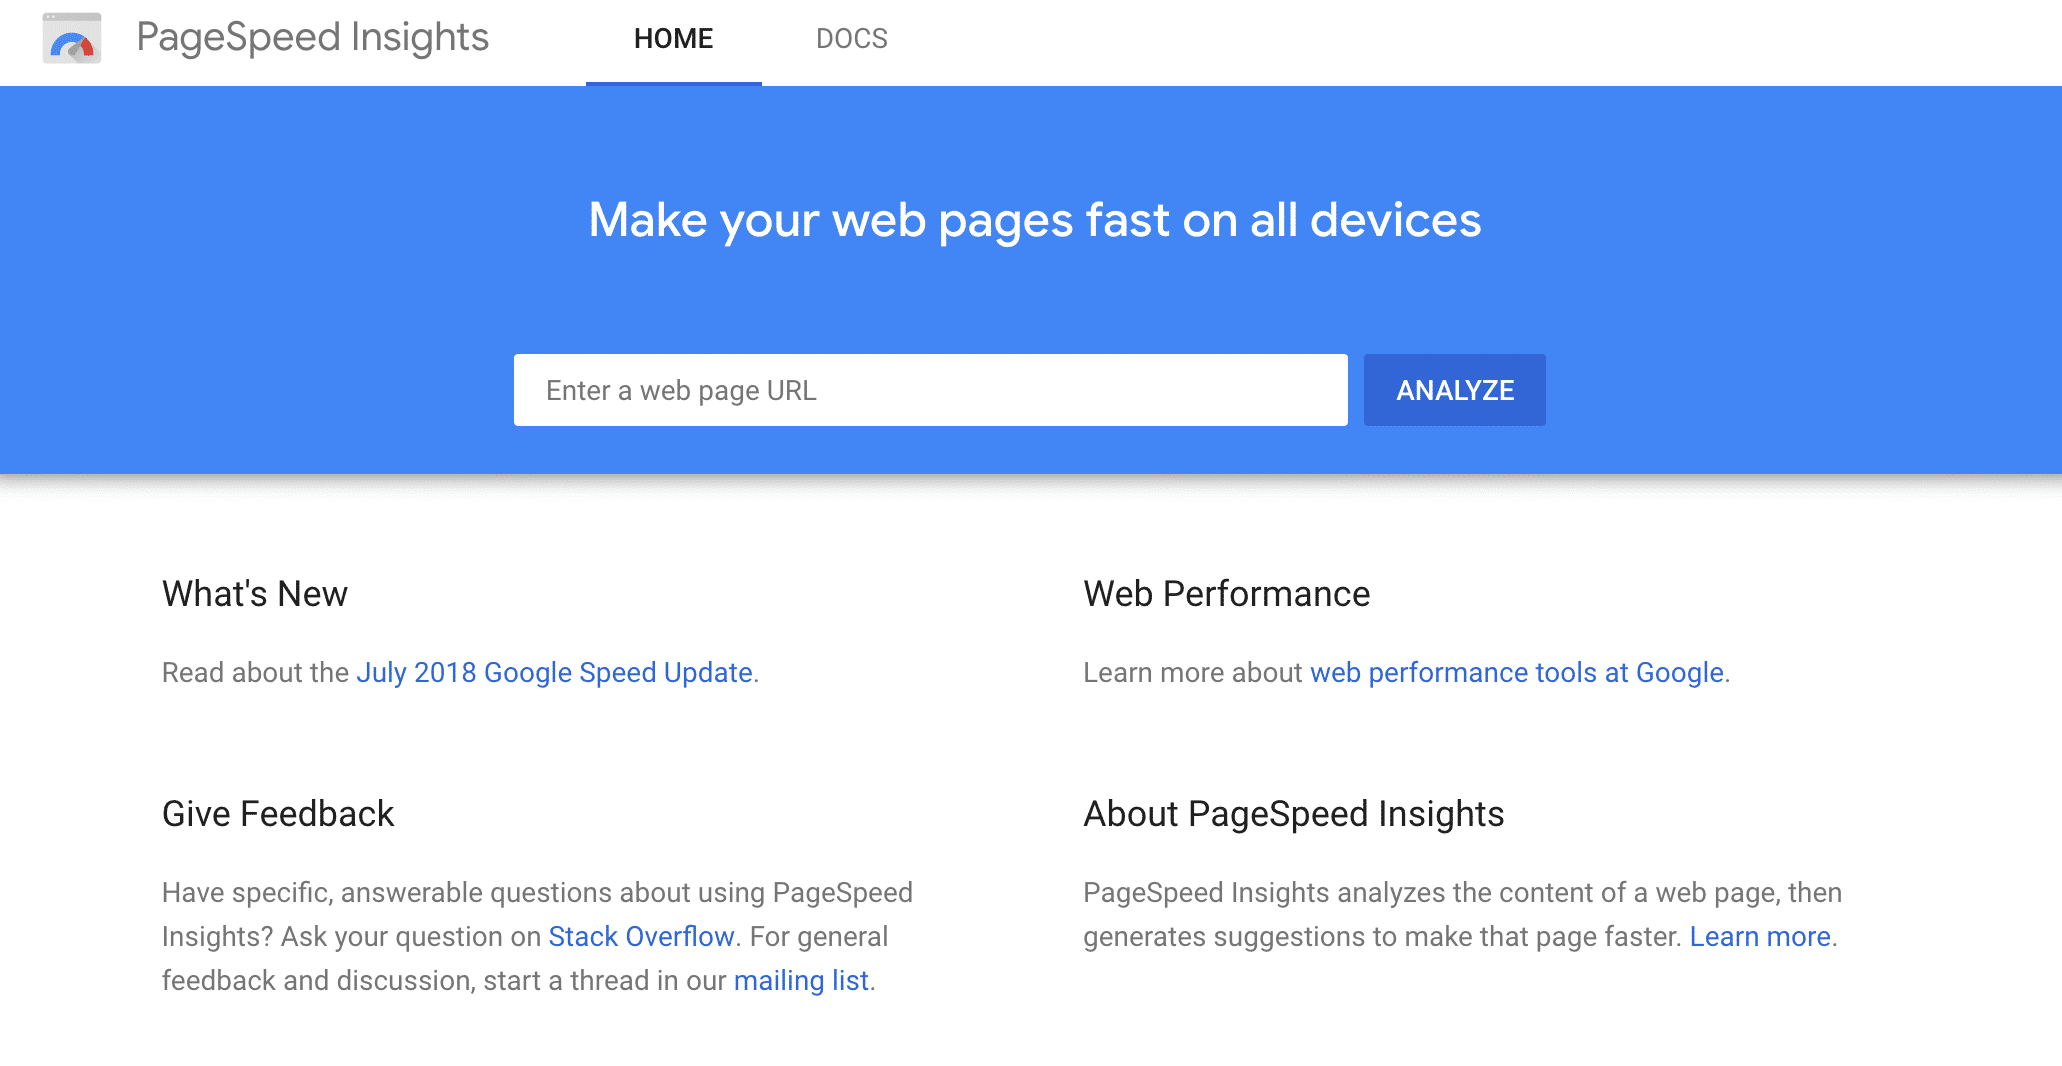
2. Google PageSpeed Insights
Google has said since 2010 that page speed is an important ranking factor for SEO. To help you improve your site’s speed, Google has its very own speed testing tool, Google PageSpeed Insights, which measures the performance of a page for mobile devices and desktop devices.
Google PageSpeed Insights tool
The PageSpeed Score ranges from 0 to 100 points, and is based on Lighthouse. A higher score is better and a score of 85 or above indicates that the page is performing well. The report page gives you a useful breakdown of the steps you can take to improve performance. PageSpeed Insights also provides you with additional user experience suggestions for mobile devices. Check out our thoughts on whether or not it’s possible to score a 100/100 score on PageSpeed Insights.
If you care about elevating your website to the top of the SERPs, it pays to listen to what Google recommends. We also have a walk-through on how to fix that stubborn leverage browser caching warning.
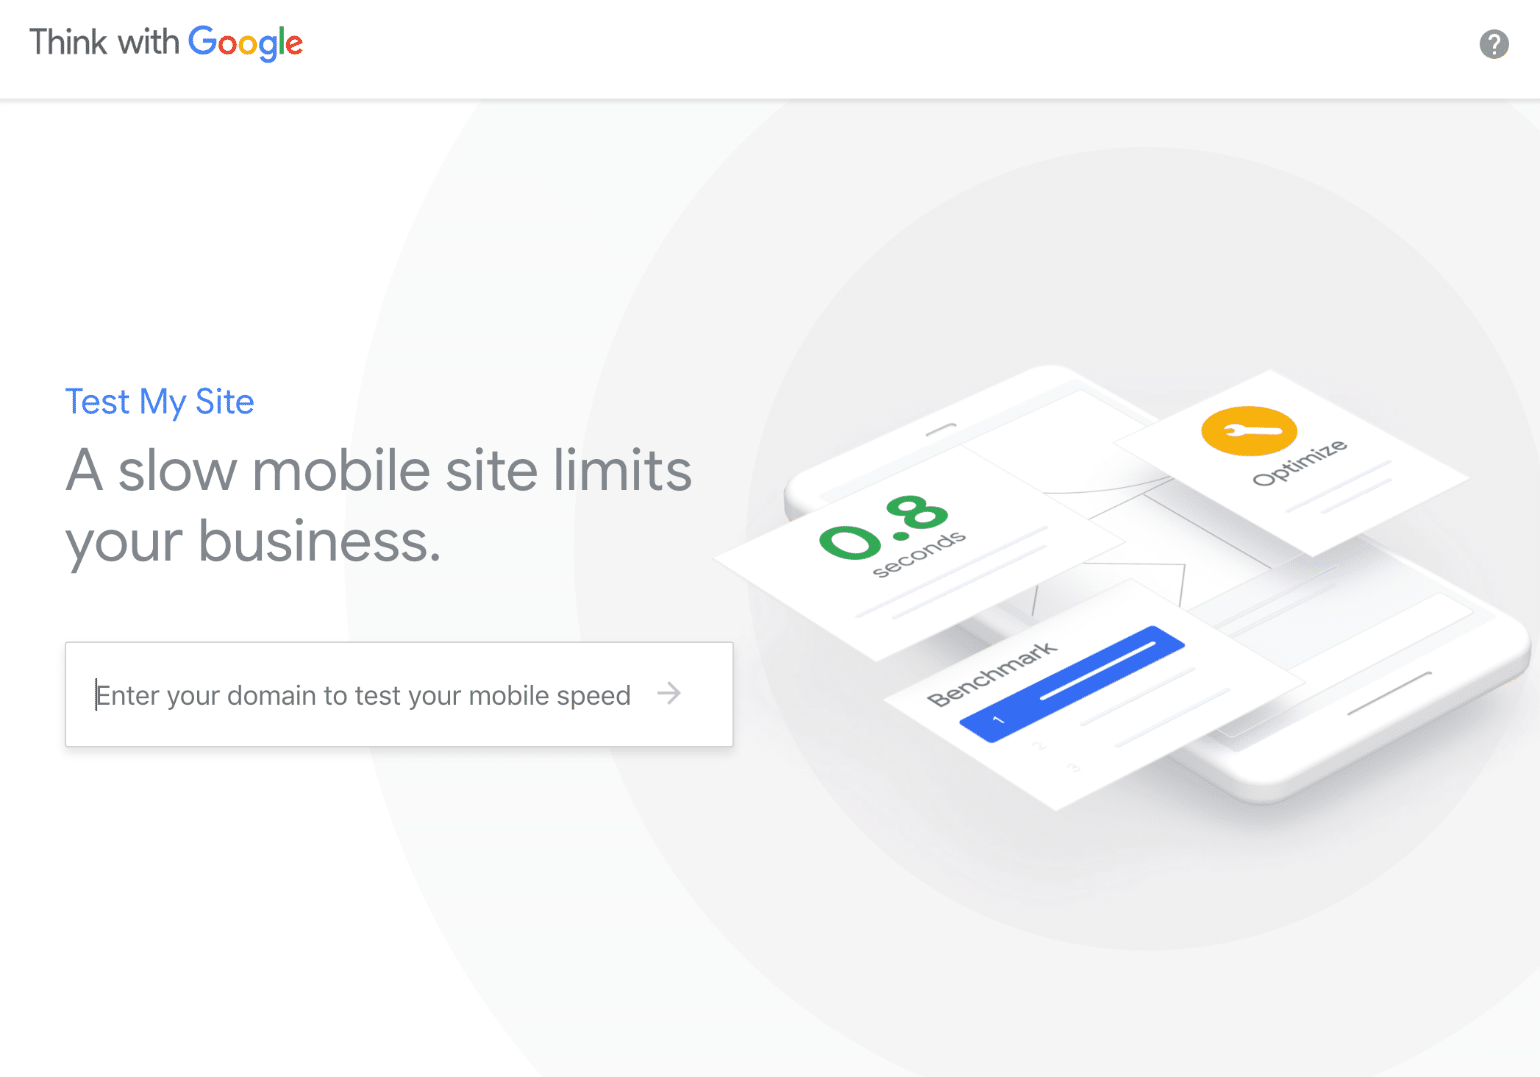
3. Google Mobile Website Speed Testing Tool
According to Google, people are 5 times more likely to leave a site if it isn’t mobile-friendly. That is why they released their mobile website speed testing tool. This tool is actually powered by Google PageSpeed Insights, and is aimed more toward marketers and agencies to better deliver easy to understand optimization reports.
Google Mobile website speed test tool
You can get reports sent right to your email, or forward the information along to your webmaster or developer. However, remember that a 100/100 score might not even be possible in all scenarios, depending on how your WordPress site is set up. With a lot of multipurpose themes and sites with dozens of external scripts, you simply will have an almost impossible time trying to achieve a perfect score. Which is perfectly OK. And definitely not the developer’s fault.
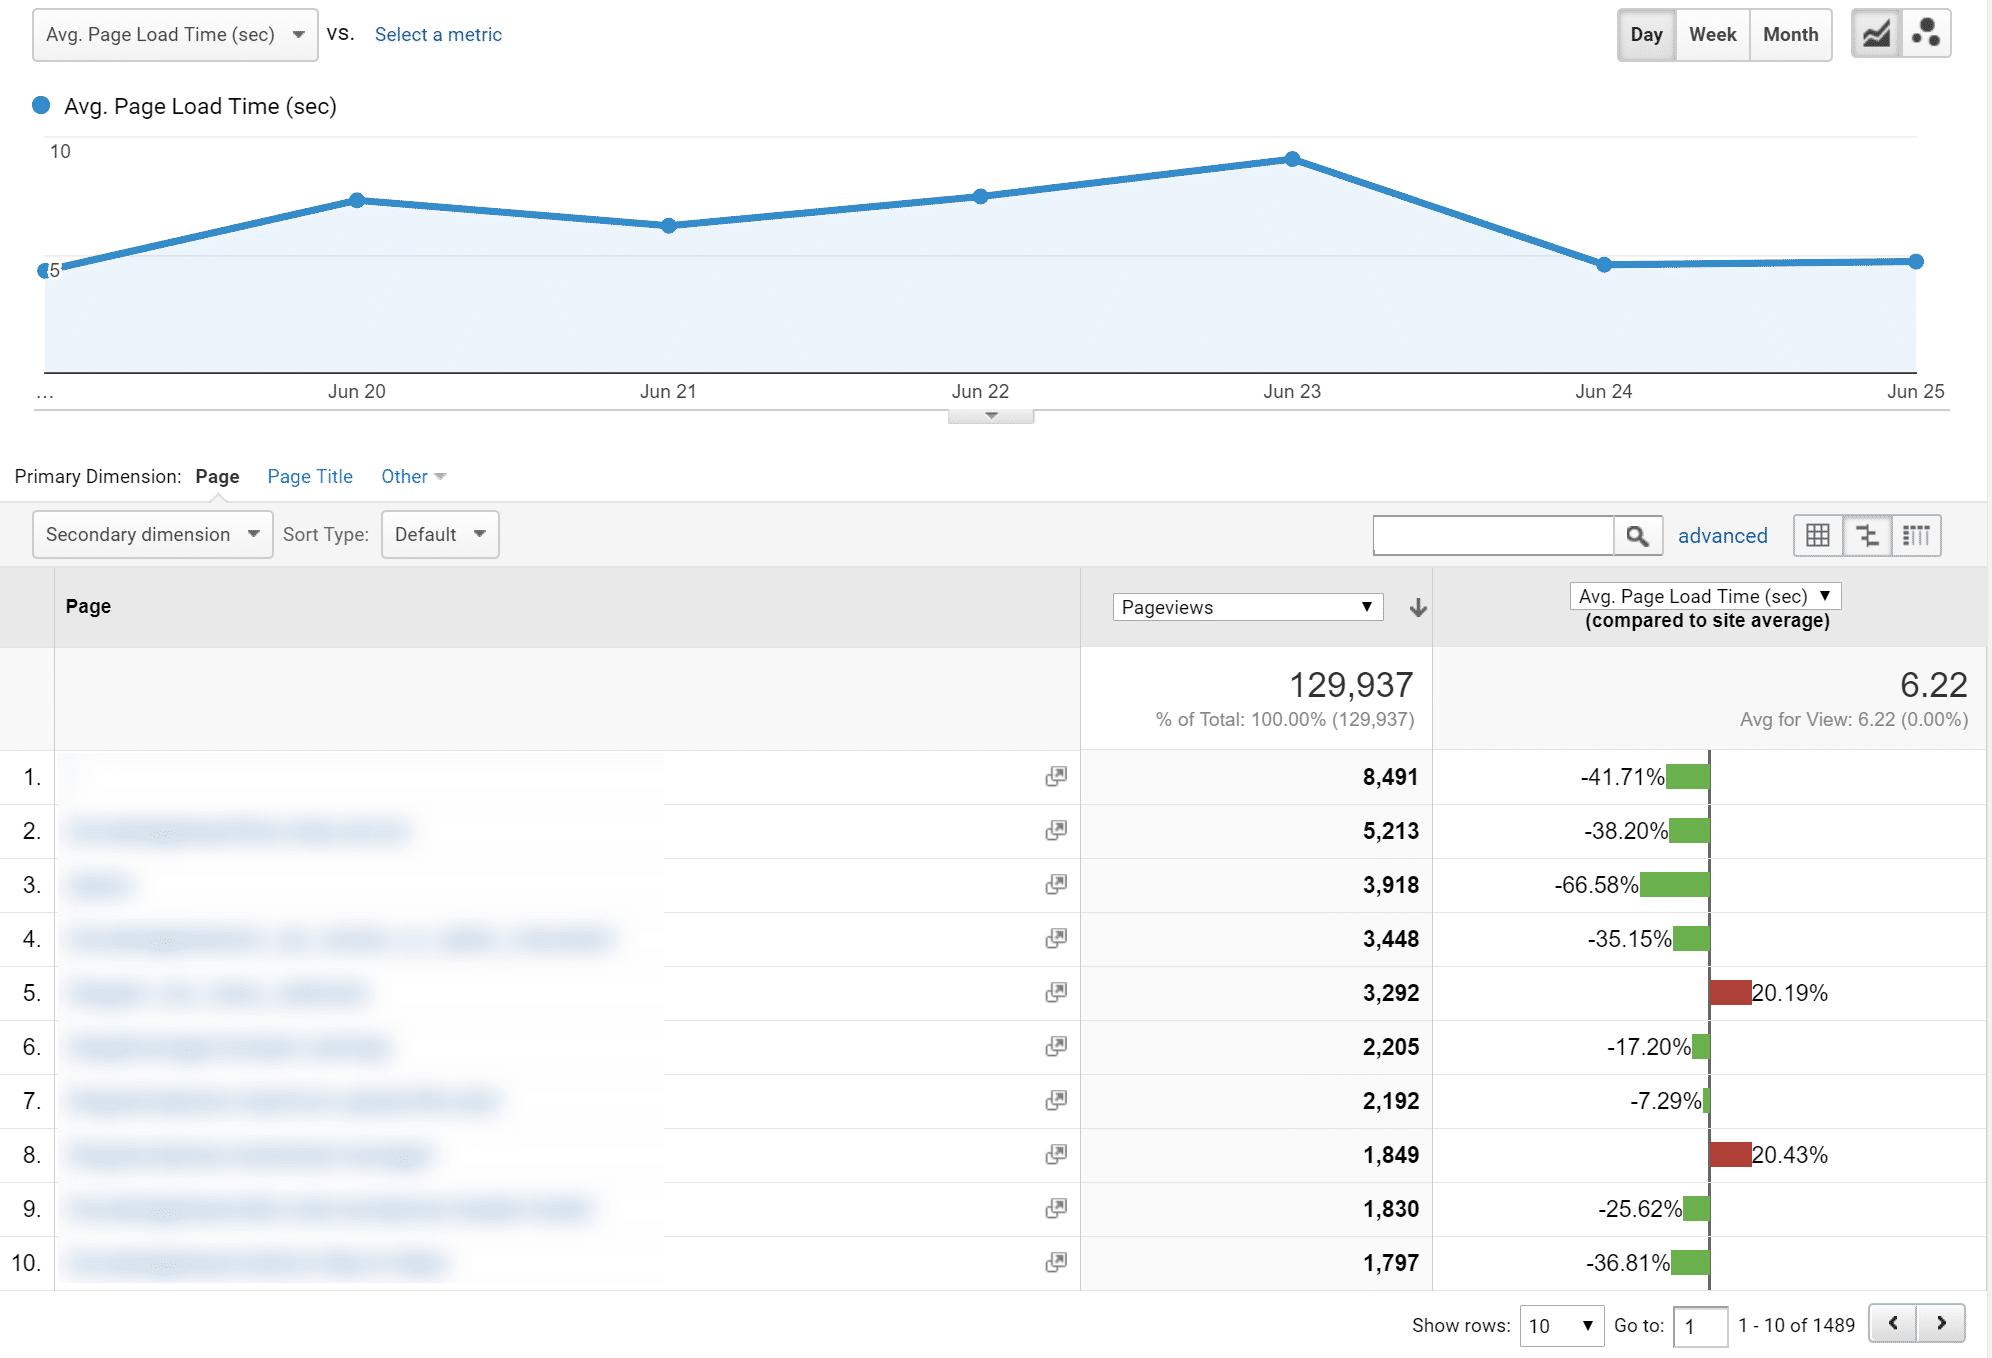
4. Google Analytics Site Speed
Google Analytics also has the ability to measure site speed. This exists in your GA dashboard under the “Behavior” menu. It captures information via a snippet of code included in a web page. Their site speed reports measure three aspects of latency:
Page-load time for a sample of pageviews on your site.
Execution speed or load time of any discrete hit, event, or user interaction that you want to track.
How quickly the browser parses the document and makes it available for user interaction.
Google Analytics site speed timings
While this can be helpful as an overall comparison, we generally recommend not using this as we’ve found the data to not always be accurate or a clear depiction of what’s really happening on the site. Why? because it’s collected from a random sampling of data.
Joe has a great write up the problem with site speed accuracy in Google Analytics. Yotta has also reported on frequent errors which can throw off the site speed averages substantially. We recommend using one of the other speed test tools mentioned in this post.
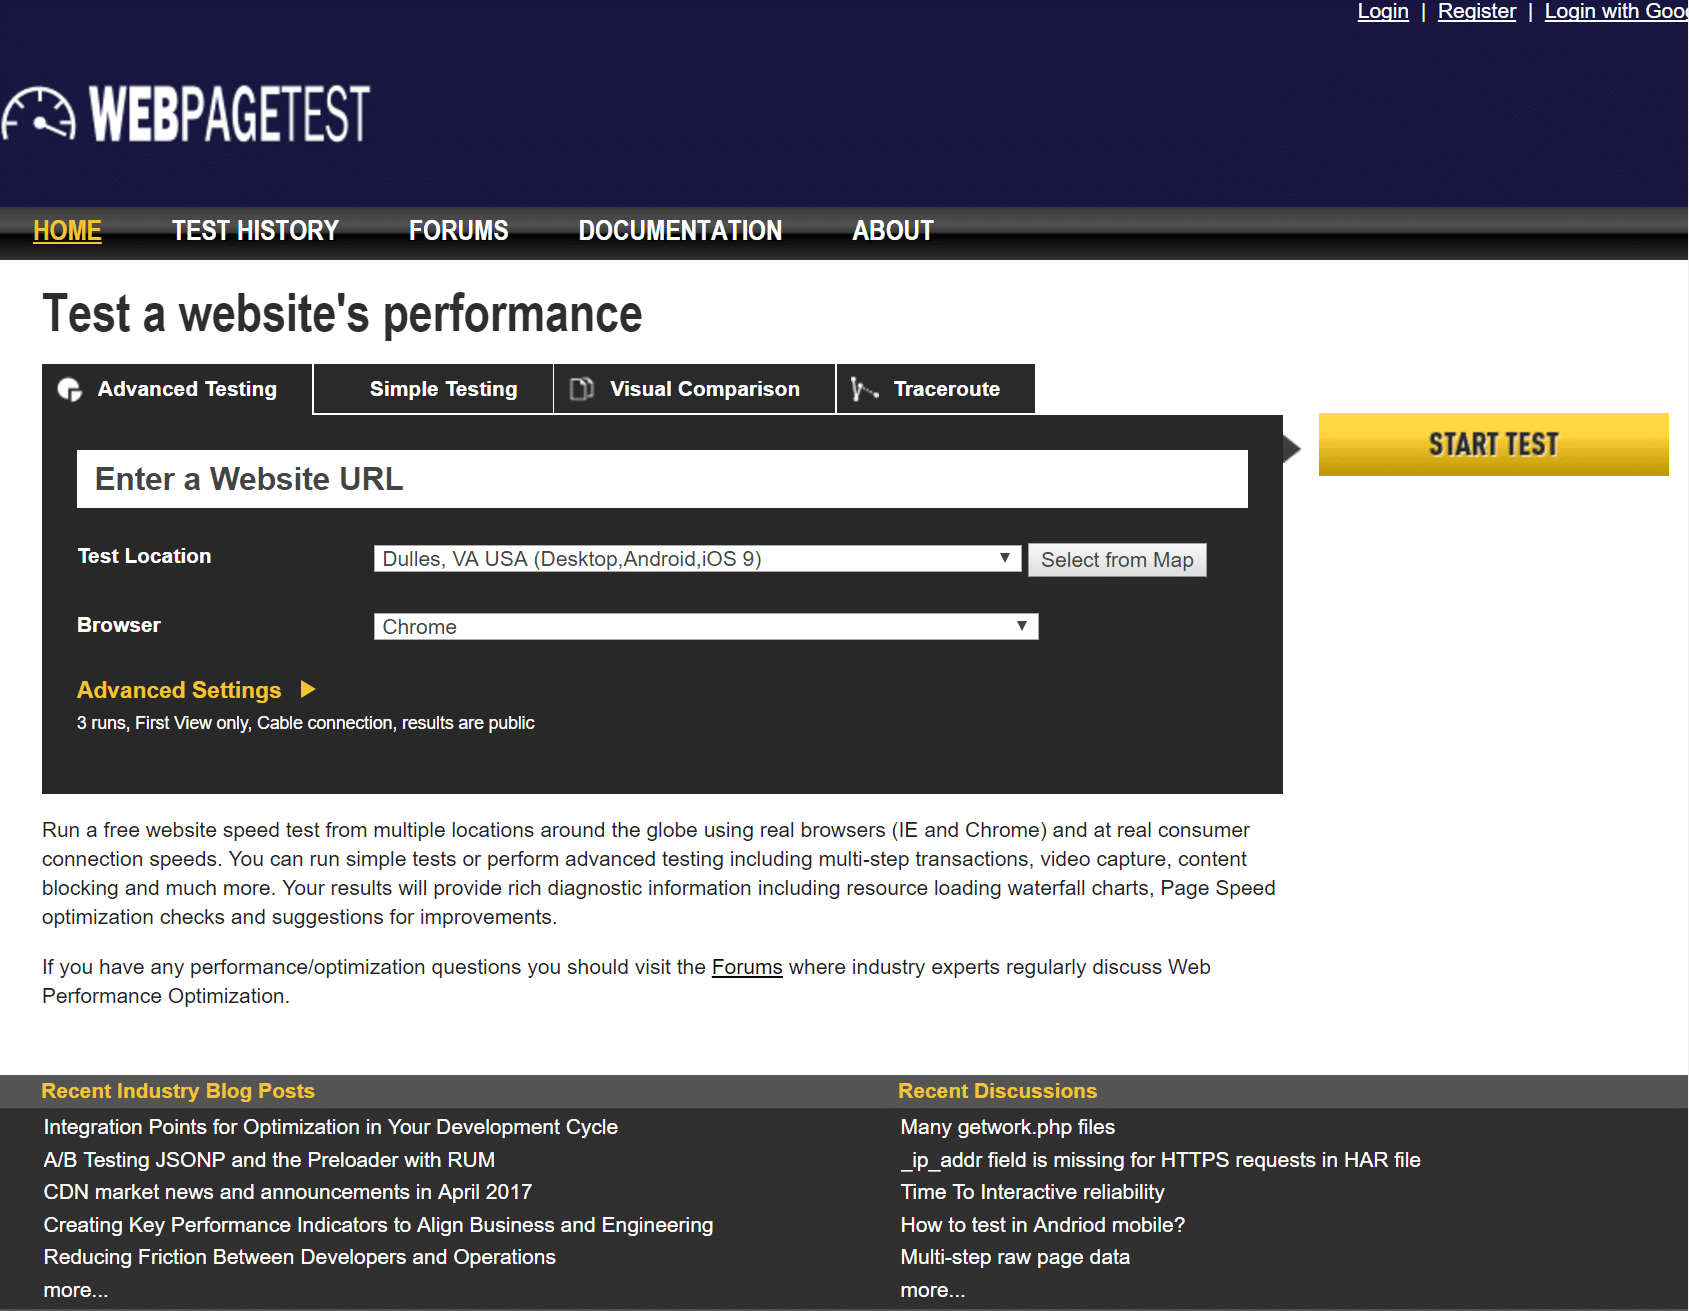
5. WebPageTest
WebPagetest was created by Patrick Meenan, a Chrome engineer at Google. It is an open source project and allows you to run a free website speed test from multiple locations around the globe using real browsers (IE, Chrome, etc). For you more advanced users needing to get additional data from your speed tests, this is a great tool.
WebPageTest
WebPageTest allows you to perform advanced tests including multi-step transactions, capture video, content blocking, compare first view verses repeat view, change the connection speed, and much more. Their waterfall charts and resource loading reports provide lots of additional information regarding improvements that can be made across your site.
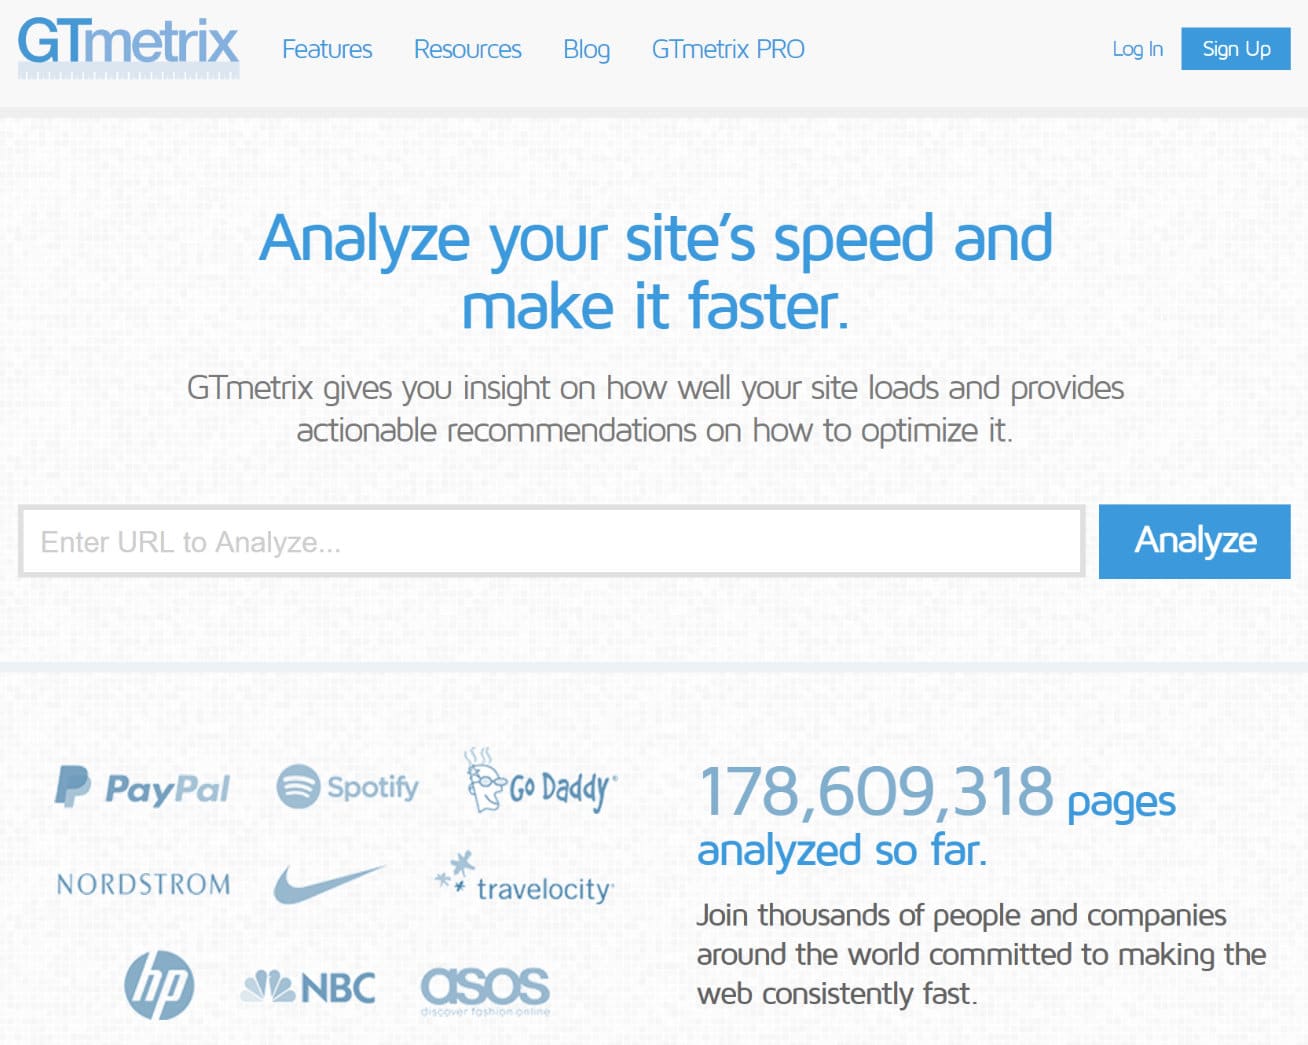
6. GTmetrix
GTmetrix is another popular speed analysis tool, and arguably the best-known of all the Pingdom alternatives. It is easy to use and beginners can pick it up quite fast. The tool provides comprehensive analysis by combining the performance and recommendations provided by Google PageSpeed Insights and YSlow. This means that GTmetrix is effectively a one-stop-shop for all of your speed optimization needs.
GTmetrix website speed test tool
To ensure that your top-level data is easier to digest, GTmetrix displays a summary at the top of the page, listing your total page load time, page size, and number of requests. The tool also displays a list of your requests in a waterfall chart, enabling you to identify problem areas and bottlenecks with ease. The waterfall chart can be downloaded, too, so that you can perform further analysis.
You can create a free account in which allows you to save the last 20 tests, compare historical data, and have pre-configured settings for testing locations, browsers, connection speeds, and more.
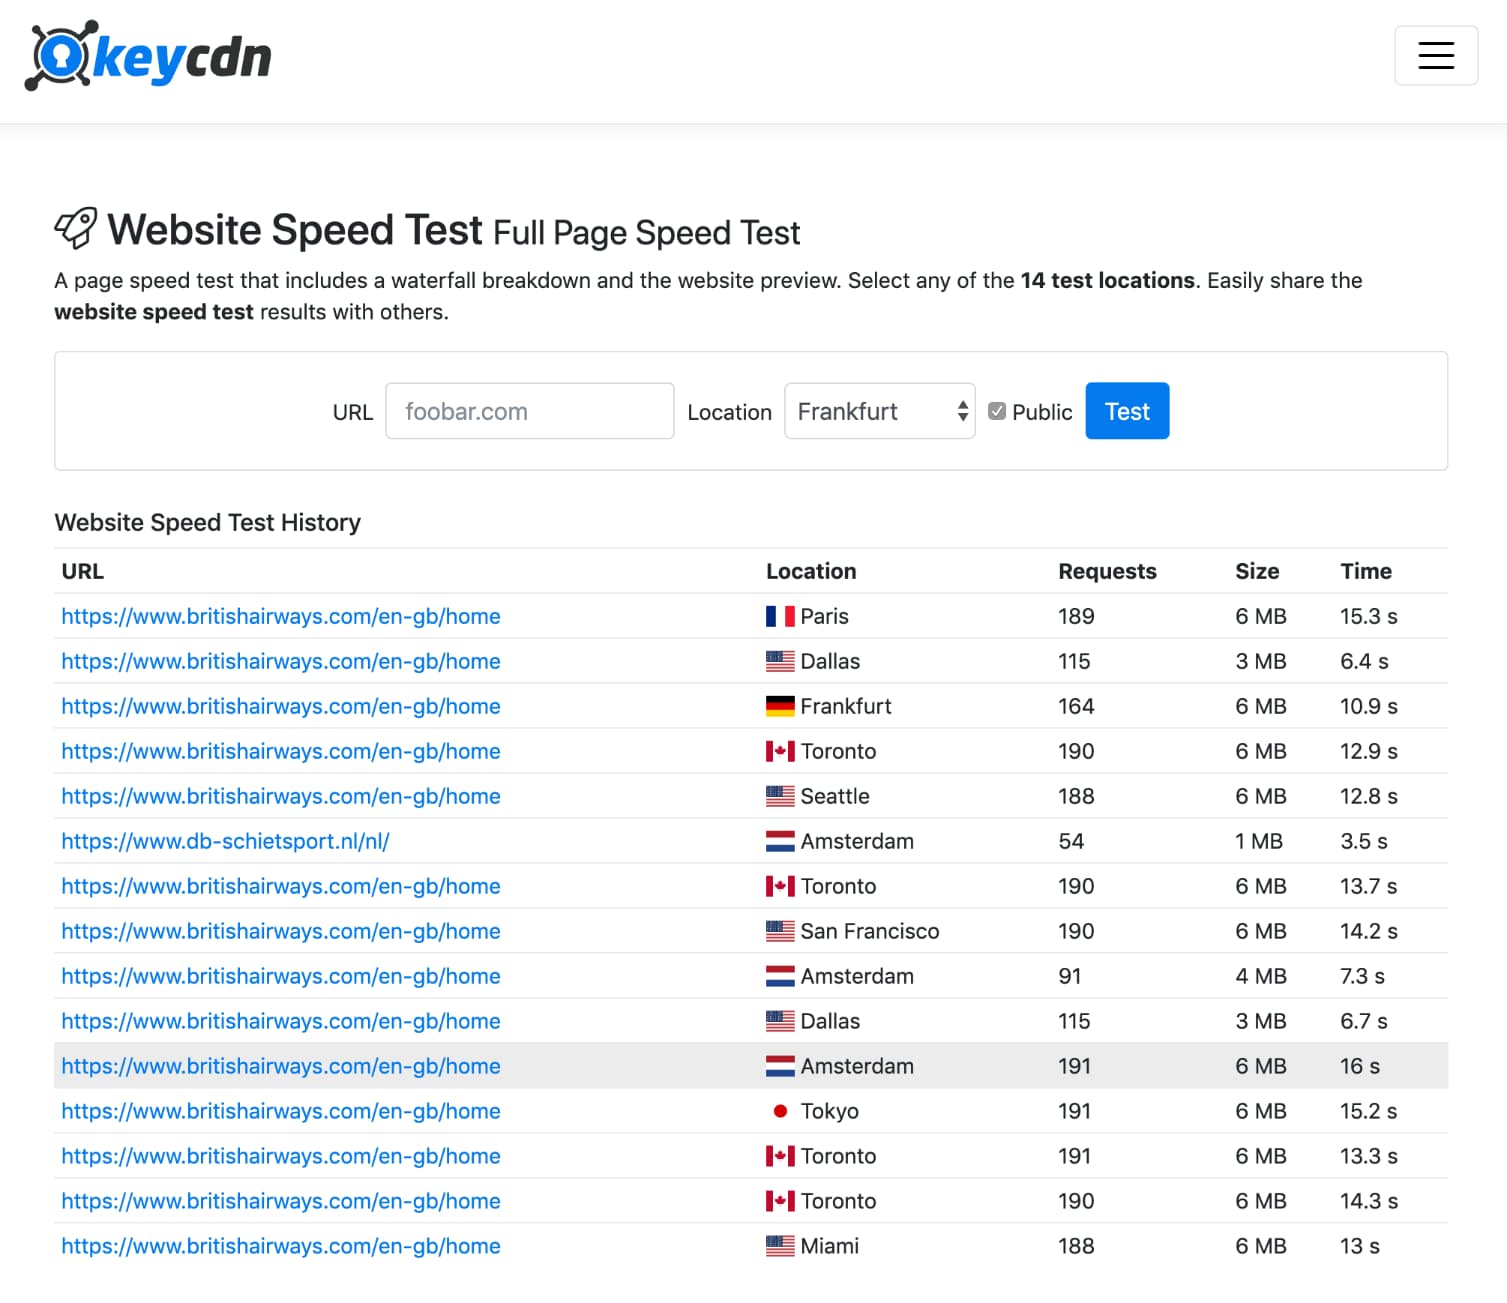
KeyCDN’s free website speed test tool provides an incredibly fast and easy way to determine the overall speed of your WordPress site. The simple page speed test includes a waterfall breakdown and a website preview. You can select from 14 different test locations, strategically located around the globe, in order to better determine the overall download time of your assets from that physical region.
KeyCDN website speed test tool
You can run both a private and public test in which you can then later share or bookmark for future reference. The breakdown report shows a great overview of the request methods (GET/POST), HTTP status codes (such as 200 OK or 404), file types, content size, wait/receive time, total download time, and the overall number of HTTP requests generated on your site. KeyCDN also has other free handy web performance testing tools such as Ping Test, HTTP/2 Test, HTTP Check, and Traceroute Tool.
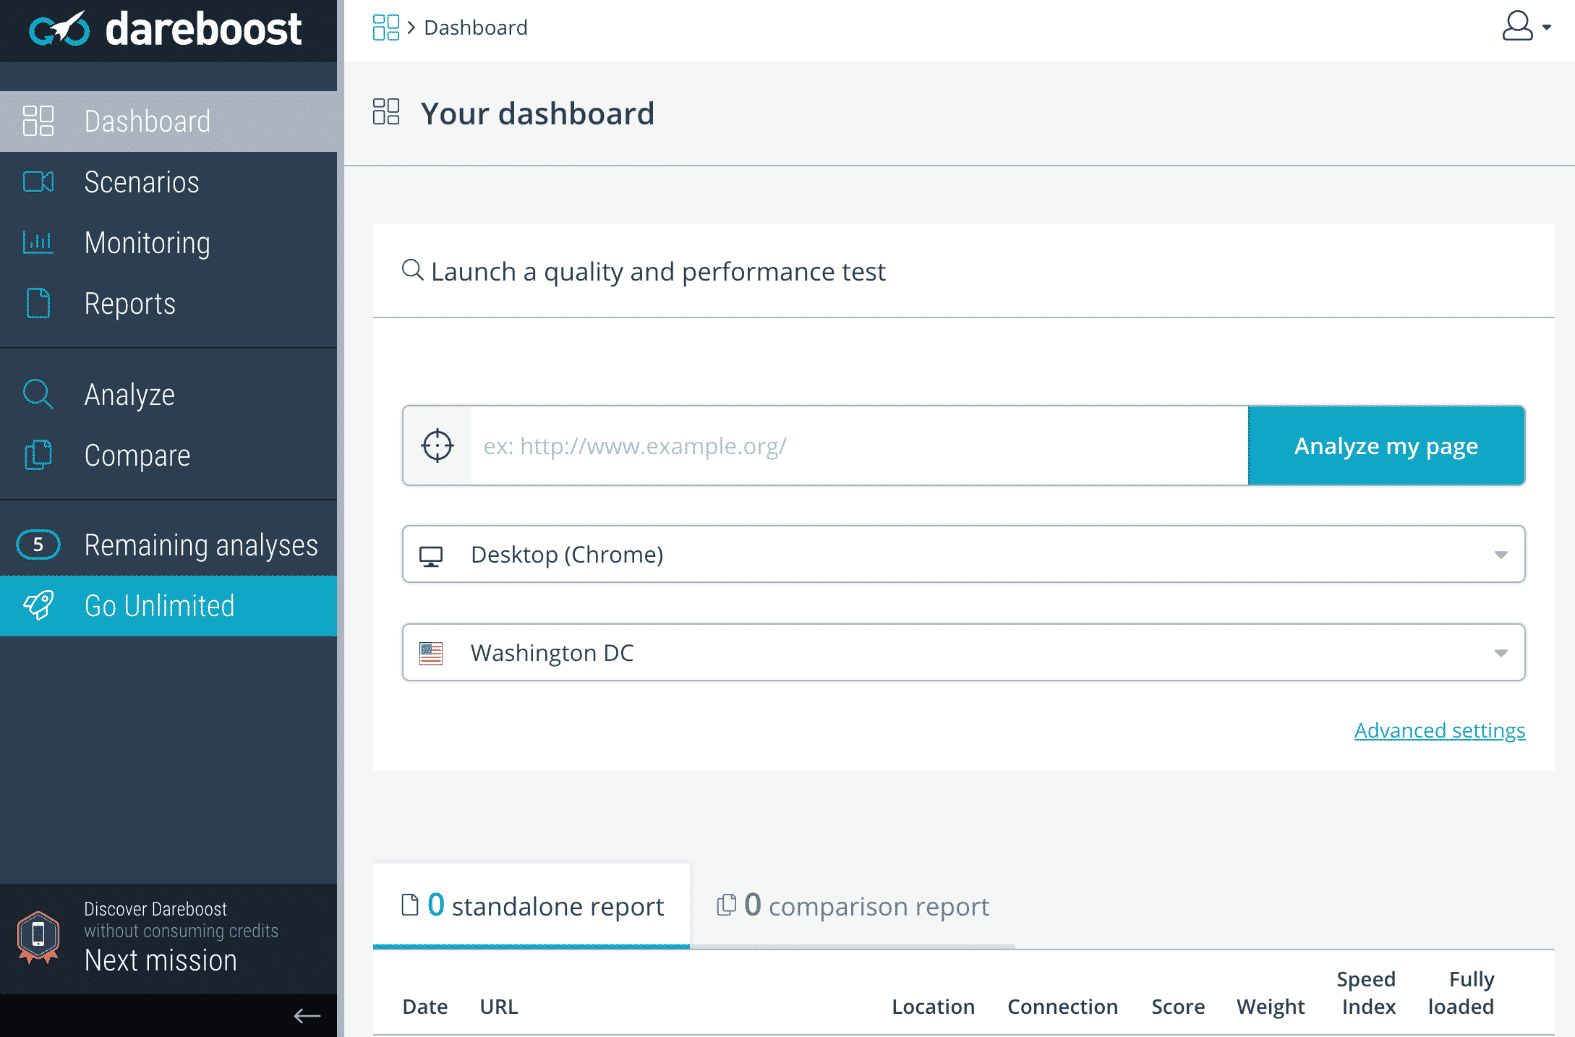
8. DareBoost
DareBoost is an all-in-one service for website speed testing, web performance monitoring, and website analysis (speed, SEO, quality, security). And while they are primarily a premium service, you can use their website speed test tool for 5 free reports per month, minus a few advanced features for paid customers. The free reports are actually pretty impressive!
DareBoost website speed test tool
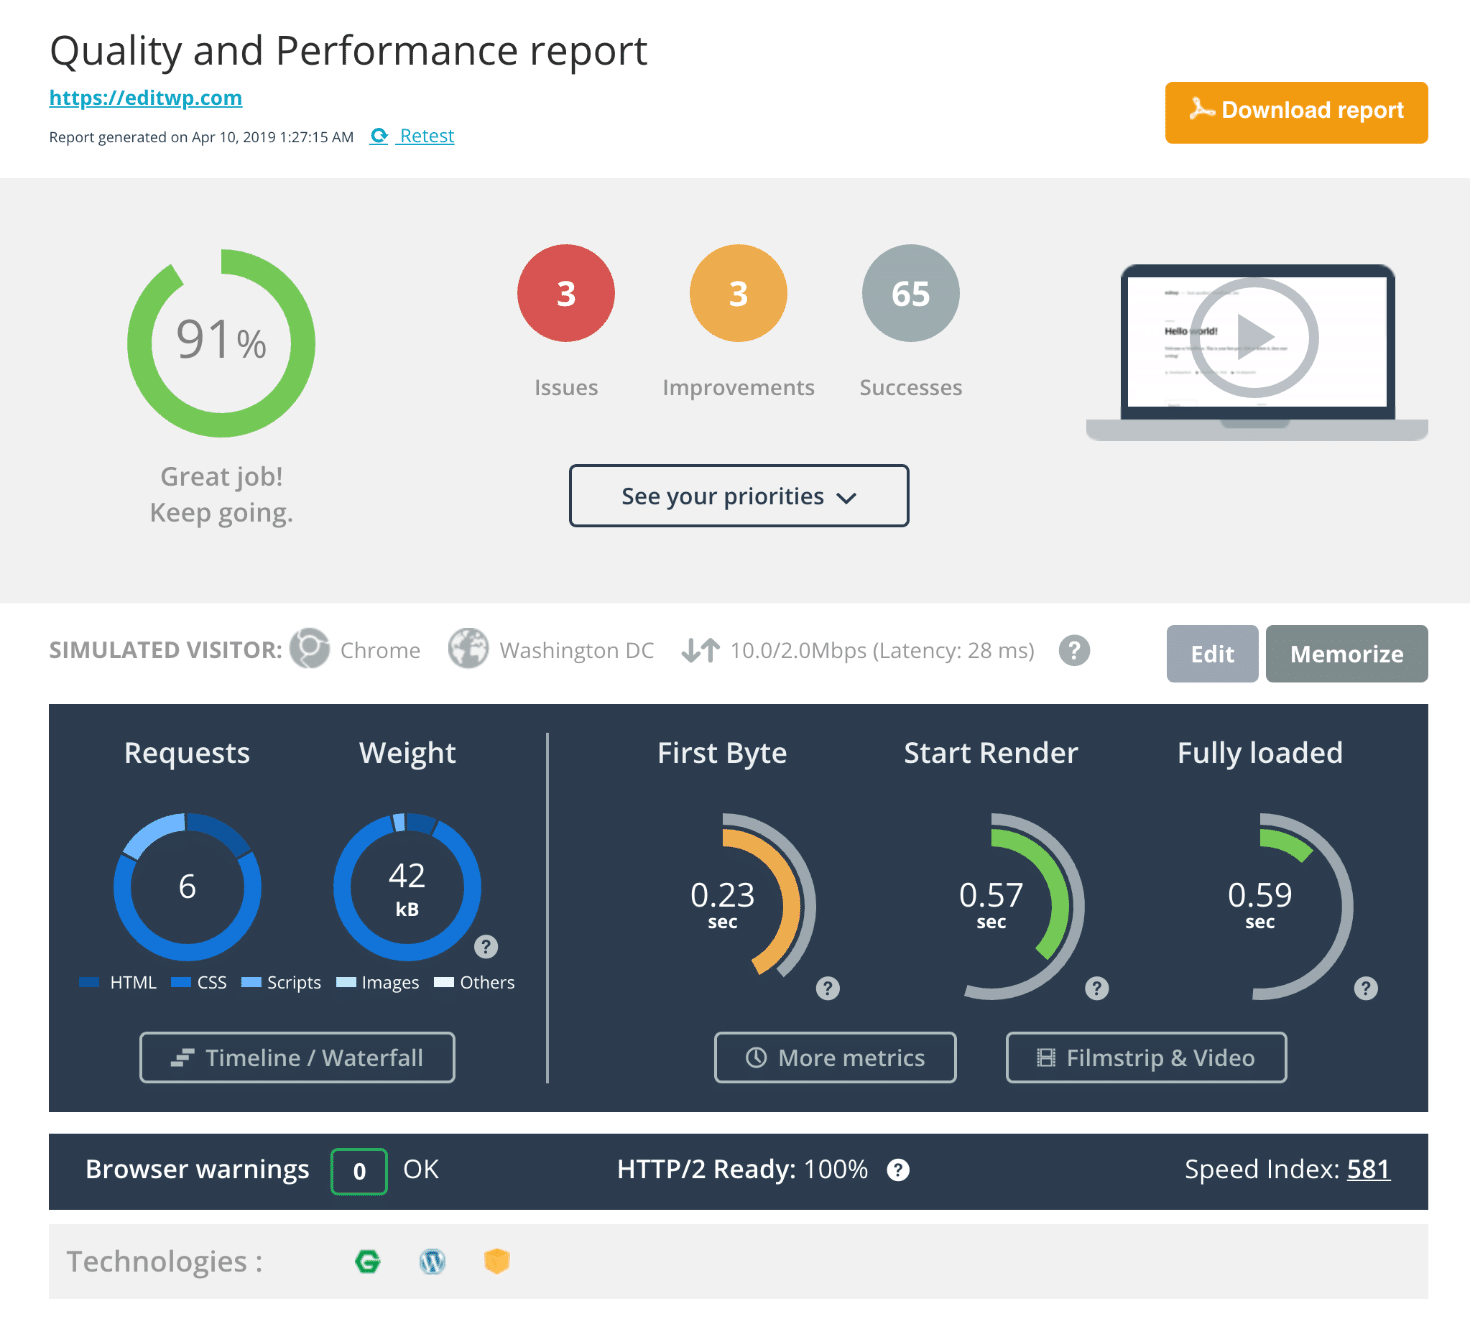
The DareBoost speed test report analyzes over 80 different data points, across the following categories:
Cache policy
Number of requests
Security
Accessibility
Compliance
Quality
jQuery
Browser Rendering
Data amount
SEO
You can quickly see where your WordPress site is struggling and needs work. The security reporting is also very unique when compared to the other tools we have mentioned. You can see things such as if your website is exposed to clickjacking attack, you are missing a content security policy header, and even information about your SSL certificate. Their design is pretty awesome too! If you are needing a report for your boss or agency, this might be a tool you want to check out.
DareBoost speed test report
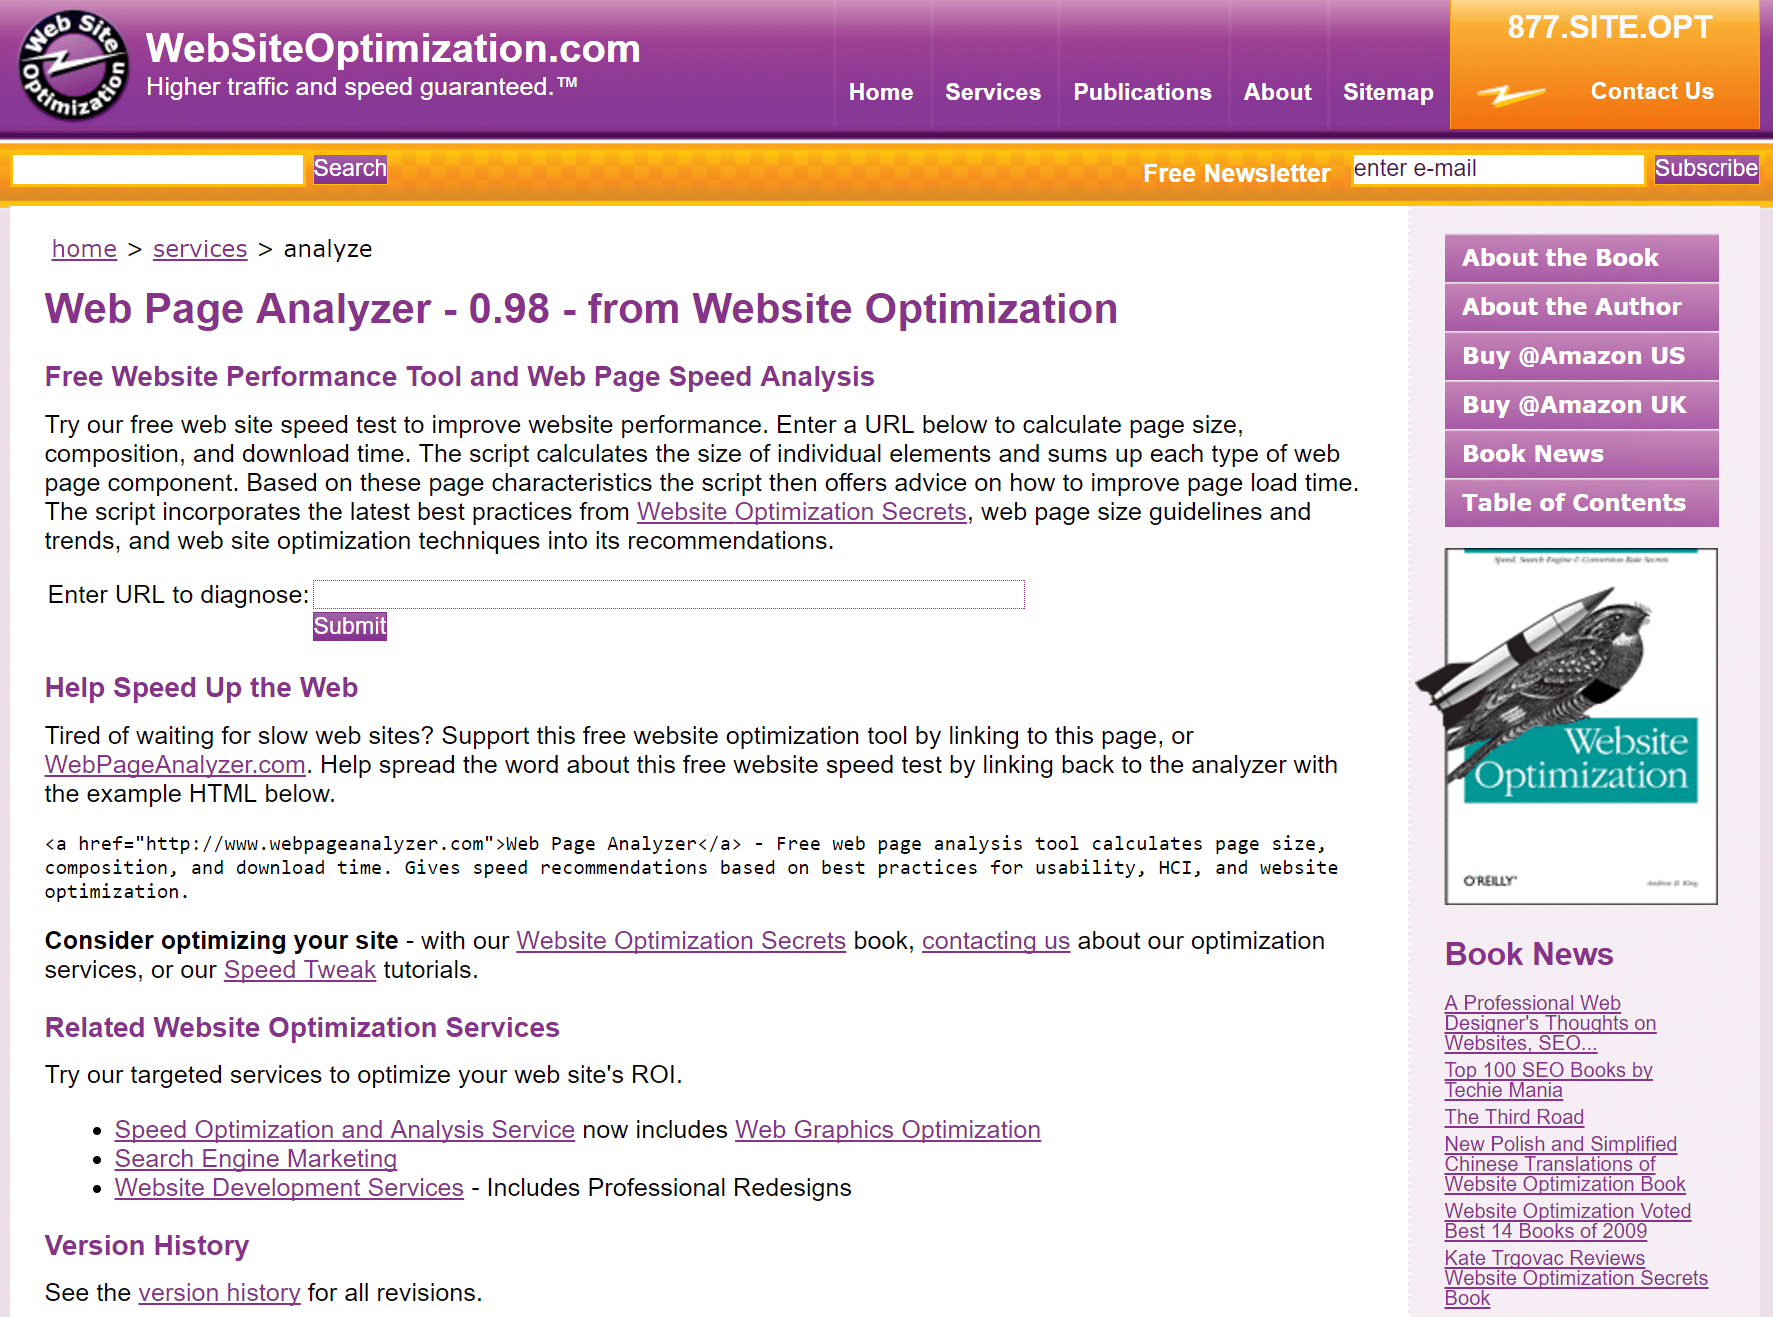
9. Web Page Analyzer
The Web Page Analyzer is a highly recommended free tool for analyzing your site’s speed, size, and composition. The script calculates the size of individual elements and sums up each type of web page component. Based on these page characteristics the script then offers advice on how to improve page load time.
Web Page Analyzer
More specifically, the tool will tell you how long your website takes to load for different connection speeds. If you like your data detailed, the Web Page Analyzer tool breaks it down for you, displaying the size and a comment for each. At the bottom of the analysis, the tool provides comments and recommendations on 11 specific aspects of your site’s performance – including telling you the areas where you perform well. It appears this tool hasn’t been updated though for a while, so don’t expect things like HTTP/2 support.
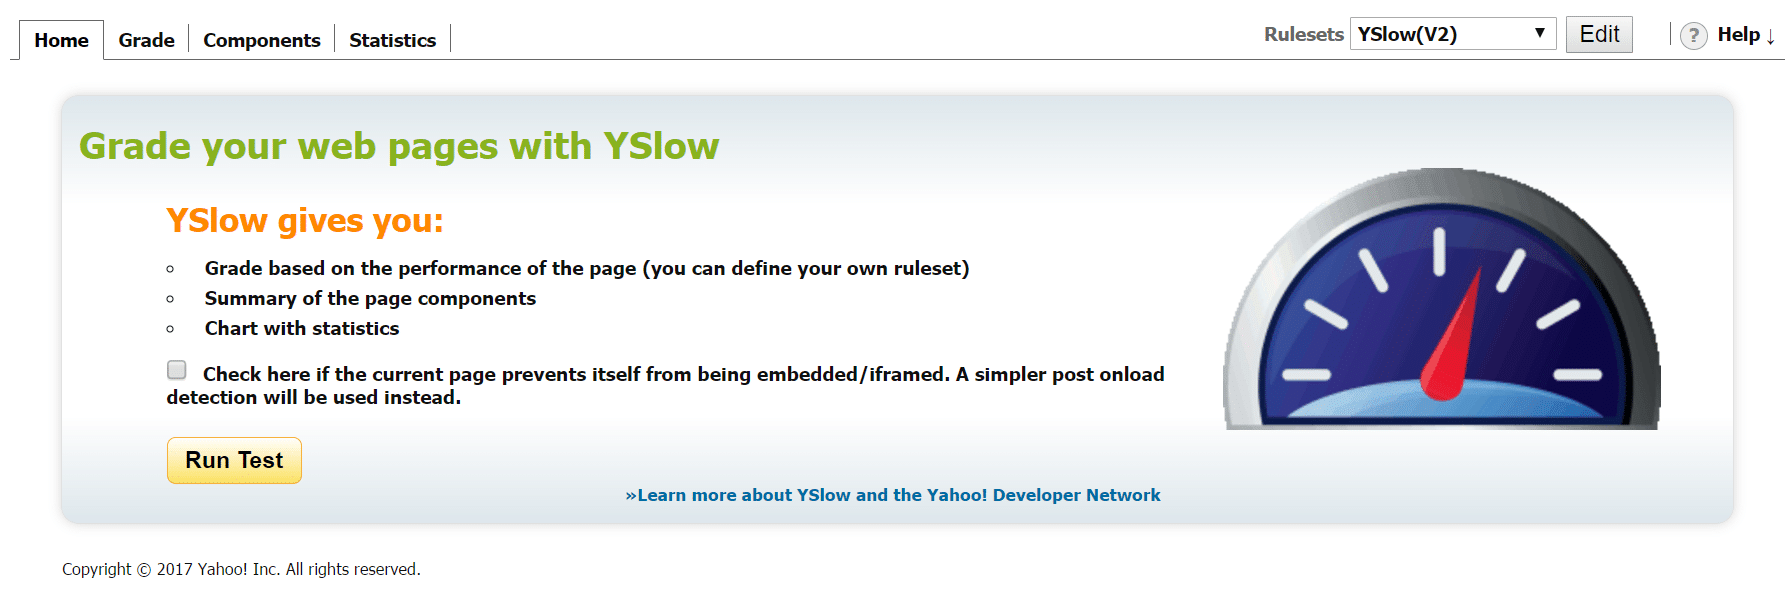
10. YSlow
Next up, Yahoo!’s page performance tool, YSlow. The tool requires installation as an add-on for your browser, but is completely free to use – and most popular web browsers are supported.
The Yahoo! team has identified 34 factors that impact a website’s speed. Unfortunately, only 23 can be tested quantitatively, and so the tool focuses its analysis on these areas – the YSlow website lists these 23 “rules” with extended details, which are well worth checking out. With the analysis complete, YSlow will grade you for each area – scored from A to F. This makes it super-easy to spot your weaker areas, which you can target for the biggest steps forward in terms of site speed.
This used to be the most popular speed testing tool. But unfortunately, the YSlow project is no longer maintained. Their last commit was 2 years ago and there are over 100 open issues on their GitHub page. However, there is still some useful information that the extension provides, but we would recommend using a newer and actively supported website speed test tool.
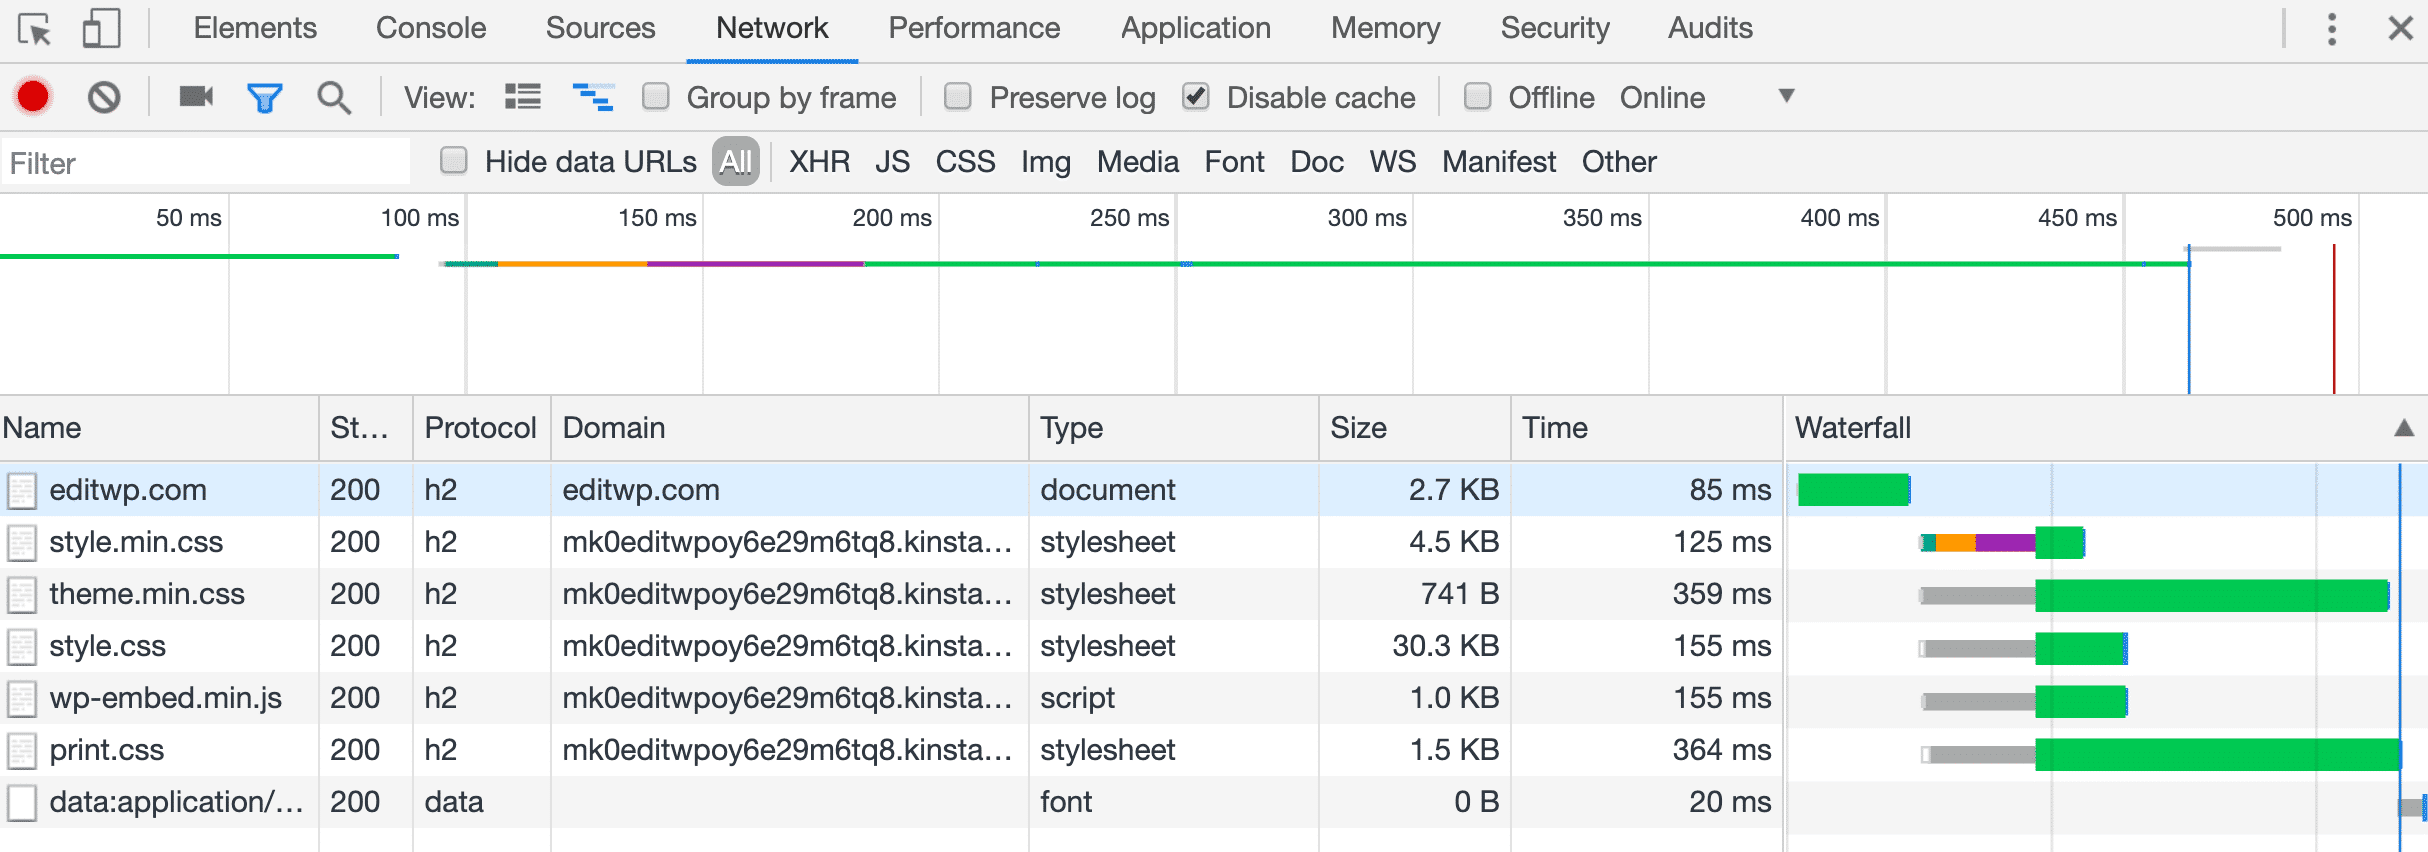
11. Chrome DevTools
The Chrome DevTools network panel is part of Chrome. This is a very popular tool among developers as it is easily accessible and a great for local debugging and testing. You can easily launch the network panel in Chrome by pressing Command+Option+I (Mac) or Control+Shift+I (Windows, Linux). You can then generate a waterfall analysis of your site and dig into the performance of each of your assets.
Chrome DevTools network waterfall
Another great feature added in Chrome 60 is the ability to block requests. This can be very useful when trying to determine how much overhead a 3rd-party service or script is having on your site.
Block request in Chrome Devtools
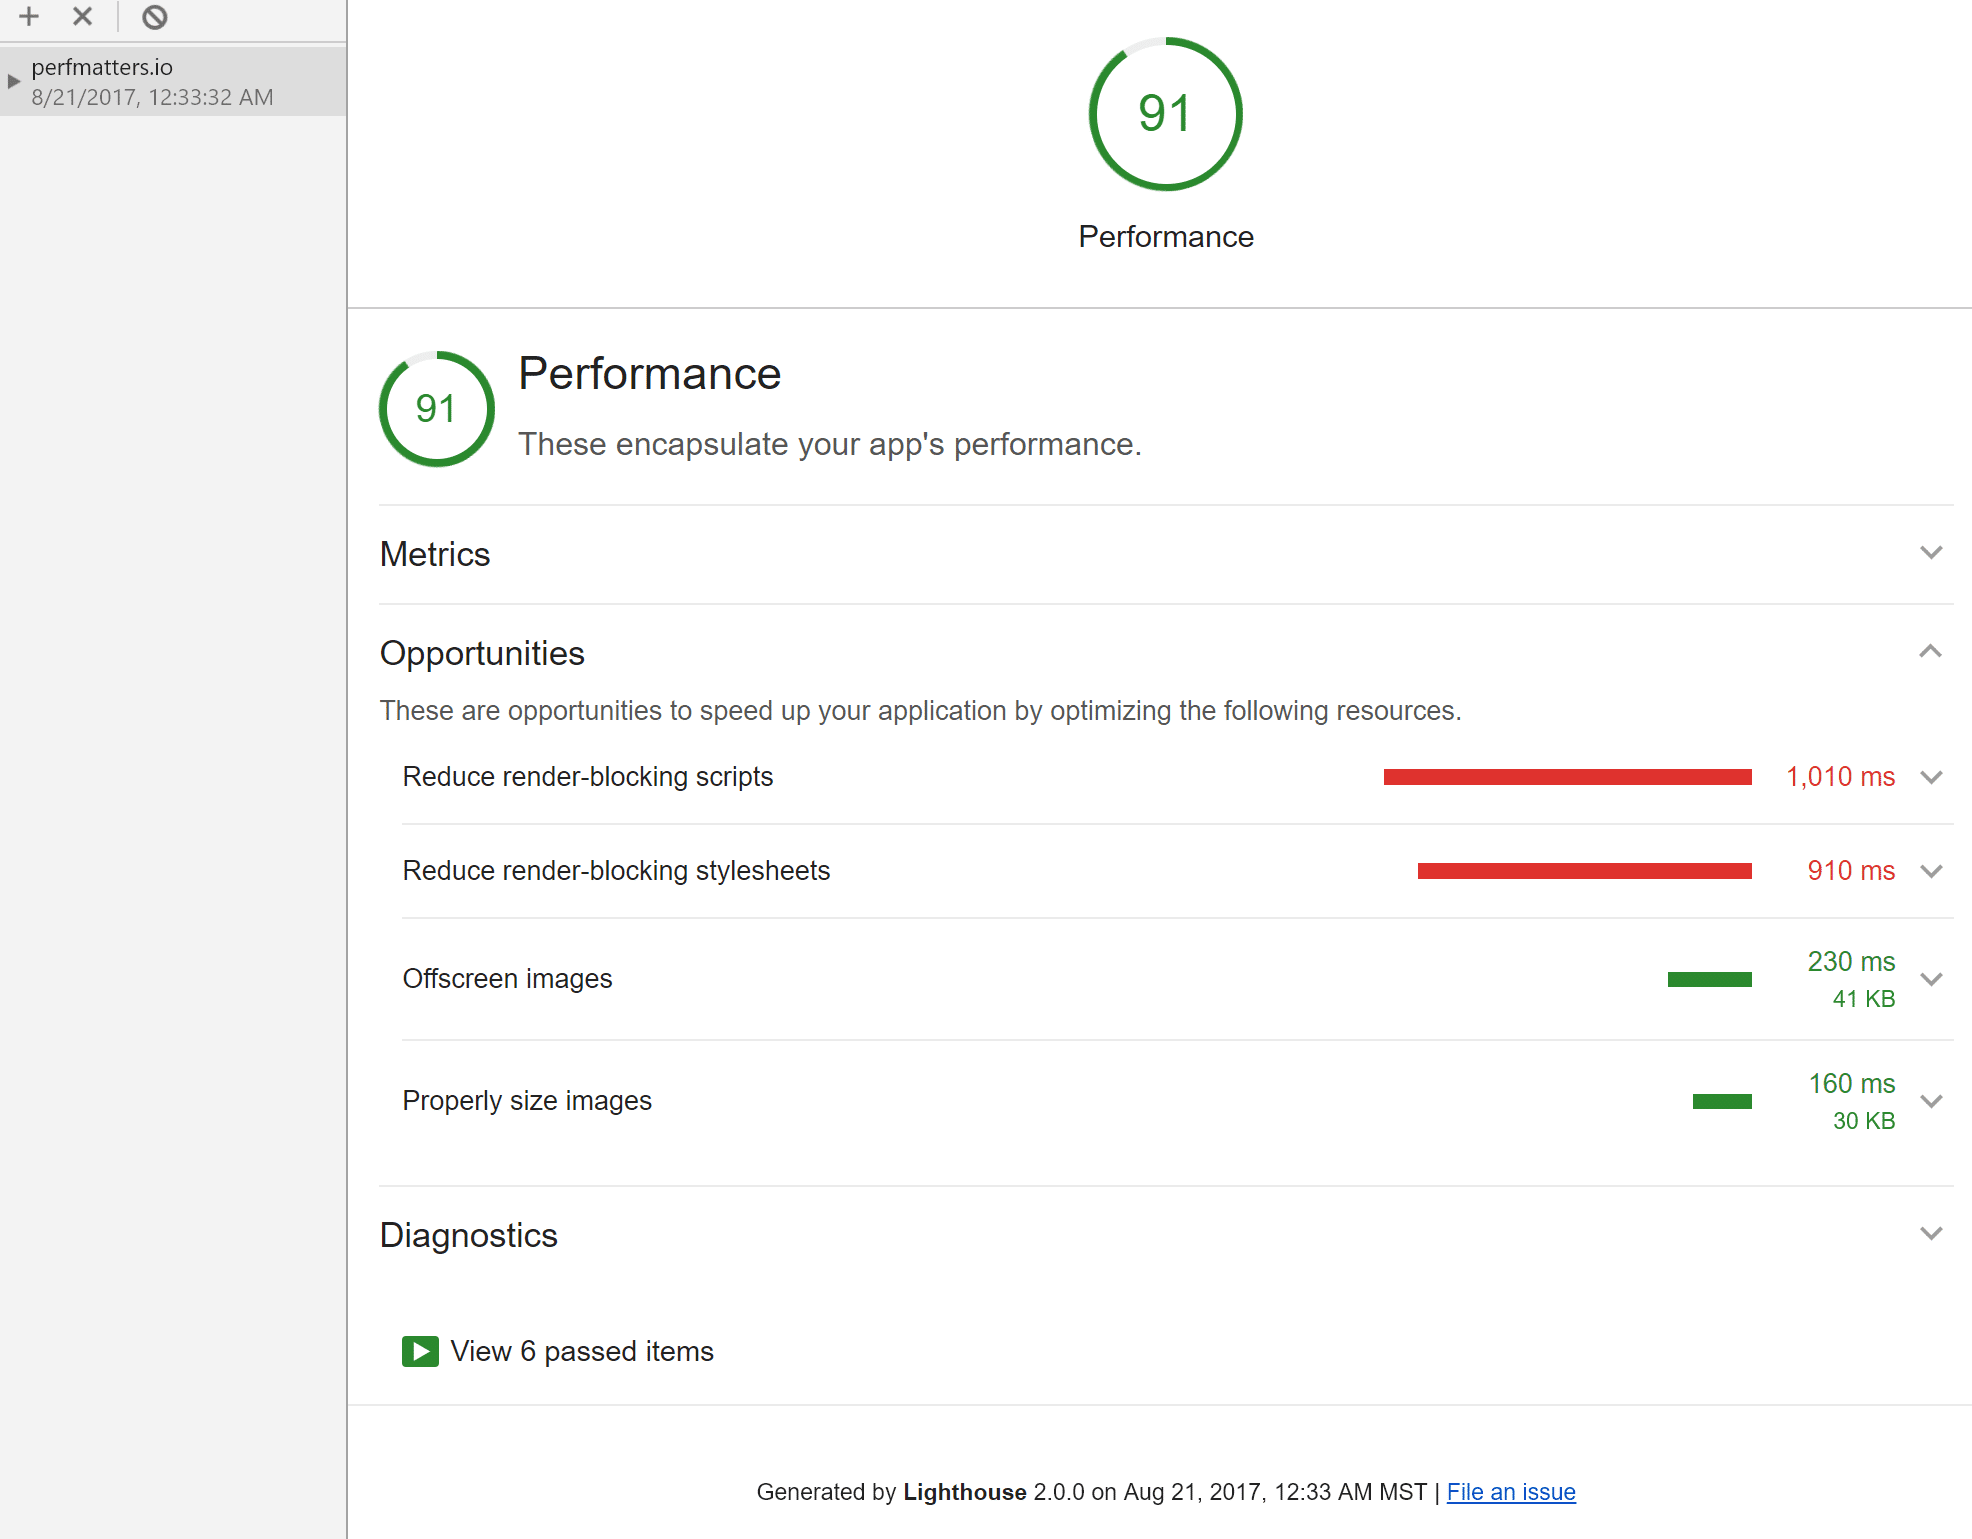
The team at Google also integrated Lighthouse into Chrome Devtools. Lighthouse is an open-source, automated tool for improving the quality of web pages. It has audits for performance, accessibility, progressive web apps, and more. You can run it from the “Audit” tab. It has a similar 0 out of 100 grading system. You can dive into your requests, see what scripts might be render-blocking, image compression savings, etc. You can then easily share the link with others.
Web performance audit Chrome Devtools
Other features in Chrome Devtools include being able to disable the cache, throttle your network connections, take screenshots of page rendering, and diagnose slow TTFB.
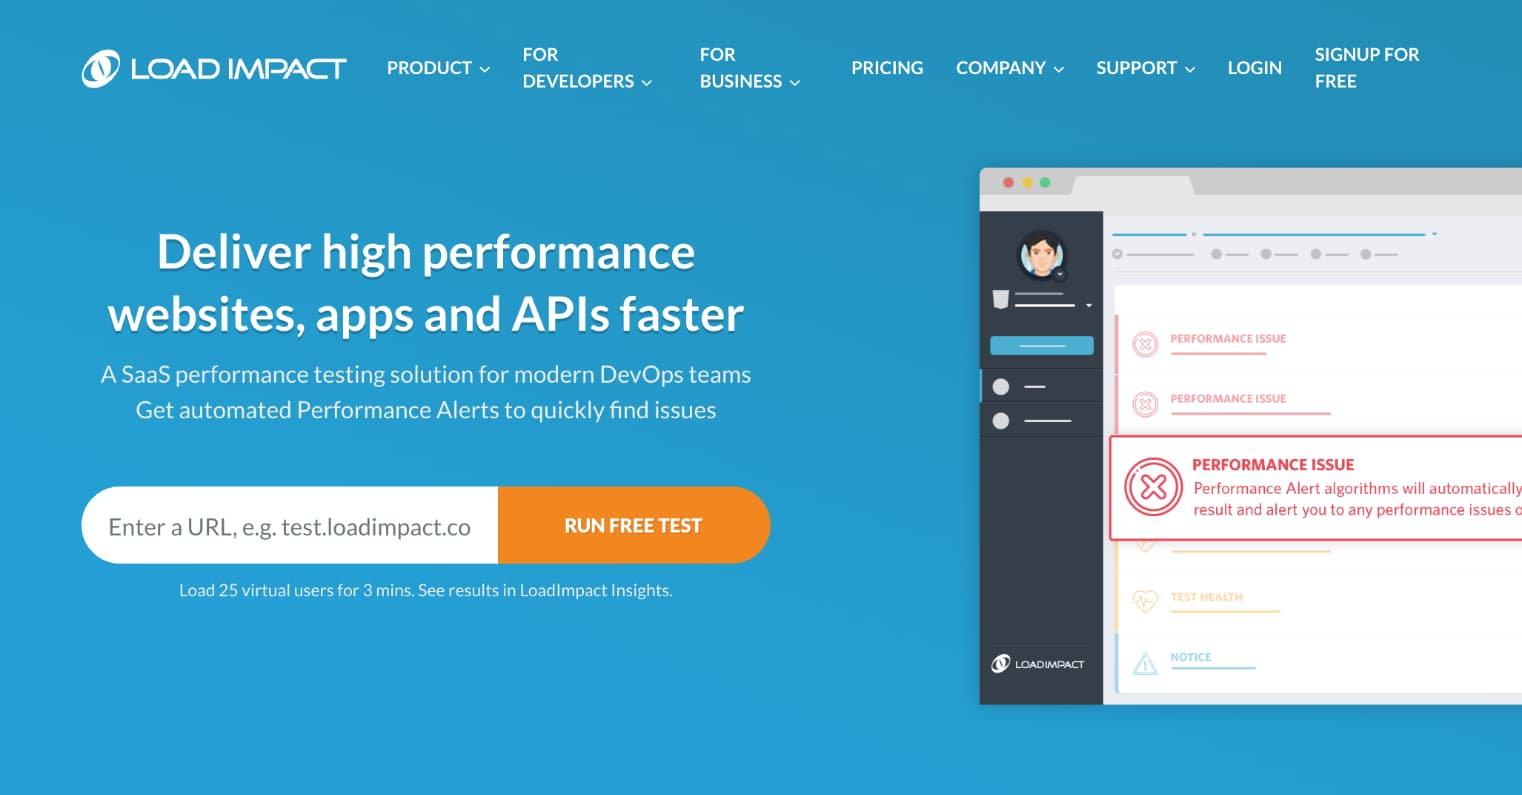
12. Load Impact
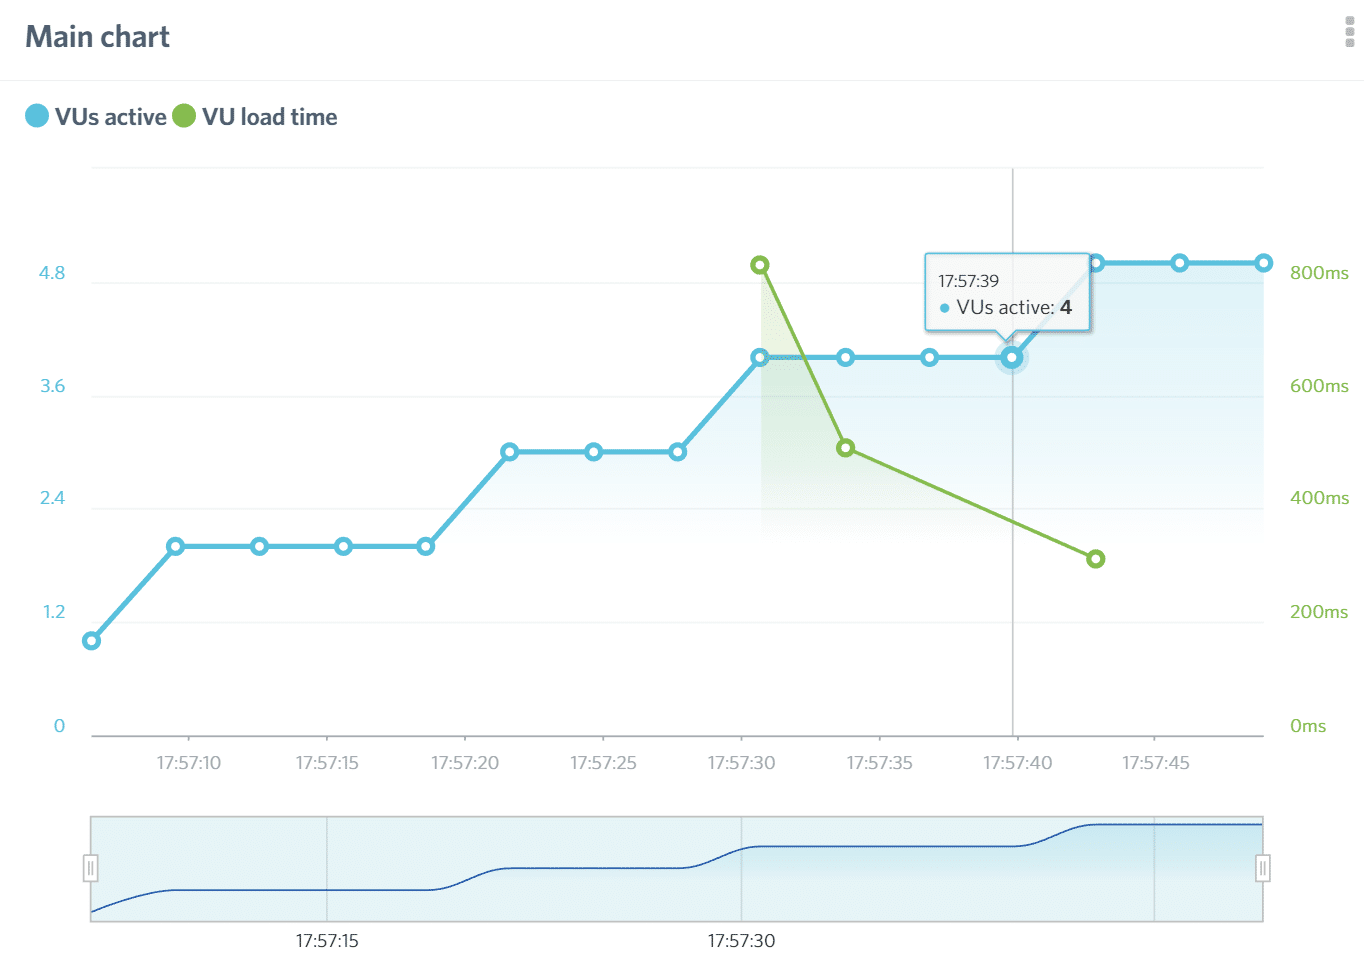
Load Impact is one of the best tools out there for testing how scalable your website is. They offer a free website performance test (5 reports per month), analyzing the consequences of having 25 concurrent users on your website and the impact this modest traffic has on-site speed.
Load Impact
Load Impact displays a handy graph, demonstrating how your load time changes when more users visit your website. To ensure your site caters to a truly global audience, Load Impact will also send virtual users to your website from different locations.
Load Impact charts
Want more? Load Impact conveniently displays top-level statistics such as bandwidth usage, requests made, and the number of requests per second. If you want extra data, considering upgrading to one of Load Impact’s premium plans – this allows you to test the impact of far greater volumes of concurrent users. The premium plans are available from $89/month.
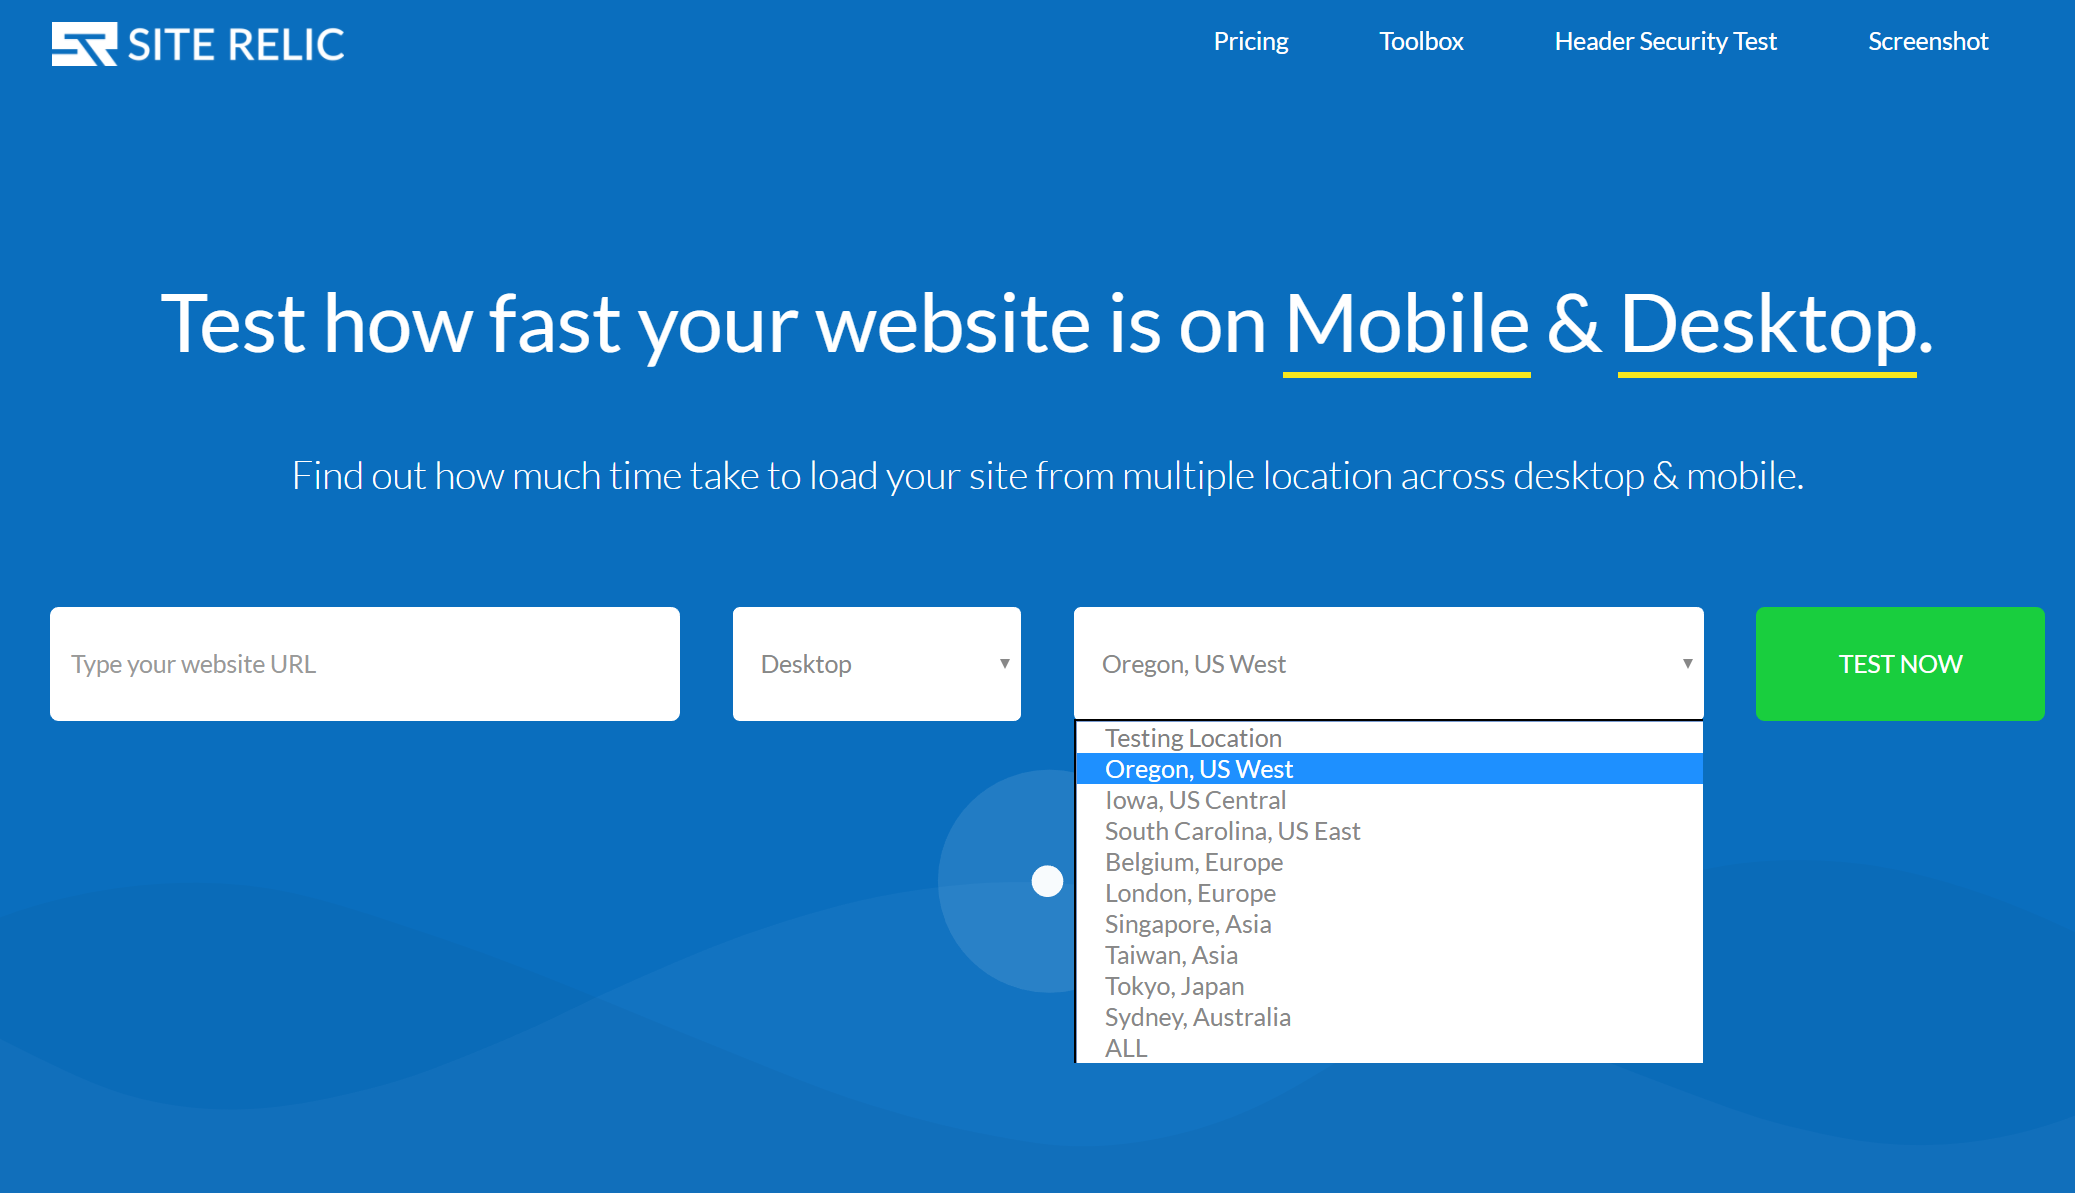
13. Site Relic
Site Relic is another completely free website speed test tool that has popped up recently. It allows you to easily check your site’s load time on both mobile and desktop across 9 different regions. You can also view your TTFB across all regions at once.
Site Relic
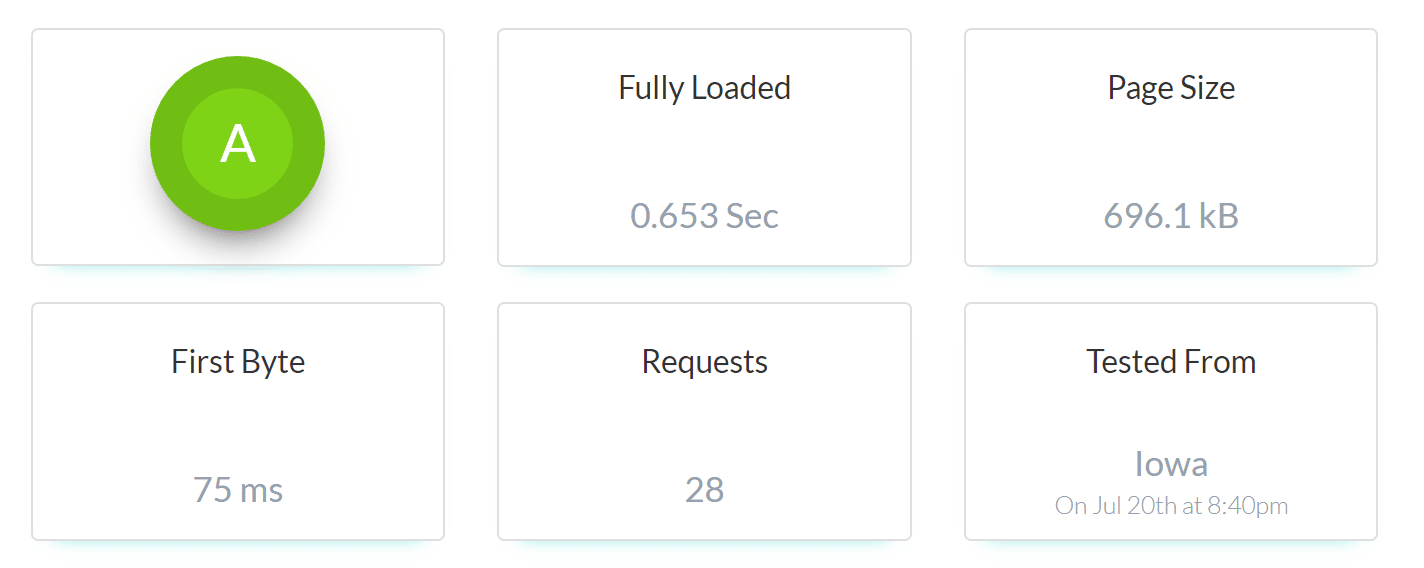
Individual location reports allow you to easily see your fully loaded time, page size, first byte, total number of requests, request counts by type, and request counts by response code. The waterfall report in the tool is also very well designed.
Site Relic speed test
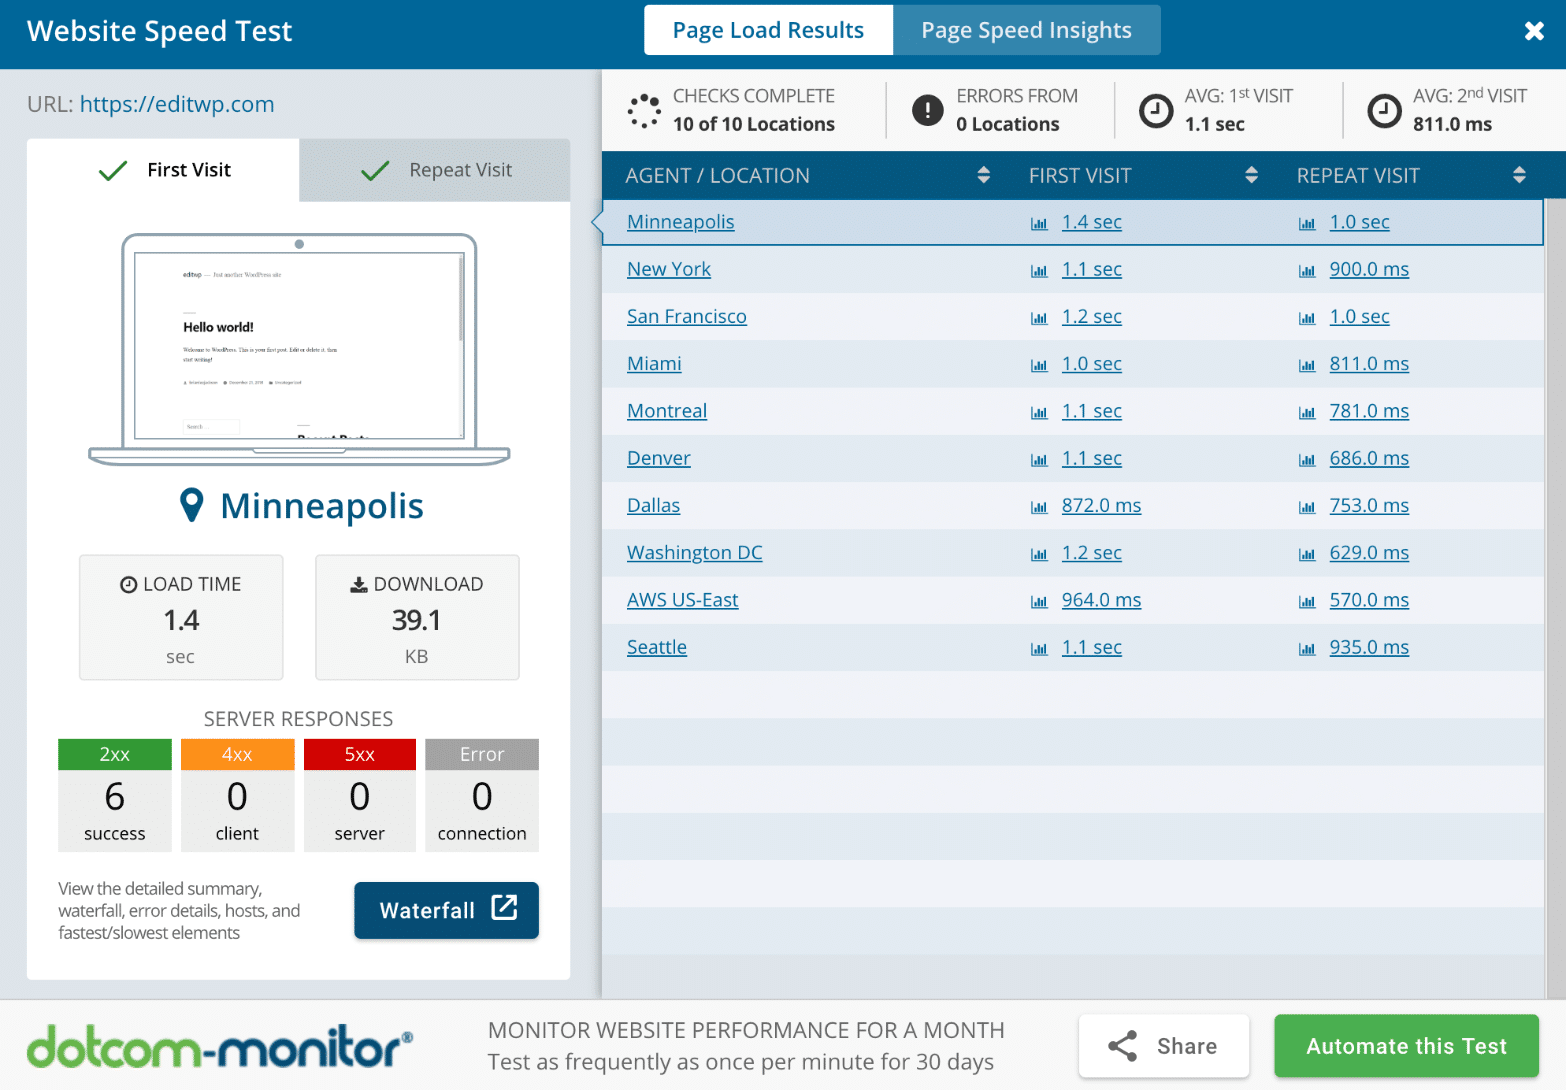
14. dotcom-monitor
dotcom-monitor has a lot of free and useful tools. One of which is their website speed test tool. It allows you to instantly test your website’s speed from 25 locations around the globe. You can choose between different browsers such as Internet Explorer, Firefox, Chrome, iOS, Android, Windows Phone, and Blackberry.
dotcom-monitor website speed test
Their web performance report includes:
Summary by location
10% of fastest elements
10% of slowest elements
Comprehensive waterfall chart
Breakdown by host element – including DNS, Connection, SSL, Request, First packet, and Download
Error check and diagnostics
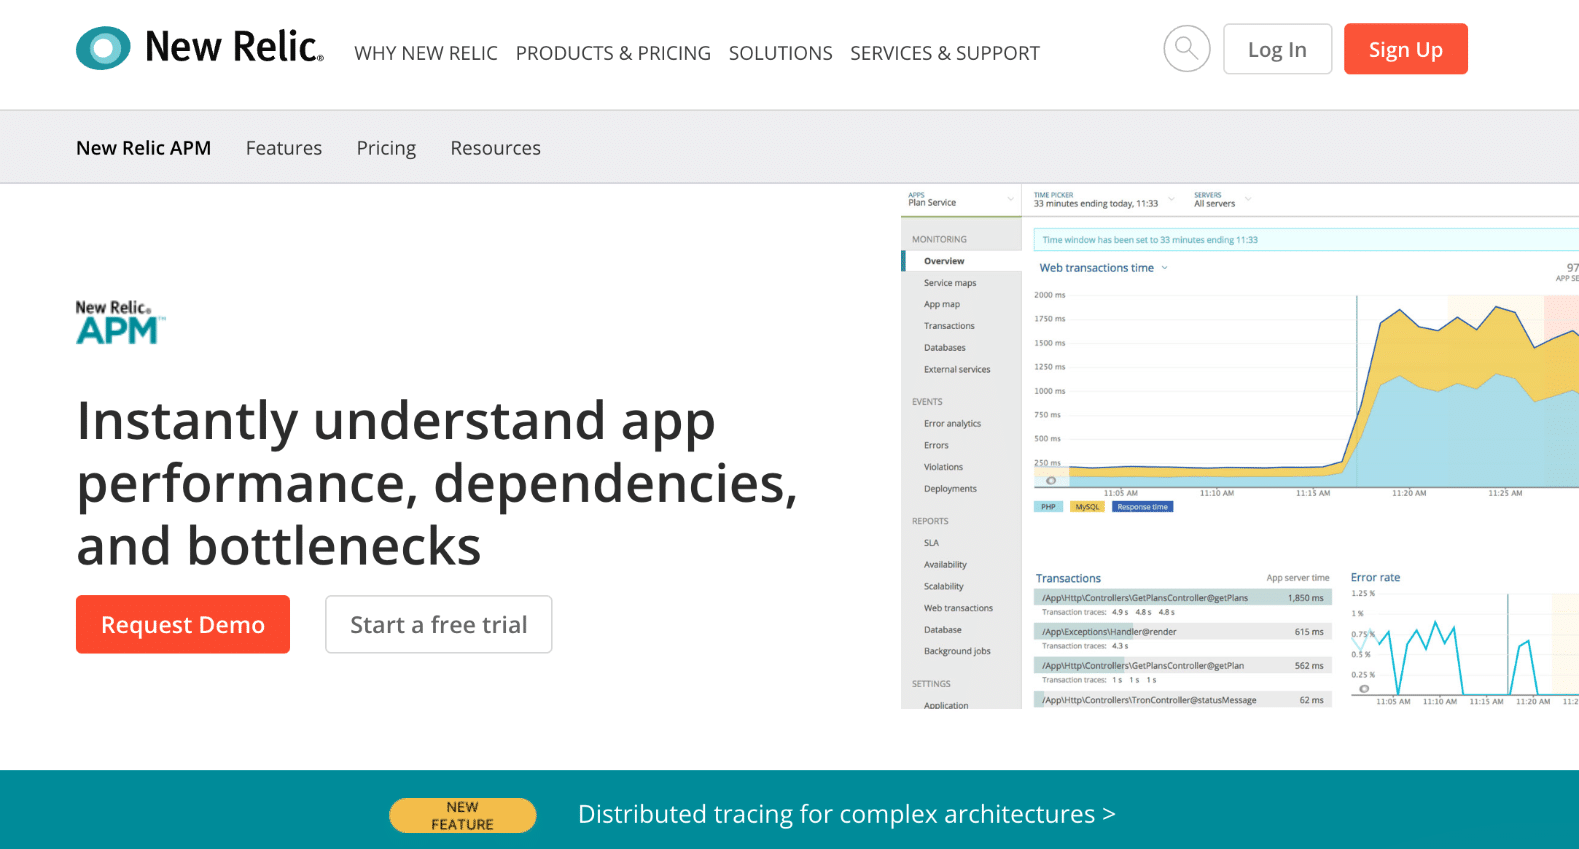
15. New Relic
New Relic offers all sorts of services, from application performance monitoring, server monitoring, mobile monitoring, and real-time user insights. Technically this is a premium tool, but if you need more data than what the above tools provide, this would be the one you want to invest in.
New Relic
We actually use two of New Relic’s products here at Kinsta to monitor uptime and performance, and that is their application monitoring and synthetics products.
New Relic web transaction times
One especially useful feature is the WordPress plugins section. You can instantly see which plugins and themes have the longest response times.
WordPress plugin response times in New Relic
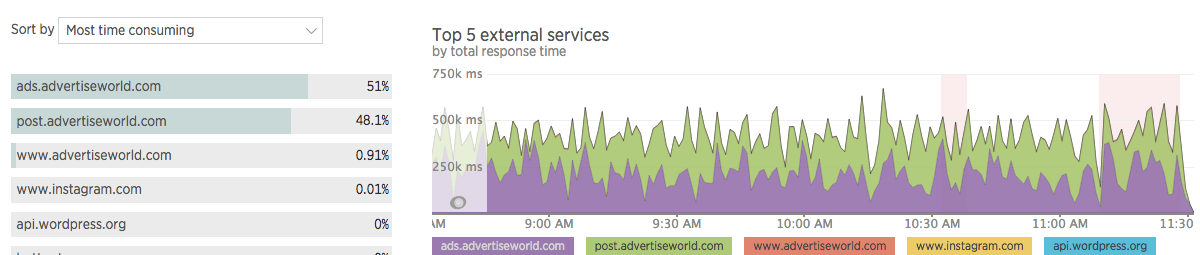
If your website starts to slow down, you can easily see this with New Relic and get notified so you can take immediate action to see what might be causing the issue. This also includes viewing external services or ad networks that might be slowing down your site. New Relic has been a great tool for us to ensure we provide the best support for our WordPress customers.
New Relic external services
Website speed is important. ? The faster it is, the better your chances of success.
Summary
Understanding how to properly speed test your WordPress site will ensure you are gauging your performance effectively. Especially if you’re trying to measure how fast your site is after you migrate to Kinsta. ?
If a lightning-quick website is your priority – and it should be! – make sure you’re using at least one of these tools to quantitatively measure your speed optimization strategy. By now, it should be abundantly clear: website speed is an important component of any successful website. The faster your website, the better your chances of success.
What tools do you use for measuring website speed? Share them in the comments below!
If I registered a domain name through one registrar, am I allowed to switch to a different registrar?Yes, it is your right to transfer your domain name registrations between registrars. Click here for more information on Transferring Your Domain Name.
How do I transfer my domain name to a new registrar?If you wish to move your domain name from one ICANN-accredited registrar to another, you may initiate the transfer process by contacting the registrar to which you wish to transfer the name. Note that there are certain situations that can prevent a domain name from being transferred, such as if it is subject to a 60-day Change of Registrant lock. See FAQ #5 for more information. Absent any valid reasons a transfer request cannot be processed, the registrar will confirm your intent to transfer your domain name using the Initial Authorization for Registrar Transfer form. If you do not respond or return the form to the registrar, your transfer request will not be processed. Please note that as of 25 May 2018, if the gaining registrar cannot access registration data for a name subject to a transfer, then the gaining registrar is not required to obtain the Form of Authorization from the Transfer Contact.Your current registrar must also verify your intent to transfer using the Confirmation of Registrar Transfer Request form. Click here for more information on Transferring Your Domain Name.
Why can’t I transfer a domain name I just registered to another registrar?There are certain situations that can prevent a domain name from being transferred to a different registrar, such as a new registration. Your registrar may deny a transfer request if the domain name is within 60 days of initial registration. Another situation is if the domain name is subject to a 60-day Change of Registrant lock. You cannot transfer a domain name to a different registrar within 60 days of making changes to the registrant name, organization or email address (or the Administrative Contact email address, if there is no registrant email address). At their discretion, some registrars may provide an option for you to opt-out of this 60-day lock period. However, this rule is in place for your protection against unauthorized transfers and the registrar does not have to offer this option. If your ultimate goal is to transfer the domain name, you may want to consider completing the transfer process before changing your contact information.Registrars also have the option of denying a transfer request within 60 days from when you last transferred the domain name to a different registrar. You may have the option to change web-hosting providers instead of registrars to avoid the inter-registrar transfer process (and lock) altogether. You may also update your domain name’s nameservers or change the hosting IP address assigned to your domain name. Check with your registrar and/or hosting provider to see what options you have.Learn More: Registrant Blog Series – Do you have a domain name? Here’s what you need to know. Part II: Transferring Your Domain Name
I want to move my domain name to someone else.It is your right to transfer your domain name registration between registrars. If you wish to move your domain name from one ICANN-accredited registrar to another, you may initiate the transfer process by contacting the registrar to which you wish to transfer the name.To transfer your domain name to another registrant, you can initiate a change of registrant by contacting your current registrar. Your registrar will then ask for your confirmation via a secure mechanism (which typically will take the form of an email to the registered name holder). You must provide your confirmation within the number of days set by your registrar (not to exceed 60 days) or your transfer will not proceed. Once your registrar receives confirmation from you, they will process the transfer and notify you and the new registrant once the transfer is completed.Learn More: Registrant Blog Series – Do you have a domain name? Here’s what you need to know. Part III: Having Issues Transferring Your Domain Name?
Someone has contacted me to purchase my domain name, what do I do?It is up to you to decide if you would like to respond to an offer for the purchase of your domain name. You can transfer your domain name to someone else if you would like. See FAQ#4 above for more information on transferring your domain name to a different Registrant.
The registrar is asking me for a code. Where do I get this? / I don’t know what you mean by authorization/EPP/transfer code and I can’t find it. How do I get this code?An Auth-Code (also called an Authorization Code, AuthInfo Code, Auth-Info Code, or transfer code) is a code created by a registrar to help identify the domain name holder and prevent unauthorized transfers (also known as a registrant or registered name holder). An Auth-Code is required for a domain holder to transfer a domain name from one registrar to another.Your registrar may allow you, via an online interface tool, to generate and manage your own AuthInfo code. If not, you will need to contact your registrar directly to obtain it. Your registrar must provide you with the AuthInfo code within five (5) calendar days of your request.Learn More About EPP Status Codes
What if I don’t know who my registrar is?If you don’t know who your current registrar is, you can look it up by performing a search for your domain name at:< https://lookup.icann.org/>. The “Registrar” field shows you who your registrar is.
Why is my registrar refusing to transfer my domain name?Your registrar may deny a transfer request in the following limited circumstances:
Evidence of fraud
Reasonable dispute over the identity of the person authorizing the transfer
Domain name is on hold due to payment owed for a previous registration period (including credit card charge-backs)
Express written objection from the domain name holder
Domain name is in “Lock” status (Registrars must provide a readily accessible and reasonable means for name holders to remove the lock status. Contact your registrar for assistance.)
Domain name is within 60 days of initial registration
Domain name is within 60 days of a previous transferYour registrar is required to specify a reason when denying your transfer request unless they are required. Contact either the current registrar or the registrar you wish to transfer to for information on the denial.Your registrar must deny a transfer request in the following limited circumstances:
Domain name is the subject of a UDRP proceeding
Domain name is subject to a court order by a court of competent jurisdiction
Domain name is the subject of a TDRP proceeding
Domain name is the subject of a URS proceeding or URS suspension
Domain name is subject to 60-Day Change of Registrant lock
My registrar is charging me a fee to transfer to a new registrar. Is this allowed?Yes. Registrars are allowed to set their own prices for this service so some may choose to charge a fee. However, a transfer cannot be denied due to non-payment of this transfer fee. There are other reasons your registrar can deny transfer request. See FAQ number 5 above for more information.
My transfer request was denied for a reason not listed above, or I do not agree with the reason my registrar provided. What can I do?If you think your request to transfer your domain name was inappropriately denied or you do not agree with the reason (if any) provided by your current registrar for denying your request, you should then submit a formal Transfer Complaint with ICANN.
My domain name has just expired. Can my registrar require me to pay for a renewal before I can transfer the domain name to a new registrar?No. You have the right to transfer an expired domain. Registrars are not allowed to deny a transfer due to expiration or nonrenewal, (unless you haven’t paid for a previous registration period).However, if the current registrar has begun to delete your domain (i.e., the EPP status code (https://www.icann.org/resources/pages/epp-status-codes-2014-06-16-en) shows the domain in Redemption Grace Period (see also https://www.icann.org/resources/pages/gtld-lifecycle-2012-02-25-en), the name must be restored by your current registrar before it can be transferred. This may result in an additional fee, sometimes referred to as a redemption fee.
My registrar is listed as the Administrative Contact for my domain name and this is preventing my transfer request from being processed. What can I do?If you are listed as the Registrant for the domain name, you may ask your new registrar of choice to send the required Form of Authorization to you rather than the listed Administrative Contact.You may also update the data associated with the domain name and name a different Administrative Contact. Some registrars offer an online interface tool for you to manage this data yourself; others can make these updates if you contact their customer service.Please note, if you decide to update the Administrative Contact email, a 60-day lock will be placed on your domain, if there is not currently a Registered Name Holder email address. You should read the registrar’s terms and conditions carefully before performing any updates or contact your registrar directly for more information.
Where can I go if I have a question that is not answered above?If you have questions about the ICANN Transfer Policy, please contact us by sending an email to [email protected].


Recent Comments