Today I discovered some great news, for me at least….
Cloudflare has now added the ability to add custom comments on your DNS records, on all plans. Users on the Pro, Business and Enterprise plan will also be able to tag DNS records as well.
This is a feature I have been waiting for for many years, not just from Cloudflare, but from Cpanel and DNS in general.
Managing DNS and keep track of what every record is for has always been problematic due to this lack of any notes or comments. This has become even more of a problem in recent years due to the requirements for the myriad of TXT records for verification, DKIM, Dmarc etc.
You very quickly lose track of what a record was for or if it is still required, so don;t want to delete it. This results in redundant, legacy records being left hanging around, potentially causing security issues, such as when an old email no longer authorized email source still has a valid dmarc and dkim record.
more details below from Cloudflare’s blog.
DNS records are important
DNS records play an essential role when it comes to operating a website or a web application. In general, they are used to mapping human-readable hostnames to machine-readable information, most commonly IP addresses. Besides mapping hostnames to IP addresses they also fulfill many other use cases like:
Ensuring emails can reach your inbox, by setting up MX records.
Validating a TLS certificate by adding a TXT (or CNAME) record.
Specifying allowed certificate authorities that can issue certificates on behalf of your domain by creating a CAA record.
Validating ownership of your domain for other web services (website hosting, email hosting, web storage, etc.) – usually by creating a TXT record.
And many more.
With all these different use cases, it is easy to forget what a particular DNS record is for and it is not always possible to derive the purpose from the name, type and content of a record. Validation TXT records tend to be on seemingly arbitrary names with rather cryptic content. When you then also throw multiple people or teams into the mix who have access to the same domain, all creating and updating DNS records, it can quickly happen that someone modifies or even deletes a record causing the on-call person to get paged in the middle of the night.
Enter: DNS record comments & tags 📝
Starting Dec 21st 2022, everyone with a zone on Cloudflare can add custom comments on each of their DNS records via the API and through the Cloudflare dashboard.
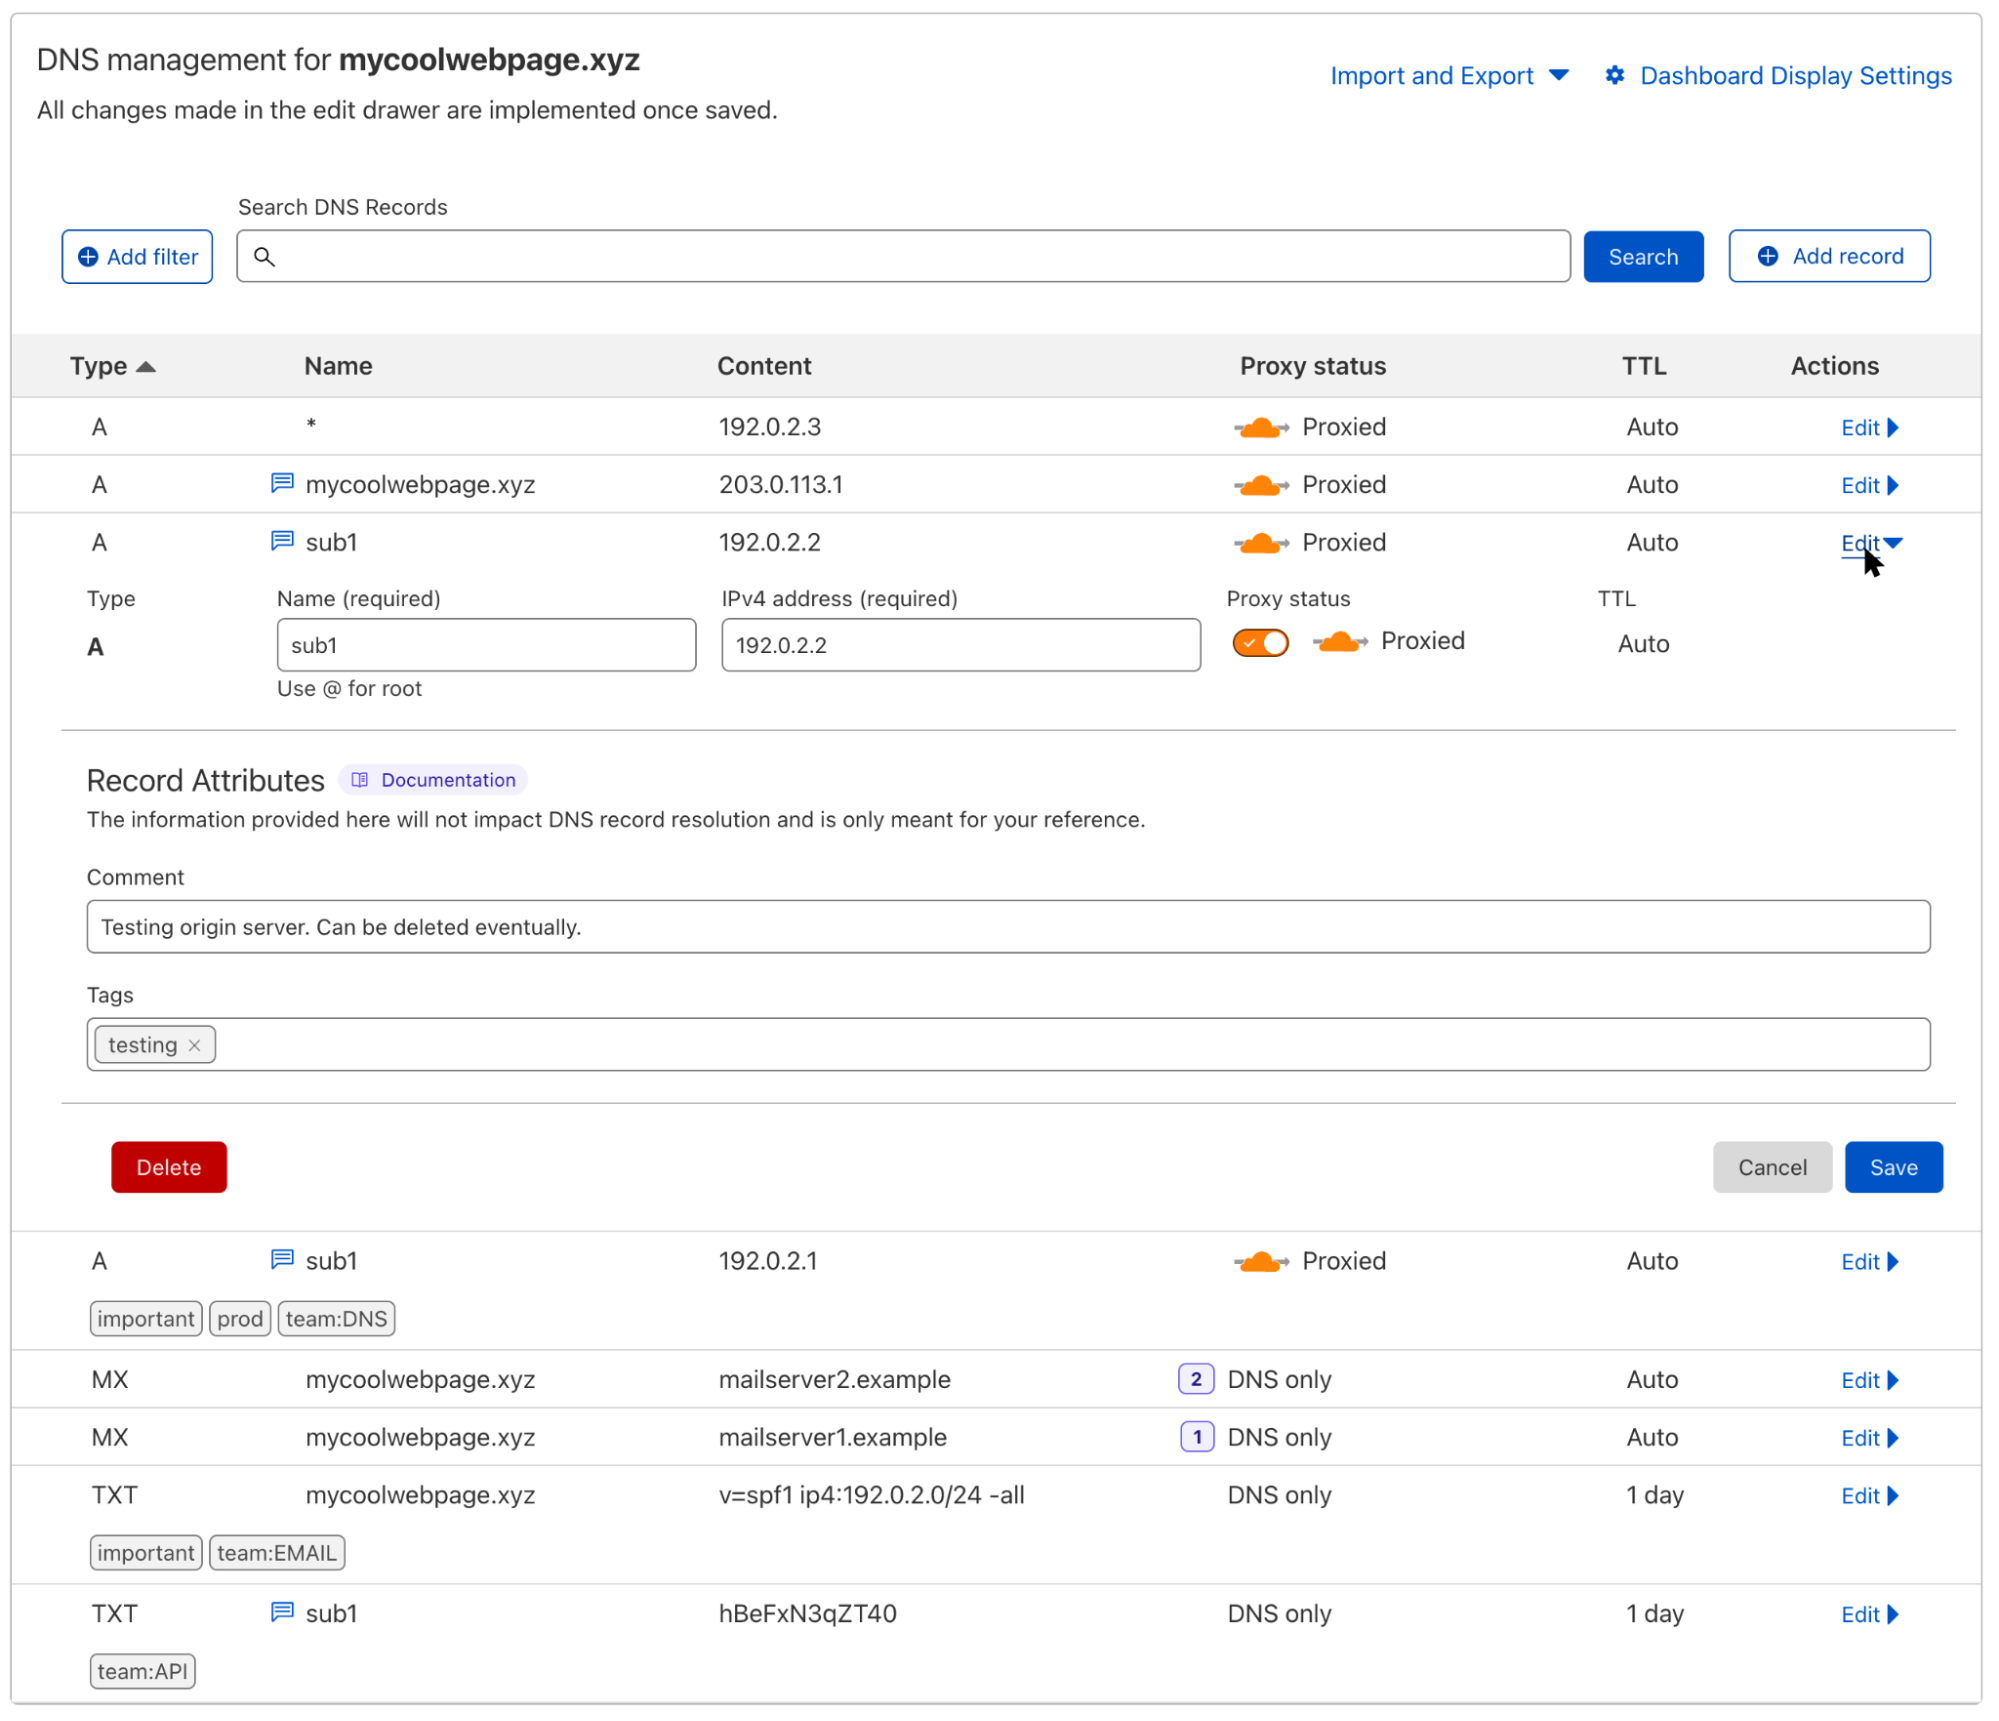
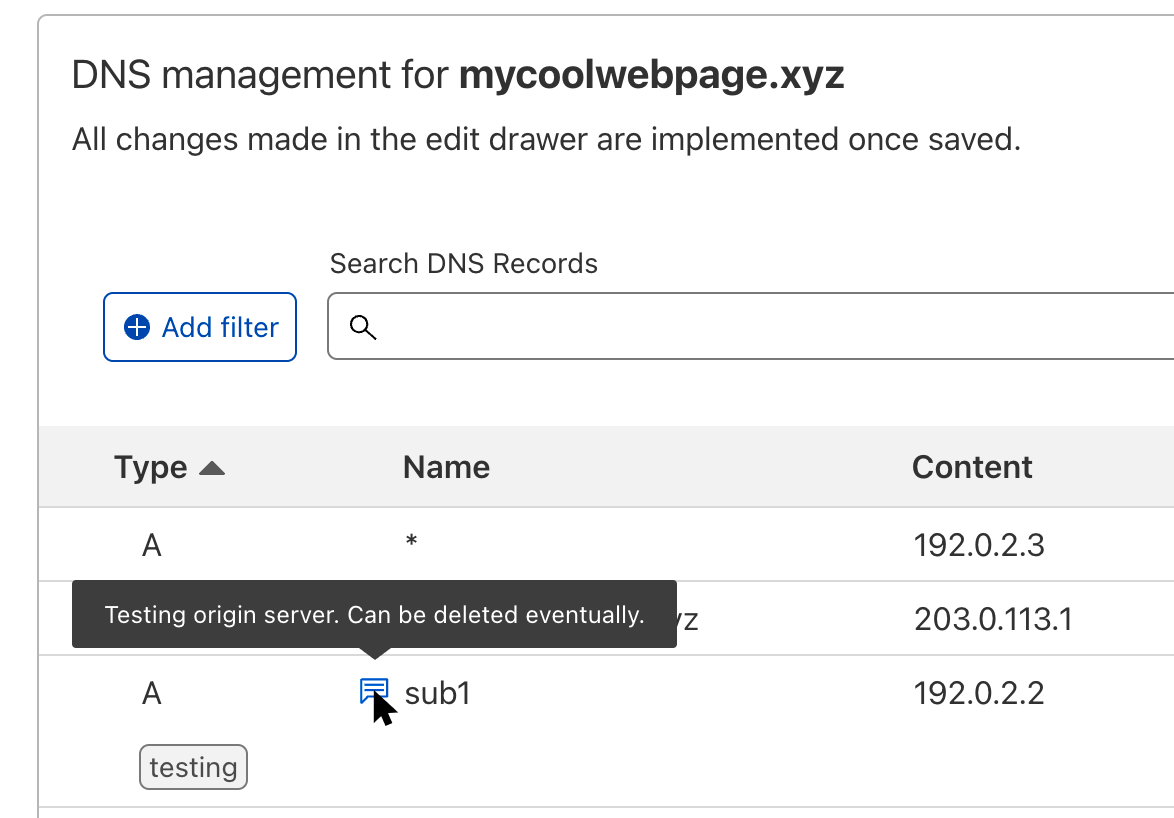
To add a comment, just click on the Edit action of the respective DNS record and fill out the Comment field. Once you hit Save, a small icon will appear next to the record name to remind you that this record has a comment. Hovering over the icon will allow you to take a quick glance at it without having to open the edit panel.
What you also can see in the screenshot above is the new Tags field. All users on the Pro, Business, or Enterprise plans now have the option to add custom tags to their records. These tags can be just a key like “important” or a key-value pair like “team:DNS” which is separated by a colon. Neither comments nor tags have any impact on the resolution or propagation of the particular DNS record, and they’re only visible to people with access to the zone.
Now we know that some of our users love automation by using our API. So if you want to create a number of zones and populate all their DNS records by uploading a zone file as part of your script, you can also directly include the DNS record comments and tags in that zone file. And when you export a zone file, either to back up all records of your zone or to easily move your zone to another account on Cloudflare, it will also contain comments and tags. Learn more about importing and exporting comments and tags on our developer documentation.
;; A Records
*.mycoolwebpage.xyz.     1      IN  A    192.0.2.3
mycoolwebpage.xyz.       1      IN  A    203.0.113.1 ; Contact Hannes for details.
sub1.mycoolwebpage.xyz.  1      IN  A    192.0.2.2 ; Test origin server. Can be deleted eventually. cf_tags=testing
sub1.mycoolwebpage.xyz.  1      IN  A    192.0.2.1 ; Production origin server. cf_tags=important,prod,team:DNS

;; MX Records
mycoolwebpage.xyz.       1      IN  MX   1 mailserver1.example.
mycoolwebpage.xyz.       1      IN  MX   2 mailserver2.example.

;; TXT Records
mycoolwebpage.xyz.       86400	IN  TXT  "v=spf1 ip4:192.0.2.0/24 -all" ; cf_tags=important,team:EMAIL
sub1.mycoolwebpage.xyz.  86400  IN  TXT  "hBeFxN3qZT40" ; Verification record for service XYZ. cf_tags=team:API
New filters
It might be that your zone has hundreds or thousands of DNS records, so how on earth would you find all the records that belong to the same team or that are needed for one particular application?
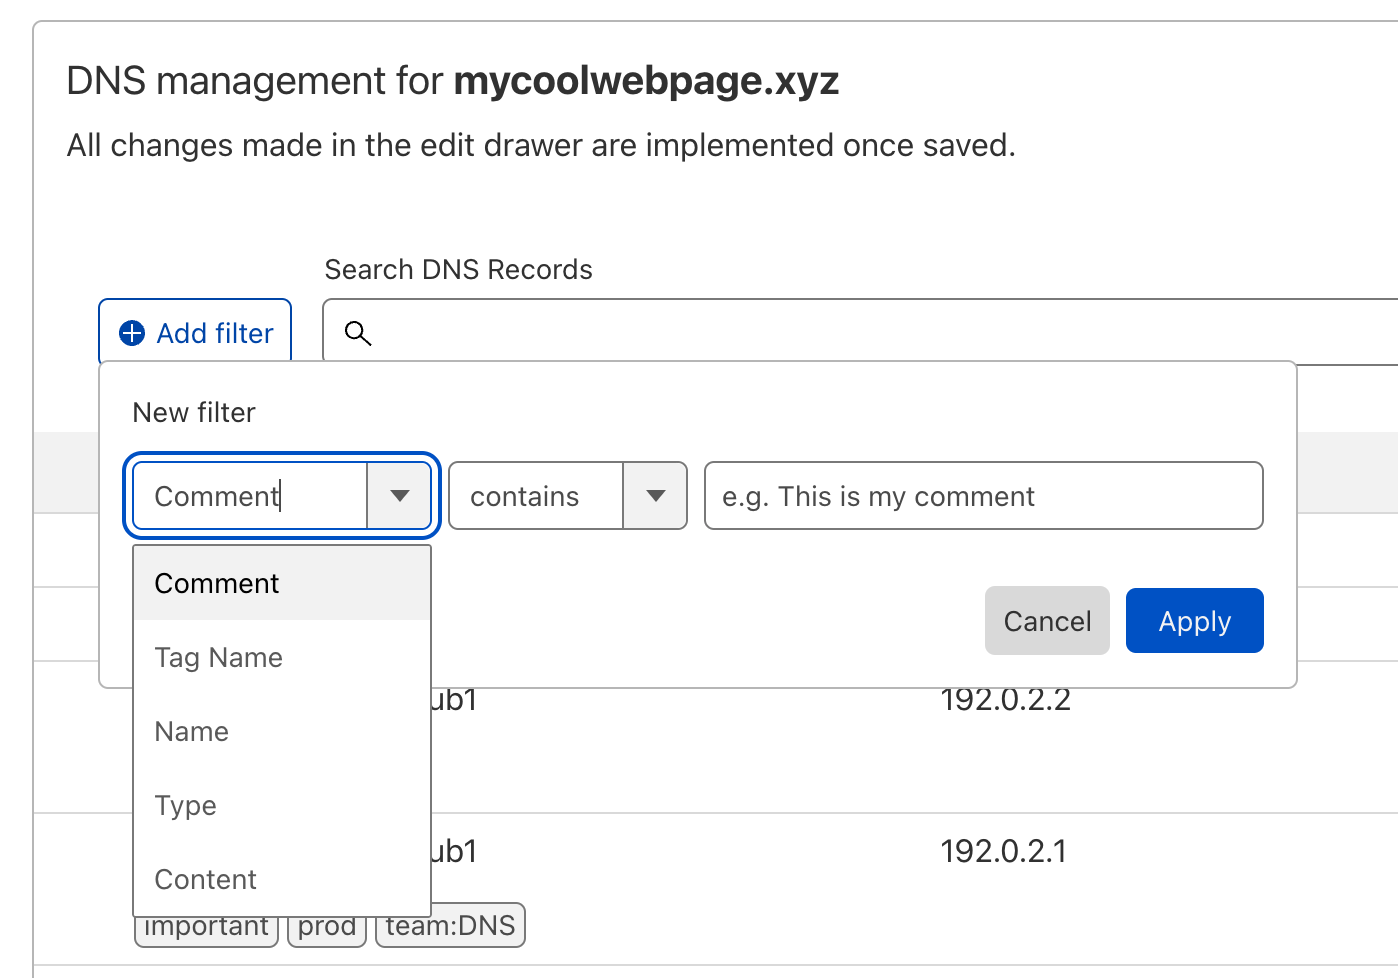
For this we created a new filter option in the dashboard. This allows you to not only filter for comments or tags but also for other record data like name, type, content, or proxy status. The general search bar for a quick and broader search will still be available, but it cannot (yet) be used in conjunction with the new filters.
By clicking on the “Add filter” button, you can select individual filters that are connected with a logical AND. So if I wanted to only look at TXT records that are tagged as important, I would add these filters:
One more thing (or two)
Another change we made is to replace the Advanced button with two individual actions: Import and Export, and Dashboard Display Settings.
You can find them in the top right corner under DNS management. When you click on Import and Export you have the option to either export all existing DNS records (including their comments and tags) into a zone file or import new DNS records to your zone by uploading a zone file.
The action Dashboard Display Settings allows you to select which special record types are shown in the UI. And there is an option to toggle showing the record tags inline under the respective DNS record or just showing an icon if there are tags present on the record.
And last but not least, we increased the width of the DNS record table as part of this release. The new table makes better use of the existing horizontal space and allows you to see more details of your DNS records, especially if you have longer subdomain names or content.
Try it now
DNS record comments and tags are available today. Just navigate to the DNS tab of your zone in the Cloudflare dashboard and create your first comment or tag. If you are not yet using Cloudflare DNS, sign up for free in just a few minutes.
Keep all of your web accounts secure with hard-to-guess passwords. Add 2-step authentication where possible and never give out your domain account information to anyone.
Employ anti-virus and spyware measures to prevent keylogging software capturing your login details and secure your domain and data from malware.
Keep your domain contact information up-to-date with your registrar; it’s the best way to ensure you can be contacted if any suspicious activity occurs on your account.
Keep track of when your domains need to be renewed and make yourself aware of the renewal process. Set a reminder to avoid your registration expiring and being snapped up by someone else.
Add domain privacy to keep your contact information out of the public domain. Thieves can use this information to impersonate you or fool you into accessing your domain.
Provide an extra level of security to your domain with a registry lock service. This prevents anyone transferring your domain without your permission.
Be vigilant with your emails to avoid a phishing attack. Hackers can email claiming to be your registrar and such an email could contain a link to a replicate site where you enter your information for them to capture.
Secure your site with SSL certification, enable DNSSEC for extra protection and add a firewall to prevent unauthorized access. Choose a reliable host, practice good server security, such as regular updates, and use a VPS to be extra safe.
Imagine the scenario, it’s midday, and the volume of visitors to your successful e-commerce site has dropped to zero. Typically, you’re making sales, but since business has come to a standstill, you’re losing hundreds, if not thousands of dollars an hour.
Admittedly, domain name security isn’t the most exciting consideration for website owners. However, given the rise in web-based attacks, domain security is more important now than ever before. Cyber crimes occur in increasingly clever forms because people don’t make basic security provisions to protect their domains. The internet is an attractive place for individuals who know how to exploit easily avoidable security gaps.
Although securing your website might sound difficult, a step-by step approach can shore up your defenses and deter hackers. If you’re wondering how to keep your domain secure and how to deter hackers, stick with us. We’ll guide you through tactics that your site visitors will recognize and improve your site’s standing with the search engines. Take proactive action by following our nine steps to keep your domain protected and appeal to your site’s visitors.
Security for Domains
Domain security is as important for your own protection as well as that of your site’s visitors. Internet users are increasingly aware of the pitfalls of cyber theft. They are concerned for their safety and privacy, and want to know how to spot an unsafe website. In the current climate, terms like “identity theft”, “hack”, and “spam” get thrown about routinely. There is nothing worse for a website’s reputation than a security breach which leaves not only the domain owner, but all related logins vulnerable.
Many domain owners overlook the security of their domain name when they are developing their general website security policies. But consider the aftermath of losing your domain, either through poor domain management or via hijacking. Aside from the damage to your business and reputation, the process of recovery can be painfully slow and expensive. Fortunately, there are several measures you, as the domain name holder can take to protect your domain name against theft and loss.
Know Your Enemy
Before learning prevention methods, it’s important to be familiar with the sort of threats your domain name is susceptible to. Anyone who successfully accesses the account you hold with your domain name registrar has the power to hijack your domain name. They may use it to divert your website visitors to their own site, or to access your email. There are a few methods that can be used to hijack a domain.
Domain hijacking, also referred to as pharming, is a form of online fraud similar to phishing, where a fraudster seeks to obtain information by redirecting a website’s traffic to another site. The alternative site was developed to steal information from users without knowing it. Hijacking in this way is a serious problem because it puts sensitive private information at risk.
Phishing tricks domain owners into thinking an email is from their legitimate domain registrar. They click on a link in the email which opens a replica site of their registrar, and they are asked to log in. Users enter their username and password into what looks like a legitimate website. This information is captured by the attacker.
9 Steps to Keep a Secure Domain
Securing your domain name is crucial to safeguarding your domain name’s settings and control panel. Anyone with bad intentions who accesses this area can change your email and website accessibility settings. It’s not only illegal access you need to be vigilant of; you don’t have to be the latest victim of cybercrime to lose control of your website. It could be snapped up and in the hands of a new owner perfectly legally if you simply forget to renew it.
Follow these nine steps to shield your domain from unauthorized changes to your domain name settings or from unintentionally slipping out of your hands.
Step 1. Keep Your Accounts Secure
Use strong passwords – A strong password isn’t necessarily a complex series of numbers, letters and symbols as we were lead to believe. This advice has been deprecated by the guy who came up with it. Instead, consider using a password manager such as Dashlane or Lastpass to create a random password that is harder to predict. Avoid using common names, birthdays, anniversaries, etc,. and, when you hire someone to work on your domain account, make sure to change the password when they leave.
Be your own firewall – Anyone with access to your domain can potentially hijack it. Never give your account information to anyone, including your webmaster. If someone needs access to your hosting account login details, use the Account Administrator feature to grant access levels to anyone who needs to manage domain names in your account.
2 step authentication – Using two-factor authentication on your account involves a two-step login process. It adds another layer of security when you need to access your account, using a password as well as another step, such as SMS authentication. Yes, it might be irritating for yourself and your domain users, but without this type of safeguard, a hacker can easily transfer your domain into their control.
Log in to your registrar account regularly – Check your account details are correct, or save yourself the hassle by purchasing Domain Monitoring. This service alerts your administrative email if any changes are made to your domain name’s settings.
Secure Email – Keeping the email linked to your domain safe is key to keeping your domain secure. Ensure your password is complex and change it frequently. Make sure to use a secure email solution and not free services that come from your broadband or telecoms provider, that might expire with lack of use or when you change provider.
If your email expires, someone else could snap it up. This leaves this person free to impersonate you in correspondence with your registrar. They might even use the forgotten password feature to have the password emailed to them.
Step 2. Employ Anti Virus/ Spyware Measures
Prevent key-logging – Install good antivirus/spyware software on your home computer, such as Bitdefender, to prevent key-logging software from capturing your usernames and passwords. Keep this software updated periodically to ensure your information isn’t handed to unauthorized persons.
Keep applications up to date – To secure yourself from hackers you have to keep up to date with security updates. This will deter viruses and malware. Out-of-date security is the most targeted way to break your security and steal data. Bitdefender or Cybersmart will help with this also, as they scan your system for vulnerabilities and out of date software.
Keep all the applications on your web account — for example, your domain account and your CMS, such as WordPress, etc —up-to-date with the latest security patches so hackers can’t exploit it. Any MySQL database used by those applications must also be kept updated to the latest version.
Step 3. Keep Your Registration Records Up-to-date
Keep your domain contact information accurate with your registrar. If you move, update your information immediately. It’s not only a legal requirement from ICANN, but keeping up-to-date records is also the best way to ensure your registrar has a way of contacting you if any suspicious activity occurs.
Make sure you are available to receive notifications so that your registrar will be able to immediately alert you if there are any changes made to your account. This forewarning gives you the chance to halt a pending transfer.
Whenever there are any changes to the contact details that you have been using for domain name transfer communications, let your registrar know.
Keep your emergency and business contact information up to date.
Step 4. Keep Track of Domain Renewals
The easiest way to lose a domain is by failing to renew it. After going through the process of buying a domain and creating a website, you will want to avoid your registration expiring. This is why you must make yourself fully aware of the renewal process for your domain. The most common arrangement is yearly renewal conducted automatically; however, it can vary from one registrar to another.
A simple way to avoid your domain being snapped up by someone else is by setting up a reminder. Many registrars allow you to renew domains for up to ten years in advance. The problem with anything you don’t regularly do is it is more likely to slip your mind. Consider setting a recurring reminder on your desktop annually. Another helpful tip is to synchronize domains, so they expire on the same date. Many domain registrars allow this, which makes things easier when you manage more than one.
Step 5. Add Domain Privacy
WHOIS is a public database the supplies its users with information regarding domain name ownership. All website owners are obliged to provide correct contact information to their registrar. The information provided with your domain registration is associated with the domain name, and a WHOIS record is created.
Anyone using the WHOIS search used to be able to access your contact information by searching the WHOIS database, however this is no longer legally allowed since the implementation of GDPR, but not all registrars follow the rules.
Thieves are after this information in particular because they can use your contact details to impersonate you and attempt to transfer your domain to a new owner. Alternatively, they might contact you to try fool you into revealing your account password.
If you don’t want this contact information available, opt for private domain registration. Domain privacy is a valuable add-on service most domain registrars provide for site owners who don’t want their contact information available publicly. The domain registrar will simply swap their contact details with yours. For example, if you are using Namecheap’s WhoisGuard, anyone wanting to contact you will have to talk to Namecheap first.
Step 6. Lock Up Your Domain
Permission to make changes – Most registrars offer a registry lock service to provide an extra level of security for domain name holders and their customers. Setting up a registrar lock (also known as domain lock and transfer lock) prevents anyone transferring your domain without your permission.Consider the worse case scenario: someone with bad intentions accesses the control panel used to activate your domain.
This area includes information about your domain’s nameservers, information which helps the DNS located your domain. If someone was to edit this information, they could drive traffic trying to reach your site somewhere else.For a small fee, your registrar can apply a registry lock. Using a registry lock is similar to identity theft protections that block anyone using your credit card, without the special authorization of the card owner.
Similarly, registrars are unable to make changes to your site’s DNS information without manual authorization from the registry.
Use a domain authorization code – An Extensible Provisioning Protocol, known as EPP, provides an extra layer of security at the time of domain name registration. A unique Authorization Information Code (AIC) is assigned by the registrar to the new domain owner. This code is needed to transfer the domain from one registrar to another. Keep your AICs secure and confidential for effective protection from unwanted domain transfers.
Step 7. Be Vigilant with Emails
People will use creative tactics to get your to disclose your domain account details. A popular method adopted by hackers is to send an email which looks just like one you would get from your domain registrar. The e-mail will ask your to click on a link that takes you to a close replica of your registrar’s website. Once you enter your information, it can be captured. If you log in through a phishing link, you might lose access to your account.
Avoid this by being vigilant about the following:
Be suspicious of emails claiming to be from your registrar
Don’t access your domain account directly from your email
Always enter the registrar’s address manually in your browser before logging in.
Step 8. Secure Your Site
SSL certification – SSL protection is one of the best-known security features you can get. Protect your customers against identity theft with an SSL Certificate. A customer’s sensitive information, such as their name, bank account information and billing address is encrypted during transmission from their computer to your domain web server.
This process ensures that their information can’t be stolen. TLS, the less well-known acronym, is a similar security protocol which succeeded SSL.Customers will see they have accessed a secure website as they will see https:// at the beginning of its URL. If you’re conducting ane-commerce business or have access to any sensitive customer information, SSL technology is a must.
Even casual internet users recognize it. You don’t need advanced computer knowledge to set this up, your host will likely provide shopping cart functionality to conduct secure transactions, for example. Another perk of SSL or TLS certificates installed on your computer is that it is a positive factor in how your site is viewed by Google.
Enable DNSSEC – DNSSEC is a complicated topic that relates to the domain name system used to translate domain names into numeric internet addresses.
When the DNS was first implemented, it wasn’t secure, and several vulnerabilities were discovered. The threat of name spoofing is an example. Name spoofing is when someone can intercept communication between you and a customer, and comes between the two parties hoping to victimize the customer.Domain name system security extensions (DNSSEC) were created to tackle this problem.
They are a set of protocols that add an extra layer of protection to the domain name system to prevent against unauthorized DNS hosts.
Reliable hosting – Hosting should be at the forefront of your battle against cyber crime. Check that your host is doing enough to ensure your site is secure from their side of things.
VPS – To be extra safe, use a VPS. Your domain exists on a slice of a much more powerful server in a secure data center. Unlike shared hosting, your domain is allotted a guaranteed amount of system resources.
Practice good server security habits – Performs regular updates on your CMS, disable unused services, plugins, widgets, etc., and control remote access.
Firewalls – Firewall the server so you can only access it from known safe locations/networks.
Step 9. Choose the Right Registrar
Don’t register your domain with the first registrar you come across. Be sure the registrar is authorized to sell domains, has a good reputation, and is trustworthy. When choosing a registrar, look beyond the price point alone; you need a quality service with good support.
Make sure your registrar provides additional security measures such as:
2-factor authorization.
Notification of account changes, such as a pending domain transfer, which gives you time to respond before a domain is moved.
Readily available, knowledgeable technical support to assist implementing your domain name security.
Trained customer service agents who screen callers so no one can impersonate anyone in order to access an account.
The Domain Name System (DNS) is the phonebook of the Internet. Humans access information online through domain names, like nytimes.com or espn.com. Web browsers interact through Internet Protocol (IP) addresses. DNS translates domain names to IP addresses so browsers can load Internet resources.
Each device connected to the Internet has a unique IP address which other machines use to find the device. DNS servers eliminate the need for humans to memorize IP addresses such as 192.168.1.1 (in IPv4), or more complex newer alphanumeric IP addresses such as 2400:cb00:2048:1::c629:d7a2 (in IPv6).
How does DNS work?
The process of DNS resolution involves converting a hostname (such as www.example.com) into a computer-friendly IP address (such as 192.168.1.1). An IP address is given to each device on the Internet, and that address is necessary to find the appropriate Internet device – like a street address is used to find a particular home. When a user wants to load a webpage, a translation must occur between what a user types into their web browser (example.com) and the machine-friendly address necessary to locate the example.com webpage.
In order to understand the process behind the DNS resolution, it’s important to learn about the different hardware components a DNS query must pass between. For the web browser, the DNS lookup occurs “ behind the scenes” and requires no interaction from the user’s computer apart from the initial request.
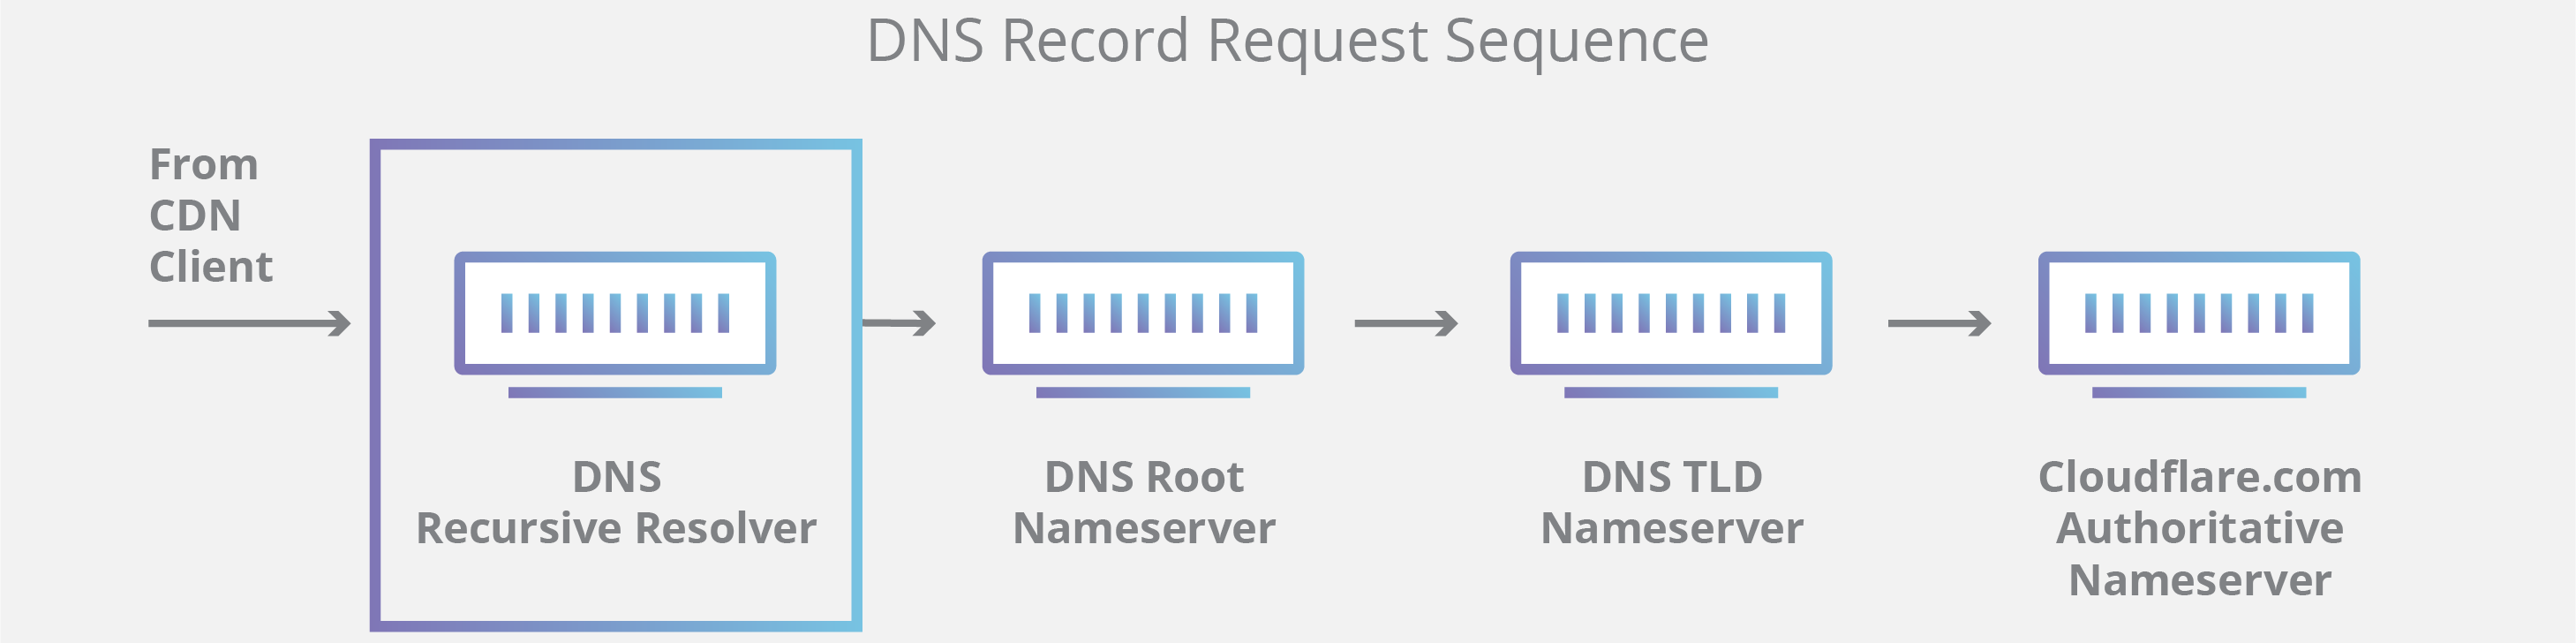
There are 4 DNS servers involved in loading a webpage:
DNS recursor – The recursor can be thought of as a librarian who is asked to go find a particular book somewhere in a library. The DNS recursor is a server designed to receive queries from client machines through applications such as web browsers. Typically the recursor is then responsible for making additional requests in order to satisfy the client’s DNS query.
Root nameserver – The root server is the first step in translating (resolving) human readable host names into IP addresses. It can be thought of like an index in a library that points to different racks of books – typically it serves as a reference to other more specific locations.
TLD nameserver – The top level domain server (TLD) can be thought of as a specific rack of books in a library. This nameserver is the next step in the search for a specific IP address, and it hosts the last portion of a hostname (In example.com, the TLD server is “com”).
Authoritative nameserver – This final nameserver can be thought of as a dictionary on a rack of books, in which a specific name can be translated into its definition. The authoritative nameserver is the last stop in the nameserver query. If the authoritative name server has access to the requested record, it will return the IP address for the requested hostname back to the DNS Recursor (the librarian) that made the initial request.
What’s the difference between an authoritative DNS server and a recursive DNS resolver?
Both concepts refer to servers (groups of servers) that are integral to the DNS infrastructure, but each performs a different role and lives in different locations inside the pipeline of a DNS query. One way to think about the difference is the recursive resolver is at the beginning of the DNS query and the authoritative nameserver is at the end.
Recursive DNS resolver
The recursive resolver is the computer that responds to a recursive request from a client and takes the time to track down the DNS record. It does this by making a series of requests until it reaches the authoritative DNS nameserver for the requested record (or times out or returns an error if no record is found). Luckily, recursive DNS resolvers do not always need to make multiple requests in order to track down the records needed to respond to a client; caching is a data persistence process that helps short-circuit the necessary requests by serving the requested resource record earlier in the DNS lookup.
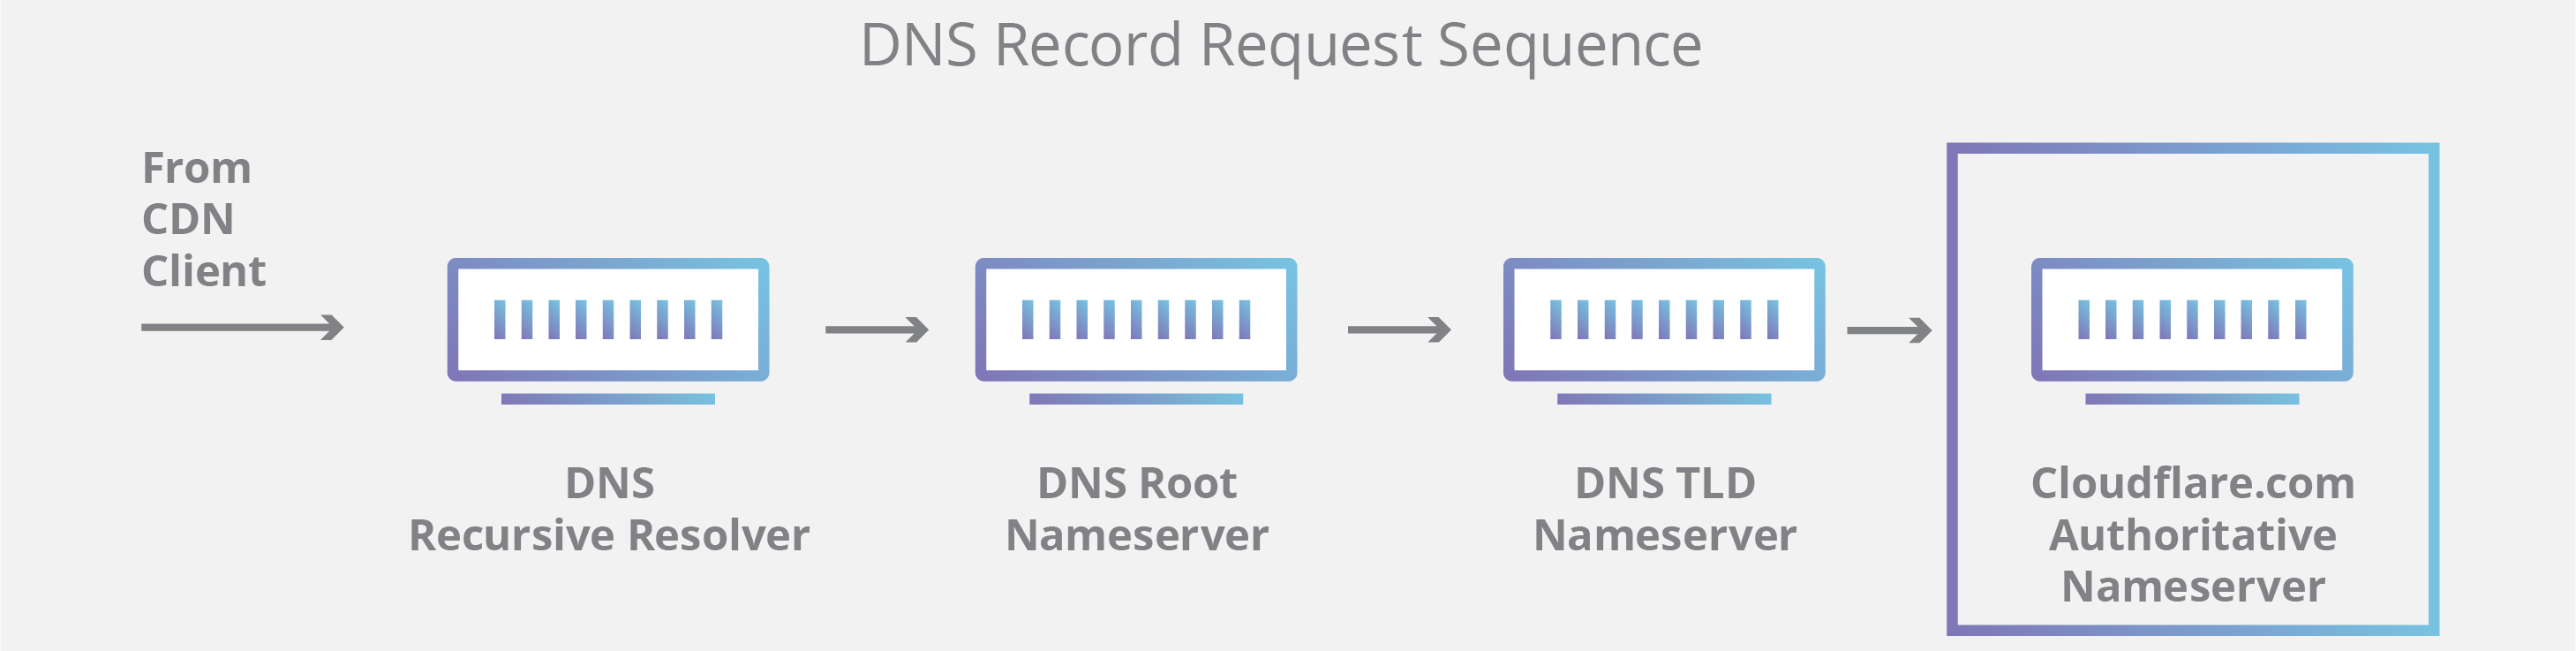
Authoritative DNS server
Put simply, an authoritative DNS server is a server that actually holds, and is responsible for, DNS resource records. This is the server at the bottom of the DNS lookup chain that will respond with the queried resource record, ultimately allowing the web browser making the request to reach the IP address needed to access a website or other web resources. An authoritative nameserver can satisfy queries from its own data without needing to query another source, as it is the final source of truth for certain DNS records.
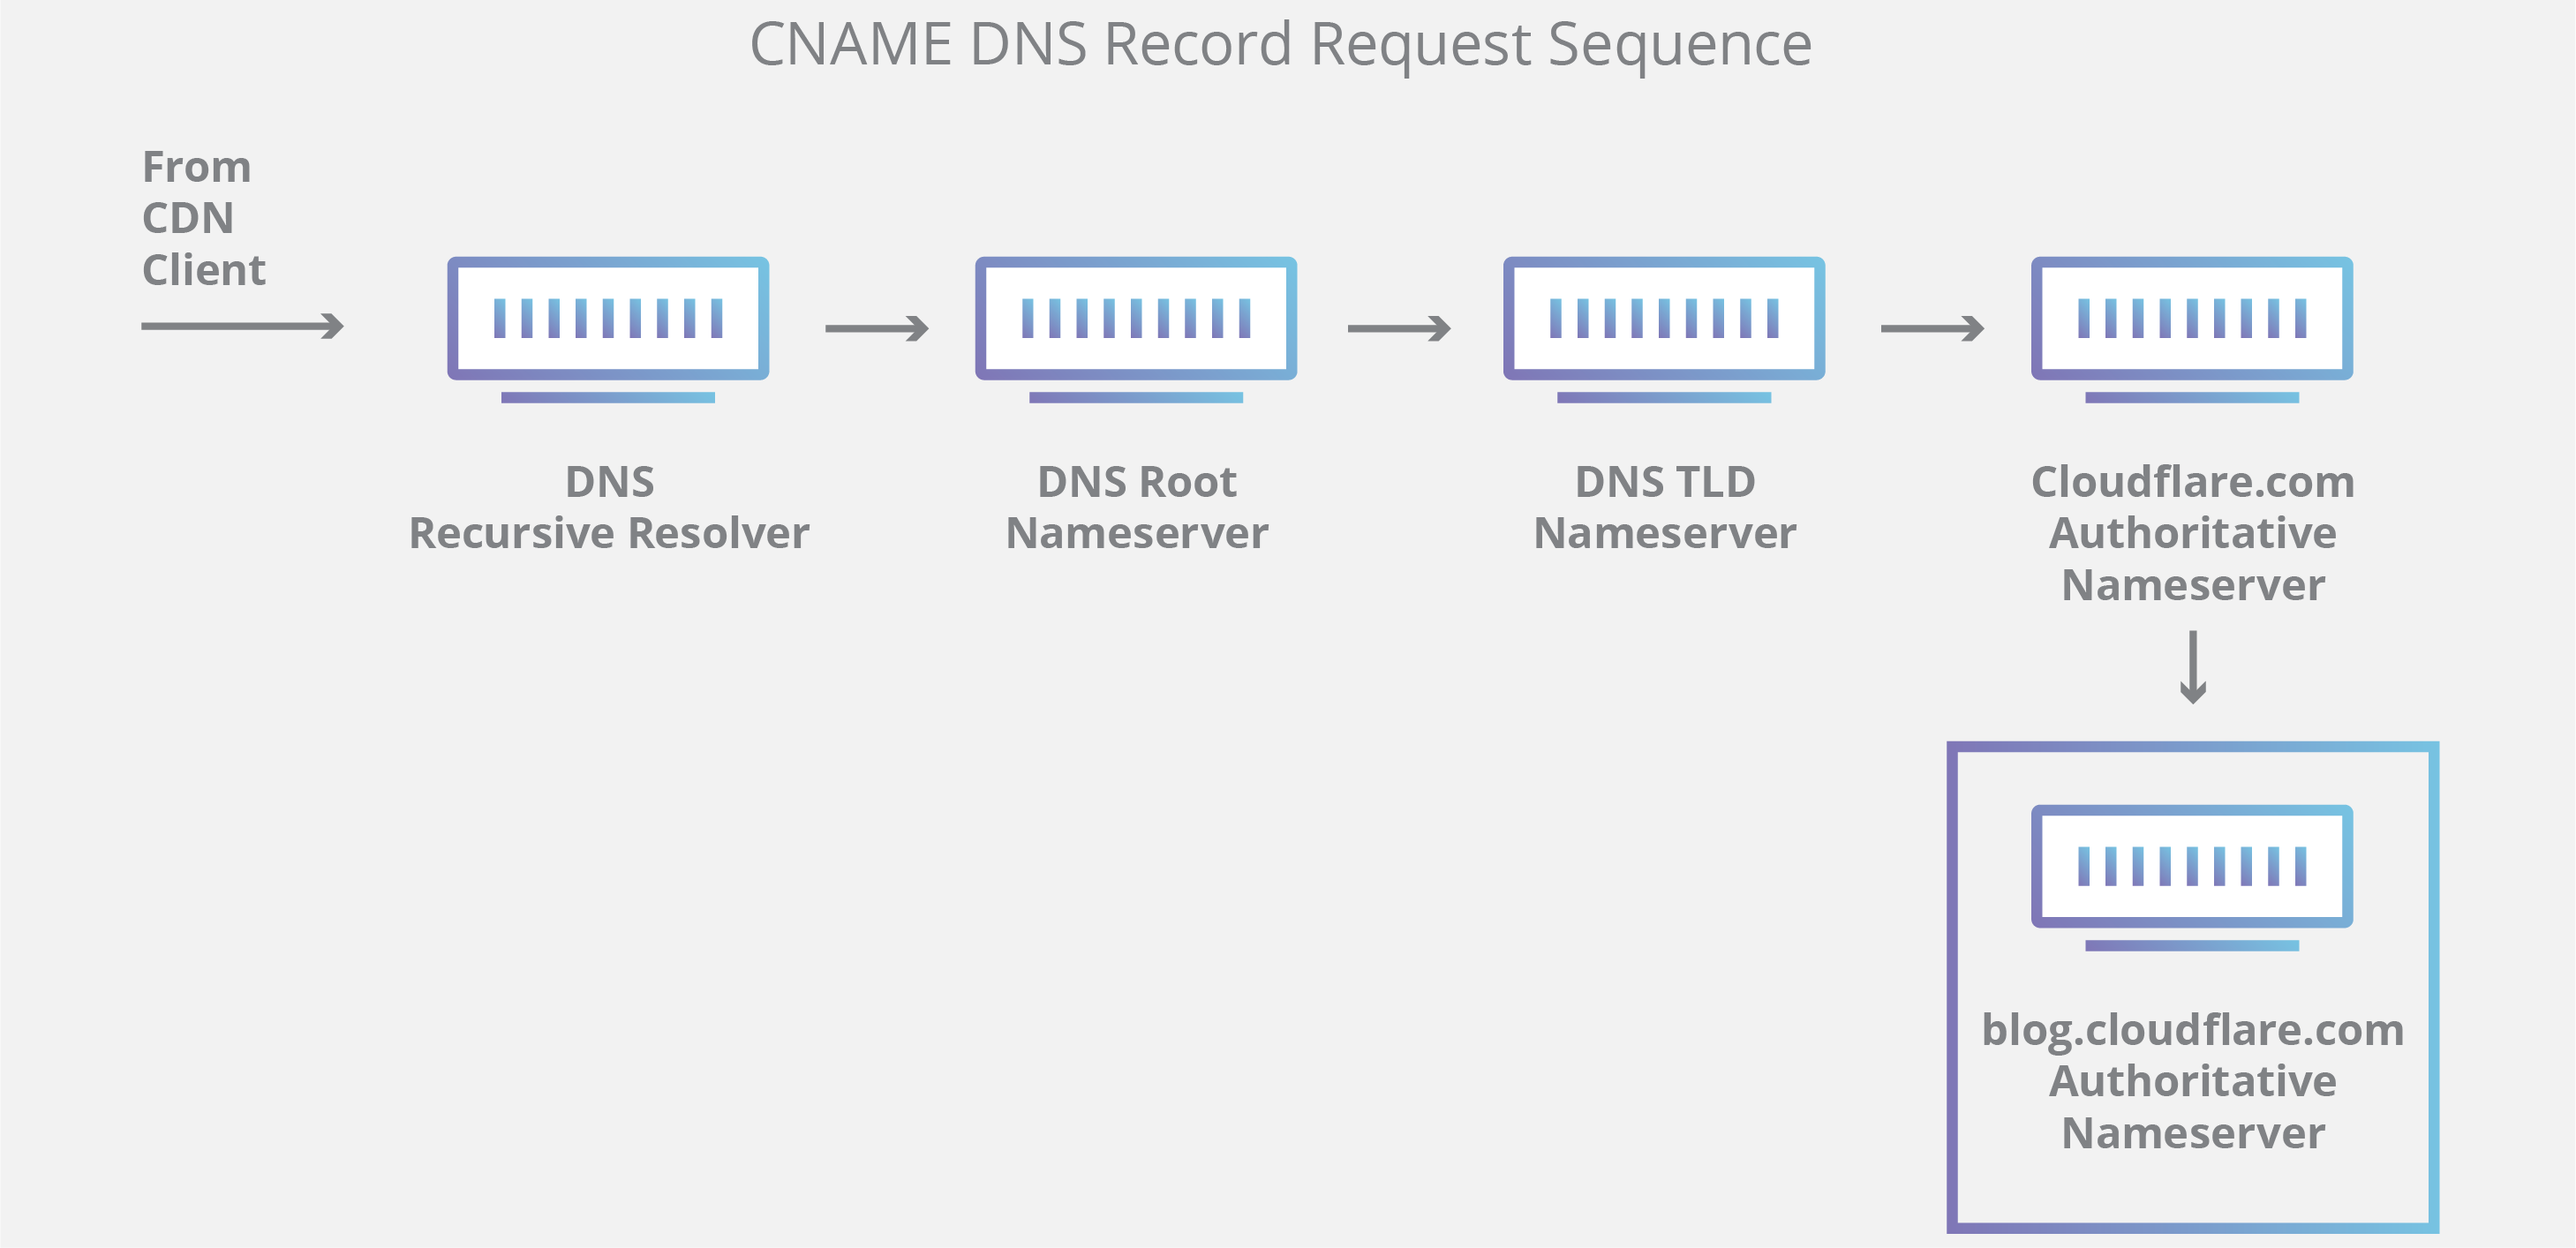
It’s worth mentioning that in instances where the query is for a subdomain such as foo.example.com or blog.cloudflare.com, an additional nameserver will be added to the sequence after the authoritative nameserver, which is responsible for storing the subdomain’s CNAME record.
There is a key difference between many DNS services and the one that Cloudflare provides. Different DNS recursive resolvers such as Google DNS, OpenDNS, and providers like Comcast all maintain data center installations of DNS recursive resolvers. These resolvers allow for quick and easy queries through optimized clusters of DNS-optimized computer systems, but they are fundamentally different than the nameservers hosted by Cloudflare.
Cloudflare maintains infrastructure-level nameservers that are integral to the functioning of the Internet. One key example is the f-root server network which Cloudflare is partially responsible for hosting. The F-root is one of the root level DNS nameserver infrastructure components responsible for the billions of Internet requests per day. Our Anycast network puts us in a unique position to handle large volumes of DNS traffic without service interruption.
What are the steps in a DNS lookup?
For most situations, DNS is concerned with a domain name being translated into the appropriate IP address. To learn how this process works, it helps to follow the path of a DNS lookup as it travels from a web browser, through the DNS lookup process, and back again. Let’s take a look at the steps.
Note: Often DNS lookup information will be cached either locally inside the querying computer or remotely in the DNS infrastructure. There are typically 8 steps in a DNS lookup. When DNS information is cached, steps are skipped from the DNS lookup process which makes it quicker. The example below outlines all 8 steps when nothing is cached.
The 8 steps in a DNS lookup:
A user types ‘example.com’ into a web browser and the query travels into the Internet and is received by a DNS recursive resolver.
The resolver then queries a DNS root nameserver (.).
The root server then responds to the resolver with the address of a Top Level Domain (TLD) DNS server (such as .com or .net), which stores the information for its domains. When searching for example.com, our request is pointed toward the .com TLD.
The resolver then makes a request to the .com TLD.
The TLD server then responds with the IP address of the domain’s nameserver, example.com.
Lastly, the recursive resolver sends a query to the domain’s nameserver.
The IP address for example.com is then returned to the resolver from the nameserver.
The DNS resolver then responds to the web browser with the IP address of the domain requested initially.
The browser makes a HTTP request to the IP address.
The server at that IP returns the webpage to be rendered in the browser (step 10).
What is a DNS resolver?
The DNS resolver is the first stop in the DNS lookup, and it is responsible for dealing with the client that made the initial request. The resolver starts the sequence of queries that ultimately leads to a URL being translated into the necessary IP address.
Note: A typical uncached DNS lookup will involve both recursive and iterative queries.
It’s important to differentiate between a recursive DNS query and a recursive DNS resolver. The query refers to the request made to a DNS resolver requiring the resolution of the query. A DNS recursive resolver is the computer that accepts a recursive query and processes the response by making the necessary requests.
What are the types of DNS Queries?
In a typical DNS lookup three types of queries occur. By using a combination of these queries, an optimized process for DNS resolution can result in a reduction of distance traveled. In an ideal situation cached record data will be available, allowing a DNS name server to return a non-recursive query.
3 types of DNS queries:
Recursive query – In a recursive query, a DNS client requires that a DNS server (typically a DNS recursive resolver) will respond to the client with either the requested resource record or an error message if the resolver can’t find the record.
Iterative query – in this situation the DNS client will allow a DNS server to return the best answer it can. If the queried DNS server does not have a match for the query name, it will return a referral to a DNS server authoritative for a lower level of the domain namespace. The DNS client will then make a query to the referral address. This process continues with additional DNS servers down the query chain until either an error or timeout occurs.
Non-recursive query – typically this will occur when a DNS resolver client queries a DNS server for a record that it has access to either because it’s authoritative for the record or the record exists inside of its cache. Typically, a DNS server will cache DNS records to prevent additional bandwidth consumption and load on upstream servers.
What is DNS caching? Where does DNS caching occur?
The purpose of caching is to temporarily stored data in a location that results in improvements in performance and reliability for data requests. DNS caching involves storing data closer to the requesting client so that the DNS query can be resolved earlier and additional queries further down the DNS lookup chain can be avoided, thereby improving load times and reducing bandwidth/CPU consumption. DNS data can be cached in a variety of locations, each of which will store DNS records for a set amount of time determined by a time-to-live (TTL).
Browser DNS caching
Modern web browsers are designed by default to cache DNS records for a set amount of time. the purpose here is obvious; the closer the DNS caching occurs to the web browser, the fewer processing steps must be taken in order to check the cache and make the correct requests to an IP address. When a request is made for a DNS record, the browser cache is the first location checked for the requested record.
In chrome, you can see the status of your DNS cache by going to chrome://net-internals/#dns.
Operating system (OS) level DNS caching
The operating system level DNS resolver is the second and last local stop before a DNS query leaves your machine. The process inside your operating system that is designed to handle this query is commonly called a “stub resolver” or DNS client. When a stub resolver gets a request from an application, it first checks its own cache to see if it has the record. If it does not, it then sends a DNS query (with a recursive flag set), outside the local network to a DNS recursive resolver inside the Internet service provider (ISP).
When the recursive resolver inside the ISP receives a DNS query, like all previous steps, it will also check to see if the requested host-to-IP-address translation is already stored inside its local persistence layer.
The recursive resolver also has additional functionality depending on the types of records it has in its cache:
If the resolver does not have the A records, but does have the NS records for the authoritative nameservers, it will query those name servers directly, bypassing several steps in the DNS query. This shortcut prevents lookups from the root and .com nameservers (in our search for example.com) and helps the resolution of the DNS query occur more quickly.
If the resolver does not have the NS records, it will send a query to the TLD servers (.com in our case), skipping the root server.
In the unlikely event that the resolver does not have records pointing to the TLD servers, it will then query the root servers. This event typically occurs after a DNS cache has been purged.
When you’re searching for a domain name, there are all kinds of terms that you’ll come across. All of this can be a little overwhelming when you’re just getting started, one of those is the concepts of domains vs subdomains.
All you want to do is build a website as quickly as possible. But, by taking the time to learn a little bit about the technical elements of your website, you’ll make it much easier to manage, build, and troubleshoot your website.
For most people, the quest to get a website online will begin with choosing a domain name.
Below you’ll learn the differences between a subdomain vs. a domain so that you can make the right decision for your next online project. Although they both serve different purposes on the web, domains and subdomains are related, as you’ll soon learn below.
What is a Domain?
To have a website that lives on the internet, you’re going to need a domain name. Without a domain name, there’s no way for visitors to access your website!
Before domain names were invented, you needed to type in the IP address for a given website to access it. Today, domain names act as a placeholder for the complex string of numbers known as an IP address. So, instead of typing in a series of numbers like 123.45.67.891 you type in domainadmintools.com into your browser.
This makes things much easier and makes the consumer internet much more user-friendly.
When you’re trying to find the perfect domain name, you’ll not only have to come up with the perfect domain name, but you’ll need to choose a domain extension as well.
This is the “.com,” “.net,” “.org” portion of a domain name. The domain name extension you choose will influence how your visitors perceive your domain, so choose wisely.
When Do You Use a Domain?
Luckily, this question is easy to answer.
If you want to have a website that’s accessible via the internet, then you’re going to need a domain name. The most challenging part about the process is choosing a domain name you like and finding the right domain name extension, or top-level domain (TLD).
In some cases, you can get away with using a subdomain to build a website. For example, when you create a free website using WordPress.com, Tumblr, or Blogger, you’ll be doing so with a subdomain.
This might work if you’re playing around and experimenting with a new platform. But, if you’re serious about your website, or building an online business, then you’ll want your own domain.
Overall, a domain is an inexpensive investment that claims your piece of virtual real estate on the internet.
What is a Subdomain?
A subdomain is an add-on to your primary domain name. For example, when you’re using the site Craigslist, you’re always using a subdomain like reno.craigslist.org, or sfbay.craigslist.org. You’ll automatically be forwarded to the subdomain that corresponds to your physical location.
Essentially, a subdomain is a separate part of your website that operates under the same primary domain name. For example, your primary domain name could be “bestwebdesigner.com,” while you could add a subdomain to that domain called “blog.bestwebdesigner.com.”
However, to create a subdomain, you must first have a primary domain name. Without a primary domain name, there’s no way to add a subdomain onto it.
Subdomains give you the freedom of creating an entirely new website, while still using the same domain name. Plus, you can usually create an unlimited number of subdomains for every domain you own.
As you’ll soon learn below, there are a few scenarios when using a subdomain makes sense.
When to Use a Subdomain
There are a ton of different reasons to use a subdomain. However, here are the most common situations where utilizing a subdomain makes sense:
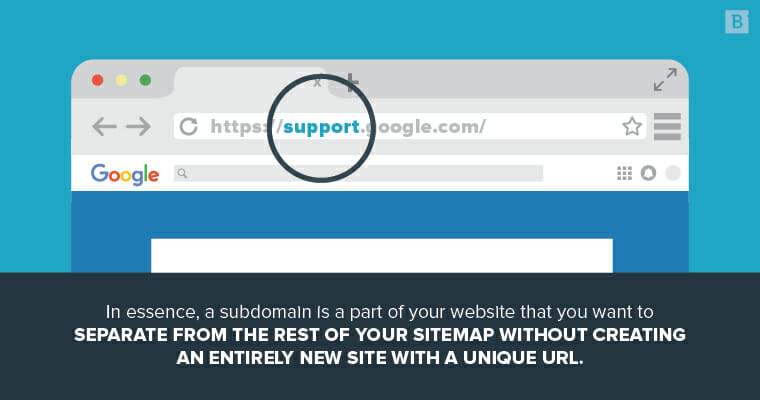
1. Creating a Site Resource or Support Page
If your website requires an extensive support, documentation, or a tutorial section, then you might find a subdomain useful.
When you’re trying to create and structure a ton of different content, you’ll need to think about how you can organize this content, so it’s easy to access and digest.
For example, you’ll find a separate support section at Google that’s using a subdomain.
Other types of websites might create a separate tutorials section, a knowledge base, or any other aspect of your site that requires extensive content management outside of a traditional blog.
2. Hosting a Company Blog
Some website owners may want to isolate their company blog from the rest of their site. Usually, this is done when the main website isn’t equipped with the right features or software to effectively manage a blog.
For example, maybe your main website is built around trying to get people to download an app. But, you want to create a company blog for content marketing purposes. The only issue is you don’t want to redesign your website with a new framework.
In this case, using a subdomain makes sense. Just create the subdomain of “blog.myappsite.com,” and you can install a CMS like WordPress on your new subdomain. Then, your only goal should be to try and mirror your existing design as close as possible.
This is a common approach that a lot of startups take. The blog isn’t the main focus of their company, so they operate it like a separate entity.
For another example, we can check out the Grammarly app. The main site is located on the primary domain, but the web app uses a subdomain. Here’s what the homepage looks like when you visit the site:
And here’s the backend when you’re logged into the grammar editor. Notice the change in domain up at the top:
3. Creating an eCommerce Store
eCommerce stores require more strict security guidelines and protocols in place to protect sensitive financial information. This might require that you install specific software, or even upgrade your SSL certificate.
You might not require this across the rest of your site, so you can host your eCommerce store on a subdomain instead, like “store.mydomain.com” or “shop.mydomain.com.”
By hosting your eCommerce store on a subdomain you also give yourself the opportunity to design a high converting storefront. By being able to pick an eCommerce specific theme you’ll have an online store that’s built from the ground up to help you sell more products. Instead of having to hack together a presentable design from your existing site.
4. Redesigning Your Site
When you’re going through a website redesign, it can be helpful to be able to see a live version of it. To do this, you can create a subdomain that allows you to build a new website entirely from scratch.
This way, you’ll be able to insert links, images, videos, and more and see how your website works completely in real-time.
You can even send traffic to your subdomain to see how users interact with your new site as well. Gaining real-time user feedback can be invaluable and help you avoid launching a new site that doesn’t align with their needs and expectations.
When you’re ready to make your new site live, just transfer over your redesigned site to your primary domain.
You can even password protect the subdomain you’re using to redesign your site, so your visitors won’t be able to view your unfinished site accidentally.
5. Testing New Products/Features
Do you have a new market you want to expand into, a new product you want to test, or a new idea you have for your site, but want to check it first?
Whatever your reason, a subdomain allows you to do all of these things and more.
When you create a subdomain, you’re giving yourself a clean slate. You essentially have a brand new website to work with, without the hassle of setting up a new domain.
Now, you can create a mini-site to test your new idea. Then, if it works, you can add this section to your existing site. A subdomain can give you creative freedom without having to sacrifice the existing user experience.
Subdomain vs. Subfolder
Another common distinction you’ll need to make when it comes to subdomains is the difference between a subdomain and a subfolder.
By now, you already know what a subdomain is, but a subfolder is a bit different. With a subfolder, you’re adding a folder to your existing domain.
So, instead of creating a new subdomain for your blog like “blog.mysite.com,” you’ll use a subfolder instead “mysite.com/blog.”
For example, here at DomainAdminTools you can access the blog by navigating to “https://domainadmintools.com/blog” , not “blog.domainadmintools.com”.
When you’re thinking about using a subdomain, you should really view it as creating a separate website. Although subdomains branch off of an existing domain name, they do take more work to build, grow, and maintain.
A subfolder is a way to organize your site more easily. Think of it as creating categories for your blog and blog posts. If you have a sports website, you could create subfolders for each sport you cover. So, you’d end up with a URL structure something like the following: “sports.com/basketball,” “sports.com/football,” “sports.com/hockey,” and on and on. Each page could operate as its own separate sports-specific blog with each page filled with unique content about that sport.
Domains, Subdomains, and URL Structure
Now that you have a better understanding of what domains vs. subdomains are let’s examine how they work together.
Your URL structure should be something you take into account whenever you’re building out your website. With the wrong URL structure, you’ll make it much more difficult for your site to rank in the search engines, plus you’ll make it harder for your visitors to navigate as well.
For example, let’s say you want to start a new blog. You’ll have three different options regarding your domain name.
Create an entirely new website: mynewblog.com
Use a subdomain: blog.mywebsite.com
Use a subfolder: mywebsite.com/blog
By using the first option, you’re going to have to register a new domain name and build an entirely new website from scratch. If you’re creating a blog that’s part of your existing website, then it probably doesn’t make sense to utilize an entirely new domain.
So, we have options two and three left. We’re either going to host our blog on a subdomain or use a subfolder.
By choosing a subdomain, we’ll have more freedom to design the layout of the blog, select a new CMS, and more. We’ll be using the trust of the main domain to create a separate site.
The final option is using a subfolder. A folder helps to organize your site better and make it easier to navigate. In terms of SEO (search engine optimization), this will help to pass more trust from your primary domain.
Overall, the strategy you choose will depend on your goals and the reason you’re thinking about creating a subdomain in the first place.
In Closing: How Domains and Subdomains Work Together
As you can see the domain name ecosystem has a ton of different moving pieces. Taking the time to understand how it all fits together does take more time, but it’ll give you a leg up on the rest of your competition.
Hopefully, by now, you have a better understanding of how domain names and subdomains work, as well as the situations when you’ll use a domain or subdomain.
To put things simply, you’ll need a domain name whenever you want to create a website that’s accessible via the internet. Subdomains are an extension of your primary domain name and are used for site organization or redesign purposes, or even to host your blog or eCommerce store.
If I registered a domain name through one registrar, am I allowed to switch to a different registrar?Yes, it is your right to transfer your domain name registrations between registrars. Click here for more information on Transferring Your Domain Name.
How do I transfer my domain name to a new registrar?If you wish to move your domain name from one ICANN-accredited registrar to another, you may initiate the transfer process by contacting the registrar to which you wish to transfer the name. Note that there are certain situations that can prevent a domain name from being transferred, such as if it is subject to a 60-day Change of Registrant lock. See FAQ #5 for more information. Absent any valid reasons a transfer request cannot be processed, the registrar will confirm your intent to transfer your domain name using the Initial Authorization for Registrar Transfer form. If you do not respond or return the form to the registrar, your transfer request will not be processed. Please note that as of 25 May 2018, if the gaining registrar cannot access registration data for a name subject to a transfer, then the gaining registrar is not required to obtain the Form of Authorization from the Transfer Contact.Your current registrar must also verify your intent to transfer using the Confirmation of Registrar Transfer Request form. Click here for more information on Transferring Your Domain Name.
Why can’t I transfer a domain name I just registered to another registrar?There are certain situations that can prevent a domain name from being transferred to a different registrar, such as a new registration. Your registrar may deny a transfer request if the domain name is within 60 days of initial registration. Another situation is if the domain name is subject to a 60-day Change of Registrant lock. You cannot transfer a domain name to a different registrar within 60 days of making changes to the registrant name, organization or email address (or the Administrative Contact email address, if there is no registrant email address). At their discretion, some registrars may provide an option for you to opt-out of this 60-day lock period. However, this rule is in place for your protection against unauthorized transfers and the registrar does not have to offer this option. If your ultimate goal is to transfer the domain name, you may want to consider completing the transfer process before changing your contact information.Registrars also have the option of denying a transfer request within 60 days from when you last transferred the domain name to a different registrar. You may have the option to change web-hosting providers instead of registrars to avoid the inter-registrar transfer process (and lock) altogether. You may also update your domain name’s nameservers or change the hosting IP address assigned to your domain name. Check with your registrar and/or hosting provider to see what options you have.Learn More: Registrant Blog Series – Do you have a domain name? Here’s what you need to know. Part II: Transferring Your Domain Name
I want to move my domain name to someone else.It is your right to transfer your domain name registration between registrars. If you wish to move your domain name from one ICANN-accredited registrar to another, you may initiate the transfer process by contacting the registrar to which you wish to transfer the name.To transfer your domain name to another registrant, you can initiate a change of registrant by contacting your current registrar. Your registrar will then ask for your confirmation via a secure mechanism (which typically will take the form of an email to the registered name holder). You must provide your confirmation within the number of days set by your registrar (not to exceed 60 days) or your transfer will not proceed. Once your registrar receives confirmation from you, they will process the transfer and notify you and the new registrant once the transfer is completed.Learn More: Registrant Blog Series – Do you have a domain name? Here’s what you need to know. Part III: Having Issues Transferring Your Domain Name?
Someone has contacted me to purchase my domain name, what do I do?It is up to you to decide if you would like to respond to an offer for the purchase of your domain name. You can transfer your domain name to someone else if you would like. See FAQ#4 above for more information on transferring your domain name to a different Registrant.
The registrar is asking me for a code. Where do I get this? / I don’t know what you mean by authorization/EPP/transfer code and I can’t find it. How do I get this code?An Auth-Code (also called an Authorization Code, AuthInfo Code, Auth-Info Code, or transfer code) is a code created by a registrar to help identify the domain name holder and prevent unauthorized transfers (also known as a registrant or registered name holder). An Auth-Code is required for a domain holder to transfer a domain name from one registrar to another.Your registrar may allow you, via an online interface tool, to generate and manage your own AuthInfo code. If not, you will need to contact your registrar directly to obtain it. Your registrar must provide you with the AuthInfo code within five (5) calendar days of your request.Learn More About EPP Status Codes
What if I don’t know who my registrar is?If you don’t know who your current registrar is, you can look it up by performing a search for your domain name at:< https://lookup.icann.org/>. The “Registrar” field shows you who your registrar is.
Why is my registrar refusing to transfer my domain name?Your registrar may deny a transfer request in the following limited circumstances:
Evidence of fraud
Reasonable dispute over the identity of the person authorizing the transfer
Domain name is on hold due to payment owed for a previous registration period (including credit card charge-backs)
Express written objection from the domain name holder
Domain name is in “Lock” status (Registrars must provide a readily accessible and reasonable means for name holders to remove the lock status. Contact your registrar for assistance.)
Domain name is within 60 days of initial registration
Domain name is within 60 days of a previous transferYour registrar is required to specify a reason when denying your transfer request unless they are required. Contact either the current registrar or the registrar you wish to transfer to for information on the denial.Your registrar must deny a transfer request in the following limited circumstances:
Domain name is the subject of a UDRP proceeding
Domain name is subject to a court order by a court of competent jurisdiction
Domain name is the subject of a TDRP proceeding
Domain name is the subject of a URS proceeding or URS suspension
Domain name is subject to 60-Day Change of Registrant lock
My registrar is charging me a fee to transfer to a new registrar. Is this allowed?Yes. Registrars are allowed to set their own prices for this service so some may choose to charge a fee. However, a transfer cannot be denied due to non-payment of this transfer fee. There are other reasons your registrar can deny transfer request. See FAQ number 5 above for more information.
My transfer request was denied for a reason not listed above, or I do not agree with the reason my registrar provided. What can I do?If you think your request to transfer your domain name was inappropriately denied or you do not agree with the reason (if any) provided by your current registrar for denying your request, you should then submit a formal Transfer Complaint with ICANN.
My domain name has just expired. Can my registrar require me to pay for a renewal before I can transfer the domain name to a new registrar?No. You have the right to transfer an expired domain. Registrars are not allowed to deny a transfer due to expiration or nonrenewal, (unless you haven’t paid for a previous registration period).However, if the current registrar has begun to delete your domain (i.e., the EPP status code (https://www.icann.org/resources/pages/epp-status-codes-2014-06-16-en) shows the domain in Redemption Grace Period (see also https://www.icann.org/resources/pages/gtld-lifecycle-2012-02-25-en), the name must be restored by your current registrar before it can be transferred. This may result in an additional fee, sometimes referred to as a redemption fee.
My registrar is listed as the Administrative Contact for my domain name and this is preventing my transfer request from being processed. What can I do?If you are listed as the Registrant for the domain name, you may ask your new registrar of choice to send the required Form of Authorization to you rather than the listed Administrative Contact.You may also update the data associated with the domain name and name a different Administrative Contact. Some registrars offer an online interface tool for you to manage this data yourself; others can make these updates if you contact their customer service.Please note, if you decide to update the Administrative Contact email, a 60-day lock will be placed on your domain, if there is not currently a Registered Name Holder email address. You should read the registrar’s terms and conditions carefully before performing any updates or contact your registrar directly for more information.
Where can I go if I have a question that is not answered above?If you have questions about the ICANN Transfer Policy, please contact us by sending an email to [email protected].


Recent Comments