Should you use Strict or Relaxed alignment for your DMARC settings?
The DMARC standard enables a domain owner to allow relaxed alignment or to require strict alignment, do note however that there is no noticeable increase in protection by using Strict mode.
We do not recommend using Strict mode (unless you have a specific reason) since there is no improvement in protection but it does make configuration and management of authentication more difficult.
Relaxed alignment is achieved if the organizational domain is the same between the user-visible From address and either the Return Path (SPF) or authenticated with the DKIM signature.
Strict alignment on the other hand requires an EXACT match between the Fully Qualified Domain Name (FQDN) of the user-visible From address and either the Return Path (SPF) or authenticated signing domain (DKIM).
If strict alignment is required and the email does not pass strict alignment, the email is considered to have failed DMARC authentication for that method (SPF or DKIM).
Strict vs Relaxed alignment is specified in the DMARC record using the following tags:
aspf (SPF)
adkim (DKIM)
The default setting, if it is not specified in the DMARC record, is relaxed alignment. For example, the following DMARC records are equivalent:
If the user-visible From address is [email protected] and the authenticated signing domain is mydomain.com,
The email is not strictly aligned with DKIM
What is the return-path email header?
Return-path is a hidden email header that indicates where and how bounced emails will be processed. This header, also referred to as a bounce address or reverse path, is an SMTP address that is separate from your original sending address, and is used specifically for collecting and processing bounced messages.
Having a clear return-path system in place is incredibly important for your email program. It acts as a safeguard, protecting senders by providing a separate location for processing bounced emails. Your original sending inbox isn’t crowded by those “failed delivery” emails and that bounced messages are kept organized and together. Having a clear, organized return-path for bounced messages can also help your email deliverability and maintain your sending reputation.
To test whether your emails are compliant, try the Email investigation tool over at EasyDMARC.
Why is return-path important?
Return-path is an important tool to have at your disposal, especially for mass email sends. Let’s say you’re sending an email blast about an offer your company is promoting to your entire email list. While we don’t want to see bounced emails, the reality is that messages can and do bounce for a variety of reasons.
When you’re sending to large groups, you can get tens, maybe even hundreds of bounced messages depending on the size and nature of your campaign. These “failed delivery” messages then come back to haunt and crowd your original sending inbox. Instead, by having an established return-path, those messages are processed and stored separately in their own specified inbox.
Return-path also helps with your deliverability and sending reputation by helping to validate your identity as a sender (i.e. whether or not you’re sending spam). Because return-path is an SMTP address, it can be used by servers and inbox providers to decide how or if they want to filter your messages. Having a properly set-up return-path can help provide credibility for your messages and subsequently, you, the sender, which in turn boosts your sending reputation.
This can be a particular issue when using domain aliases (send mail as) with Google Workspace (gmail), as gmail will use the primary domain in the return-path and will thus fail authentication when using strict mode. To avoid this, use relaxed mode, which will fix spf alignment failed.
Below is an example where the primary domain is michaels.me.uk and the secondary (alias) domain is kopage.com, using send email as in the gmail settings.
The above report was generated using the email investigation tool at EasyDMARC.
How return-path works
Return-path specifies where bounced messages should go when they cannot be delivered. It is usually set up by your email or other relay platform provider but can often be customized.
Servers and inbox providers validate your identity and reputation before pushing your message through to recipients’ inboxes.
To get you through these filters, return-path and DMARC work together. DMARC examines your message to confirm that the domain provided in the “sent from” field matches the domain provided in the return-path field, which helps to validate your identity as a sender. After DMARC has verified and matched these domains, servers and inbox providers will be able to filter you out more easily.
Types of bounced emails
There are two types of bounced emails: hard bounces and soft bounces.
A hard bounce occurs when you have a permanent issue with a recipient, such as an invalid email address or typo in your mailing list.
Soft bounces are more temporary and usually occur when there’s a problem with a recipient’s inbox, including file size or attachment issues or the possibility of a recipient having a full inbox.
When a message hard bounces, the general best practice is to check that there are no typos in the recipient’s address. If there are none, you should remove the address from your mailing list. Keeping email addresses that hard bounce can damage your reputation as a sender and affect your deliverability in the long run.
When an email soft bounces, you have a little bit more wiggle room than with a hard bounce. Email addresses that soft bounce can be kept in your mailing list for future campaigns, but you’ll want to watch them to see if they bounce again. If they continue to bounce, they should be removed from your mailing list.
Phishing is a cybercrime in which a target or targets are contacted by email, telephone or text message by someone posing as a legitimate institution to lure individuals into providing sensitive and personal data such as banking, credit card details, and passwords, usually on fake websites.
The information is then used to access important accounts and can result in identity theft, fraud and financial loss.
The first phishing lawsuit was filed in 2004 against a Californian teenager who created the imitation of the website “America Online”. With this fake website, he was able to gain sensitive information from users and access their credit card details to withdraw money from their accounts. Other than email and website phishing, there’s also ‘vishing’ (voice phishing), ‘smishing’ (SMS Phishing) and several other phishing techniques cybercriminals are constantly coming up with.
Common Features of Phishing Emails
Too Good To Be True– Lucrative offers and eye-catching or attention-grabbing statements are designed to attract people’s attention immediately. For instance, many will claim that you have won an iPhone, a lottery, or some other lavish prize. Just don’t click on any suspicious emails. Remember that if it seems too good to be true, it usually is!
Sense of Urgency – A favorite tactic amongst cybercriminals is to ask you to act fast because the super deals are only for a limited time. Some of them will even tell you that you have only a few minutes to respond. When you come across these kinds of emails, it’s best to just ignore them. Sometimes, they will tell you that your account will be suspended unless you update your personal details immediately. Most reliable organizations give ample time before they terminate an account and they never ask patrons to update personal details over the Internet. When in doubt, visit the source directly rather than clicking a link in an email.
Hyperlinks – A link may not be all it appears to be. Hovering over a link shows you the actual URL where you will be directed upon clicking on it. It could be completely different or it could be a popular website with a misspelling, for instance, www.bankofarnerica.com – the ‘m’ is actually an ‘r’ and an ‘n’, so look carefully.
Attachments – If you see an attachment in an email you weren’t expecting or that doesn’t make sense, don’t open it! They often contain payloads like ransomware or other viruses. The only file type that is always safe to click on is a .txt file.
Unusual Sender– Whether it looks like it’s from someone you don’t know or someone you do know, if anything seems out of the ordinary, unexpected, out of character or just suspicious in general don’t click on it!
Here is a great KnowBe4 resource that outlines 22 social engineering red flags commonly seen in phishing emails. We recommend printing out this PDF to pass along to family, friends, and coworkers.
Social Engineering Red Flags
Prevent Phishing Attacks:
Though hackers are constantly coming up with new techniques, there are some things that you can do to protect yourself and your organization:
To protect against spam mails, spam filters can be used. Generally, the filters assess the origin of the message, the software used to send the message, and the appearance of the message to determine if it’s spam. Occasionally, spam filters may even block emails from legitimate sources, so it isn’t always 100% accurate.
The browser settings should be changed to prevent fraudulent websites from opening. Browsers keep a list of fake websites and when you try to access the website, the address is blocked or an alert message is shown. The settings of the browser should only allow reliable websites to open up.
Many websites require users to enter login information while the user image is displayed. This type of system may be open to security attacks. One way to ensure security is to change passwords on a regular basis, and never use the same password for multiple accounts. It’s also a good idea for websites to use a CAPTCHA system for added security.
Banks and financial organizations use monitoring systems to prevent phishing. Individuals can report phishing to industry groups where legal actions can be taken against these fraudulent websites. Organizations should provide security awareness training to employees to recognize the risks.
Changes in browsing habits are required to prevent phishing. If verification is required, always contact the company personally before entering any details online.
If there is a link in an email, hover over the URL first. Secure websites with a valid Secure Socket Layer (SSL) certificate begin with “https”. Eventually all sites will be required to have a valid SSL.
Generally, emails sent by cybercriminals are masked so they appear to be sent by a business whose services are used by the recipient. A bank will not ask for personal information via email or suspend your account if you do not update your personal details within a certain period of time. Most banks and financial institutions also usually provide an account number or other personal details within the email, which ensures it’s coming from a reliable source.
Need Help?
If you need help in protecting yourself from phishing ransomware or other cybercrime, get in touch.
DKIM stands for DomainKeys Identified Mail and is used for the authentication of an email that’s being sent. Like SPF, DKIM is an open standard for email authentication that is used for DMARC alignment. A DKIM record exists in the DNS, but it is a bit more complicated than SPF. DKIM’s advantage is that it can survive forwarding, which makes it superior to SPF and a foundation for securing your email.
Starting in 2004 from merging two similar efforts, “enhanced DomainKeys” from Yahoo and “Identified Internet Mail” from Cisco and has since been widely adopted for email authentication.
What is a DKIM Record?
A domain owner adds a DKIM record, which is a modified TXT record, to the DNS records on the sending domain. This TXT record will contain a public key that’s used by receiving mail servers to verify a message’s signature. The key is often provided to you by the organization that is sending your email, for example SendGrid, Postmark, or Google Apps.
What is a DKIM Signature?
DKIM gives emails a signature header that is added to the email and secured with encryption. Each DKIM signature contains all the information needed for an email server to verify that the signature is real, and it is encrypted by a pair of DKIM keys. The originating email server has what is called the “private DKIM key,” which can be verified by the receiving mail server or ISP with the other half of the keypair, called the “public DKIM key.”
These signatures travel with the emails and are verified along the way by the email servers that move the emails toward their final destination.
How does DKIM work?
When an inbound mail server receives a message, it will detect the DKIM signature and look up the sender’s public DKIM key in DNS. The variable or DKIM selector provided in the DKIM signature is used to determine where to look for this key. If the key is found, it can be used to decrypt the DKIM signature. This is then compared to the values retrieved from the received mail. If they match, the DKIM is valid.
Read about DKIM Selectors and how to discover which ones your domain may be currently using.
Why use DKIM for Email?
Implementing DKIM for email provides major benefits:
Protection of message integrity. The content of the email can be verified that it hasn’t been changed while being sent.
Increases domain reputation and email deliverability.
One of the foundational methods of email authentication for DMARC.
How do I know if DKIM is working?
Test your domain’s DKIM settings – Our DKIM Inspector is a free diagnostic tool that check if the public part of your DKIM signature—using the selector—has been implemented correctly in the DNS of your domain. Our free DKIM Validator can help you verify that your DKIM record is properly formatted.
What happens when DKIM fails?
When DKIM alignment fails—or when the d= value in the Header From does not match the d= value in the DKIM signature—it can negatively impact deliverability as mailbox providers may send the message to the spam folder or block it entirely.
It is important to examine all messages that have failed to identify the sources as valid or as malicious. If you recognize a source as legitimate, you can investigate and set up DKIM correctly. If a source is not recognized, make sure to research it because this could indicate an attempt to send malicious emails on behalf of your domain.
Why DKIM-Only Isn’t Safe Enough
DKIM on its own isn’t a reliable way of authenticating the identity of the email sender and does nothing to prevent the spoofing of the domain visible in the header of the email. DMARC solves the problem by guaranteeing that the domain the end user sees is the same as the domain that is validated by DKIM and SPF. Learn more about DMARC alignment.
Furthermore, the addition of DMARC provides email received instructions on what to do with emails which do not match these checks via DMARC policy enforcement.
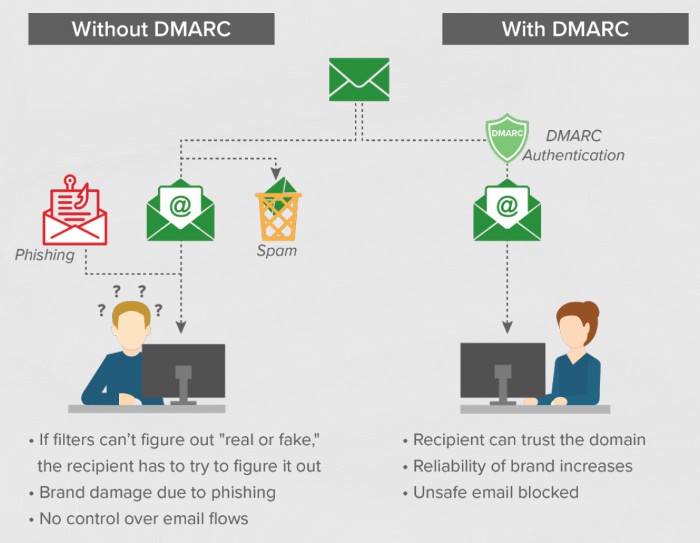
Domain-based Message Authentication Reporting and Conformance (DMARC) is a free and open technical specification that is used to authenticate an email by aligning SPF and DKIM mechanisms. By having DMARC in place, business owners large and small can fight the massive cybersecurity problems caused by phishing and reputation damage caused by spoofing.
With DMARC you can tell the world how to handle the unauthorized use of your email domains by instituting a policy in your DMARC record. The three DMARC policies are:
p=none
Monitors your email traffic. No further actions are taken.
p=quarantine
Sends unauthorized emails to the spam folder.
p=reject
The final policy and the ultimate goal of implementing DMARC. This policy ensures that unauthorized email doesn’t get delivered at all.
How does DMARC work?
DMARC is based upon the results of SPF and/or DKIM, so at least one of those has to be in place for the email domain. To deploy DMARC, you need to publish a DMARC record in the DNS.
A DMARC record is a text entry within the DNS record that tells the world your email domain’s policy after checking SPF and DKIM status. DMARC authenticates if either SPF, DKIM, or both pass. This is referred to as DMARC alignment or identifier alignment. Based on identifier alignment, it is possible that SPF and DKIM pass, but DMARC fails.
A DMARC record also tells email servers to send XML reports back to the reporting email address listed in the DMARC record. These reports provide insight on how your email is moving through the ecosystem and allow you to identify everything that is using your email domain.
Because reports are written in XML, making sense of them can be tricky, and they can be numerous. dmarcian’s platform can receive these reports and provide visualization on how your email domains are being used, so you can take action and move your DMARC policy towards p=reject.
What is a DMARC Record?
As a mission-driven company, dmarcian is focused on spreading the adoption of DMARC. Because of this, we interface with a wide range of people with varying degrees of knowledge. We thought we’d take a step back and take a look at something fundamental: What is a DMARC record?
A DMARC record is a text entry within the DNS record that tells the world your email domain’s policy when it comes to checking to see if your SPF and/or DKIM has passed or failed.
A DMARC record also tells the servers that touch your email on its way to its final destination to send XML reports back to the reporting email address listed in the DMARC record. These reports provide insight on how your email is moving through the ecosystem and allow you to identify everything that is using your email domain.
More information on publishing DMARC records can be found here.
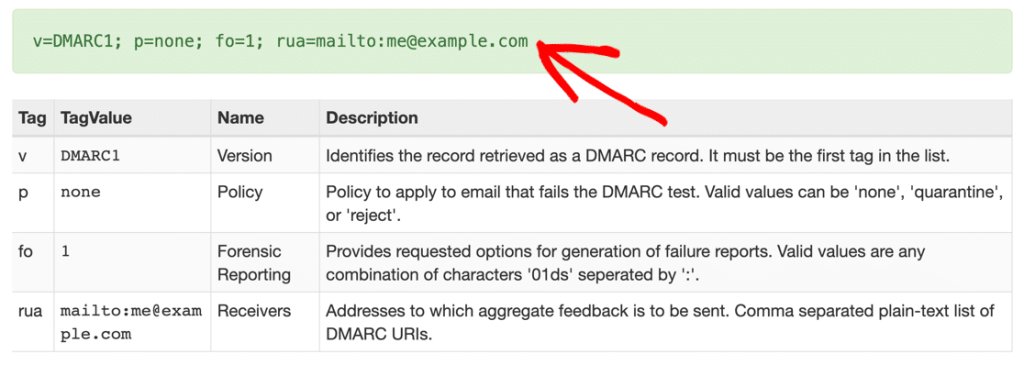
The DMARC Record; what does it look like?
“v=” indicates this is a DMARC record
“p=” indicates the DMARC policy
“rua=” indicates where data should be sent
RUA is reporting that provides an aggregate view of all of a domain’s traffic. The other option is RUF reports that are redacted forensic copies of the individual emails that are not 100% compliant with DMARC. While RUA reports show the traffic of the email, RUF reports contain snippets from the actual emails themselves. While RUA reporting is all that is needed for DMARC deployment, more advanced users may also add the RUF tag, which will send more sensitive information.
These reports are in Extensible Markup Language (XML), which isn’t easy to read:
There are tools that can translate these XML files into a human-friendly format. Services like Dmarcly, where the RUA reports can be pointed to, automatically process the reports and give you insight via a powerful dashboard to make identifying the valid uses of your email domain easier while disallowing abuse. A dmarcian account will store past reports so you can observe trends and be alerted when new threats arise.
Why Use DMARC for Email?
Email is involved in more than 90% of all network attacks and without DMARC, it can be hard to tell if an email is real or fake. DMARC allows domain owners to protect their domain(s) from unauthorized use by fighting phishing, spoofing, CEO fraud, and Business Email Compromise.
By always sending DMARC compliant email, the operator of an Internet domain can tell the world “everything I send is easy to identify using DMARC—feel free to drop fake email that pretends to be me.”
DMARC’s utility as an anti-spoofing technology stems from a significant innovation; instead of attempting to filter out malicious email, why not provide operators with a way to easily identify legitimate email? DMARC’s promise is to replace the fundamentally flawed “filter out bad” email security model with a “filter in good” model.
If you’re curious about the health of your domain or anyone’s, use this free Domain Checker for a quick check. It inspects DMARC, SPF and DKIM and tells you which actions you need to take to reach compliance.
Benefits of DMARC
If you use email, you’ll benefit by incorporating DMARC.
When strong security controls are deployed against fraudulent email, delivery is simplified, brand reliability increases and visibility is granted to domain owners on how their domains are being used around the Internet.
Security
Security Disallow unauthorized use of your email domain to protect people from spam, fraud, and phishing.
Visibility Gain visibility into who and what across the Internet is sending email using your email domain.
Delivery Use the same modern plumbing that mega companies use to deliver email.
Identity Make your email easy to identify across the huge and growing footprint of DMARC-capable receivers.
Need Help?
If you are interested in a fully managed email security, domain alignment, Dmarc service
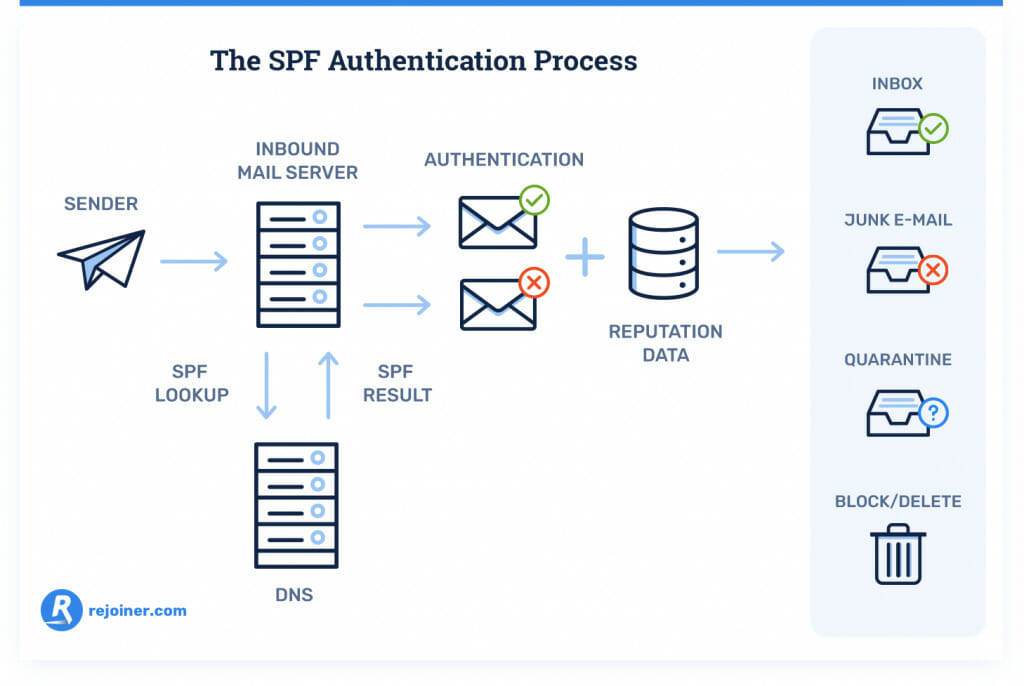
Sender Policy Framework (SPF) is used to authenticate the sender of an email. With an SPF record in place, Internet Service Providers can verify that a mail server is authorized to send email for a specific domain. An SPF record is a DNS TXT record containing a list of the IP addresses that are allowed to send email on behalf of your domain.
How does SPF work?
To take advantage of SPF, you publish an SPF record in the DNS. The record is a list of all the IP addresses that are allowed to send email on behalf of the domain.
The SPF mechanism uses the domain in the return-path address to identify the SPF record. When a sender tries to hand-off an email to an email “receiving” server for delivery, the server checks to see if the sender is on the domain’s list of allowed senders. If so, then a link has been established between the piece of email and the email domain. If not, then the server continues processing the email as usual without this link, as any number of things could be going on.
The email might be real, but the list of senders might not be accurate. Real email might have been forwarded which means the email could have come from anywhere and the list of allowed senders doesn’t help too much. Or, the email is fake and unwanted. Too many possible outcomes makes it difficult to attach meaning to the absence of the link that SPF can provide. DKIM fills the gap in the DMARC technical framework as an additional way to try and link a piece of email back to a domain.
What is SPF Format?
More information about how an SPF record is formatted, and how you can create one for your email domain, can be found here: How to Create and Add an SPF Record
Already have an SPF record? We have also developed a comprehensive guide to SPF record formatting to increase your understanding and help troubleshoot any SPF issues that our free SPF Surveyor may bring to your attention: SPF Record Syntax
SPF and DMARC for Email
By itself, SPF can associate a piece of email with a domain. With the DNS records in place, DMARC ties the results of SPF to the content of email, specifically to the domain found in the return path or From: header of an email. For SPF to work correctly in the context of DMARC, the return-path address has to be relevant to the domain of the From: header, which is the item that ties together DMARC alignment.
Why is SPF Important?
SPF has become exceedingly vital to help verify which sending infrastructure can relay email on behalf of your domain. Implementing SPF for email provides major benefits:
Increases domain reputation and email deliverability.
Fights domain impersonation and email spoofing to protect your brand reputation.
One of the foundational methods of email authentication for DMARC.
How do I check my SPF Record?
Check your domain’s SPF settings – dmarcian’s SPF Surveyor is an SPF diagnostic tool that presents a graphical view of SPF records. It allows you to quickly identify which servers are authorized to send on behalf of a domain.
Why SPF-Only Isn’t Safe Enough
Though SPF is a layer of proven email authentication that has been around since the late 1990s, it does have its challenges. Simply put, forwarding of email happens on the Internet and the SPF mechanism doesn’t survive the forwarding process. Forwarding typically happens when you send email to [email protected] and that person has set their email to be forwarded to another address, like [email protected]. In this example, your email appears to be coming out of infrastructure that appears to have nothing to do with you.
DKIM signing can survive forwarding. If your domain is covered with DKIM, dmarcian’s ability to detect forwarding increases. SPF does not work in the context of forwarding, as SPF is simply a list of servers that are authorized to send on behalf of your domain, and it isn’t possible for a domain owner to maintain a list of forwarders.
SPF Misconceptions
Companies often misunderstand how SPF works and instruct their customers to include the company’s own SPF record. However, this ends up doing nothing if the company uses its own domain in the bounce address. When an email receiver processes a piece of email, it will look at the company’s SPF record—not the SPF record of the customer.
Two unwanted things happen because of this misconception:
Unnecessary “includes” are added into their SPF records. This causes SPF records to bloat and introduces management challenges.
Confusion is introduced as people just want to get SPF into place to complete their DMARC deployment. The result is that SPF passes, but DMARC fails.
For SPF to work correctly in the context of DMARC, the bounce address has to be relevant to the domain of the From: header. Unfortunately, many companies that send email on behalf of others do not currently allow their customers to change the bounce address to the customer’s domain. This is slowly changing, but companies first have to understand the basics of how SPF works. We have resources available to help companies send DMARC compliant email on behalf of others.
Note: There is obsolete technology called SenderID that tried to perform SPF-like checks, except it used the From: header domain (among others) as the item to check. SenderID also attempted to reuse existing SPF records, causing even more confusion.
When it comes to website security, most people are quite oblivious to the vulnerabilities that exist and are exposed on their own site.
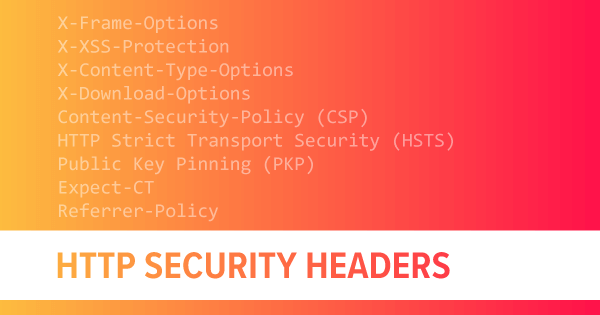
Securing your website is all about minimizing attack surface and adding more layers of security. One strong layer that you can (and should) add is proper HTTP security headers. When responding to requests, your web server should include a number of security headers that help stop unwanted activity like XSS, MITM, and click-jacking attacks. While sending security headers does not guarantee 100% defense against all such attacks, it does help modern browsers keep things secure. So in this tutorial, we walk through seven of the most important and effective HTTP security headers you should add to your website in order to your website to bolster the security.
Note that the solutions below only work on Apache and compatible servers that use .htaccess, such as Litespeed.
Here are 7 Important HTTP Security Headers for Your Website.
Note: You can verify your site’s security headers using a free online tool such as the one provided by SecurityHeaders.com.
X-XSS-Protection
The X-XSS-Protection security header enables the XSS filter provided by modern web browsers (IE8+, Chrome, Firefox, Safari, et al). Here is the recommended configuration for this header:
# X-XSS-Protection
<IfModule mod_headers.c>
	Header set X-XSS-Protection "1; mode=block"
</IfModule>
Added to your site’s .htaccess file or server configuration file, this code instructs supportive browsers to block any requests containing malicious scripts. For more configuration options and further information about X-XSS-Protection, check out these resources:
The X-Frame-Options (XFO) security header helps modern web browsers protect your visitors against clickjacking and other threats. Here is the recommended configuration for this header:
# X-Frame-Options
<IfModule mod_headers.c>
	Header set X-Frame-Options "SAMEORIGIN"
</IfModule>
Added to your site’s .htaccess file or server configuration file, this code instructs supportive browsers to block any frames/content requested from external locations. So if your own site includes an iframe that loads a resources from the same domain, the content will load normally. But if any iframe is included that loads resources from any other domain, the content will be blocked. For more configuration options and further information about X-Frame-Options, check out these resources:
The X-Content-Type-Options security header enables supportive browsers to protect against MIME-type sniffing exploits. It does this by disabling the browser’s MIME sniffing feature, and forcing it to recognize the MIME type sent by the server. This header is very flexible and may be configured extensively, however the most common implementation looks like this:
# X-Content-Type-Options
<IfModule mod_headers.c>
	Header set X-Content-Type-Options "nosniff"
</IfModule>
Added to your site’s .htaccess file or server configuration file, this code instructs supportive browsers to use the MIME type declared by the origin server. There are a couple of precautions to keep in mind. First, as with any security header, it does not stop 100% of all attacks or threats; it does stop some of them, however, and thus provides another layer of protection for your site. Also note that this header currently is supported only in Chrome and later versions of Internet Explorer. Hopefully other browsers will add support in the future. For more configuration options and further information about X-Content-Type-Options, check out these resources:
The Strict-Transport-Security (HSTS) header instructs modern browsers to always connect via HTTPS (secure connection via SSL/TLS), and never connect via insecure HTTP (non-SSL) protocol. While there are variations to how this header is configured, the most common implementation looks like this:
Added to your site’s .htaccess file or server configuration file, this code instructs supportive browsers to always use HTTPS for connections. This helps stop man-in-the-middle (MITM) and other attacks targeting insecure HTTP connections. For more configuration options and further information about Strict-Transport-Security, check out these resources:
The Referrer-Policy security header instructs modern browsers how to handle or exclude the Referer header (yes the header normally is spelled incorrectly, missing an “r”). For those who may not be familiar, the Referer header contains information about where a request is coming from. So for example if you are at example.com and click a link from there to domain.tld, the Referer header would specify example.com as the “referring” URL.
With that in mind, the Referrer-Policy enables you to control whether or not the Referer header is included with the request. Here is an example showing how to add the Referrer-Policy header via Apache:
# Referrer-Policy
<IfModule mod_headers.c>
	Header set Referrer-Policy "same-origin"
</IfModule>
Added to your site’s .htaccess file or server configuration file, this code instructs supportive browsers to only set the referrer header for request from the current domain (same-origin). Keep in mind that this header is less about security and more about controlling referrer information, as is required by various rules and regulations (e.g., GDPR). For more configuration options and further information about Referrer-Policy, check out these resources:
The Feature-Policy header tells modern browsers which browser features are allowed. For example, if you want to ensure that only geolocation and vibrate features are allowed, you can configure the Feature-Policy header accordingly. It also enables you to control the origin for each specified feature. Here is an example showing how to add a Feature-Policy header via Apache:
Added to your site’s .htaccess file or server configuration file, this code instructs supportive browsers to enable only geo-location and vibrate features. Keep in mind that this header is less about security and more about ensuring a smooth experience for your users. For more configuration options and further information about Feature-Policy, check out these resources:
The Content-Security-Policy (CSP) header tells modern browsers which dynamic resources are allowed to load. This header is especially helpful at stopping XSS attacks and other malicious activity. This header provides extensive configuration options, which will need to be fine-tuned to match the specific resources required by your site. Otherwise if the header configuration does not match your site’s requirements, some resources may not load (or work) properly.
Because of this, there isn’t one most common example to look at. So instead here are a few different examples, each allowing different types of resources.
Example 1
First example, here is a CSP directive that allows resources from a CDN, and disallows any framed content or media plugins. This example is from the Google docs page linked below.
# Content-Security-Policy - Example 1
<IfModule mod_headers.c>
	Header set Content-Security-Policy "default-src https://cdn.example.com; child-src 'none'; object-src 'none'"
</IfModule>
Example 2
Second example, this CSP directive enables script resources loaded from a jQuery subdomain, and limits stylesheets and images to the current domain (self). This example is from the Mozilla docs page linked below.
# Content-Security-Policy - Example 2
<IfModule mod_headers.c>
	Header set Content-Security-Policy "default-src 'none'; img-src 'self'; script-src 'self' https://code.jquery.com; style-src 'self'"
</IfModule>
Example 3
And for a third example, here is the directive I use on most of my WordPress-powered sites. Logically these sites tend to use the same types of resources, so I can keep things simple and use the following code on all sites:
Stare at that for a few moments and you should get the idea: the header is setting the allowed source(s) for fonts, images, scripts, and styles. For each of these, a secure HTTPS connection is required. The only exception is also to allow data URIs as a source for fonts and images.
So for any of these examples, when added to your site’s .htaccess file or server configuration file, the code tells supportive browsers which dynamic resources are allowed and/or not allowed. But seriously, if you’re thinking about adding the powerful Content-Security-Policy security header, take a few moments to read thru some of the documentation:
Yes CSP can be confusing, but there is no reason to despair. There are numerous online tools that make it easier to figure out how to implement CSP, for example here are some top sites:
A quick search for “csp test online” yields many results.
Even better, they now have “CSP generators” that literally write the code for you based on your input variables. Here are two solid looking CSP generators:
There are lots of useful tools out there to make CSP easier. Just enter your infos and copy/paste the results. If in doubt, use multiple tools and compare the results; the code should be the same. If not, don’t hesitate to reach out to the tool providers, who will be able to answer any questions, etc.
All Together
For the sake of easy copy/pasting, here is a code snippet that combines all of the above-described security headers.
Important: before adding this code to your site, make sure to read through each technique as explained in corresponding sections above. There may be important notes and information that you need to understand regarding each particular directive included in this code snippet.
# Security Headers
<IfModule mod_headers.c>
	Header set X-XSS-Protection "1; mode=block"
	Header set X-Frame-Options "SAMEORIGIN"
	Header set X-Content-Type-Options "nosniff"
	Header always set Strict-Transport-Security "max-age=63072000; includeSubDomains"
	# Header set Content-Security-Policy ...
	Header set Referrer-Policy "same-origin"
	Header set Feature-Policy "geolocation 'self'; vibrate 'none'"
</IfModule>
As with each of the above techniques, this code may be added to your site via .htaccess or Apache config. Understand that this technique includes commonly used configurations for each of the included headers. You can (and should) go through each one to make sure that the configuration matches the requirements and goals of your site. Also remember to test thoroughly before going live.
Note: Notice the following line in the above “Security Headers” code snippet:
# Header set Content-Security-Policy ...
The pound sign or hash tag or whatever you want to call it means that the line is disabled and is ignored by the server. This means that the Content-Security-Policy directive is “commented out” and thus not active in this technique. Why? Because as explained previously, there is no recommended “one-size-fits-all” CSP example that works perfectly in all websites. Instead, you will need to replace the commented out line with your own properly configured CSP header, as explained above.
Testing
Once you are done, you can use these handy Geekflare Tools to test that your security headers are working properly.


Recent Comments