Keep all of your web accounts secure with hard-to-guess passwords. Add 2-step authentication where possible and never give out your domain account information to anyone.
Employ anti-virus and spyware measures to prevent keylogging software capturing your login details and secure your domain and data from malware.
Keep your domain contact information up-to-date with your registrar; it’s the best way to ensure you can be contacted if any suspicious activity occurs on your account.
Keep track of when your domains need to be renewed and make yourself aware of the renewal process. Set a reminder to avoid your registration expiring and being snapped up by someone else.
Add domain privacy to keep your contact information out of the public domain. Thieves can use this information to impersonate you or fool you into accessing your domain.
Provide an extra level of security to your domain with a registry lock service. This prevents anyone transferring your domain without your permission.
Be vigilant with your emails to avoid a phishing attack. Hackers can email claiming to be your registrar and such an email could contain a link to a replicate site where you enter your information for them to capture.
Secure your site with SSL certification, enable DNSSEC for extra protection and add a firewall to prevent unauthorized access. Choose a reliable host, practice good server security, such as regular updates, and use a VPS to be extra safe.
Imagine the scenario, it’s midday, and the volume of visitors to your successful e-commerce site has dropped to zero. Typically, you’re making sales, but since business has come to a standstill, you’re losing hundreds, if not thousands of dollars an hour.
Admittedly, domain name security isn’t the most exciting consideration for website owners. However, given the rise in web-based attacks, domain security is more important now than ever before. Cyber crimes occur in increasingly clever forms because people don’t make basic security provisions to protect their domains. The internet is an attractive place for individuals who know how to exploit easily avoidable security gaps.
Although securing your website might sound difficult, a step-by step approach can shore up your defenses and deter hackers. If you’re wondering how to keep your domain secure and how to deter hackers, stick with us. We’ll guide you through tactics that your site visitors will recognize and improve your site’s standing with the search engines. Take proactive action by following our nine steps to keep your domain protected and appeal to your site’s visitors.
Security for Domains
Domain security is as important for your own protection as well as that of your site’s visitors. Internet users are increasingly aware of the pitfalls of cyber theft. They are concerned for their safety and privacy, and want to know how to spot an unsafe website. In the current climate, terms like “identity theft”, “hack”, and “spam” get thrown about routinely. There is nothing worse for a website’s reputation than a security breach which leaves not only the domain owner, but all related logins vulnerable.
Many domain owners overlook the security of their domain name when they are developing their general website security policies. But consider the aftermath of losing your domain, either through poor domain management or via hijacking. Aside from the damage to your business and reputation, the process of recovery can be painfully slow and expensive. Fortunately, there are several measures you, as the domain name holder can take to protect your domain name against theft and loss.
Know Your Enemy
Before learning prevention methods, it’s important to be familiar with the sort of threats your domain name is susceptible to. Anyone who successfully accesses the account you hold with your domain name registrar has the power to hijack your domain name. They may use it to divert your website visitors to their own site, or to access your email. There are a few methods that can be used to hijack a domain.
Domain hijacking, also referred to as pharming, is a form of online fraud similar to phishing, where a fraudster seeks to obtain information by redirecting a website’s traffic to another site. The alternative site was developed to steal information from users without knowing it. Hijacking in this way is a serious problem because it puts sensitive private information at risk.
Phishing tricks domain owners into thinking an email is from their legitimate domain registrar. They click on a link in the email which opens a replica site of their registrar, and they are asked to log in. Users enter their username and password into what looks like a legitimate website. This information is captured by the attacker.
9 Steps to Keep a Secure Domain
Securing your domain name is crucial to safeguarding your domain name’s settings and control panel. Anyone with bad intentions who accesses this area can change your email and website accessibility settings. It’s not only illegal access you need to be vigilant of; you don’t have to be the latest victim of cybercrime to lose control of your website. It could be snapped up and in the hands of a new owner perfectly legally if you simply forget to renew it.
Follow these nine steps to shield your domain from unauthorized changes to your domain name settings or from unintentionally slipping out of your hands.
Step 1. Keep Your Accounts Secure
Use strong passwords – A strong password isn’t necessarily a complex series of numbers, letters and symbols as we were lead to believe. This advice has been deprecated by the guy who came up with it. Instead, consider using a password manager such as Dashlane or Lastpass to create a random password that is harder to predict. Avoid using common names, birthdays, anniversaries, etc,. and, when you hire someone to work on your domain account, make sure to change the password when they leave.
Be your own firewall – Anyone with access to your domain can potentially hijack it. Never give your account information to anyone, including your webmaster. If someone needs access to your hosting account login details, use the Account Administrator feature to grant access levels to anyone who needs to manage domain names in your account.
2 step authentication – Using two-factor authentication on your account involves a two-step login process. It adds another layer of security when you need to access your account, using a password as well as another step, such as SMS authentication. Yes, it might be irritating for yourself and your domain users, but without this type of safeguard, a hacker can easily transfer your domain into their control.
Log in to your registrar account regularly – Check your account details are correct, or save yourself the hassle by purchasing Domain Monitoring. This service alerts your administrative email if any changes are made to your domain name’s settings.
Secure Email – Keeping the email linked to your domain safe is key to keeping your domain secure. Ensure your password is complex and change it frequently. Make sure to use a secure email solution and not free services that come from your broadband or telecoms provider, that might expire with lack of use or when you change provider.
If your email expires, someone else could snap it up. This leaves this person free to impersonate you in correspondence with your registrar. They might even use the forgotten password feature to have the password emailed to them.
Step 2. Employ Anti Virus/ Spyware Measures
Prevent key-logging – Install good antivirus/spyware software on your home computer, such as Bitdefender, to prevent key-logging software from capturing your usernames and passwords. Keep this software updated periodically to ensure your information isn’t handed to unauthorized persons.
Keep applications up to date – To secure yourself from hackers you have to keep up to date with security updates. This will deter viruses and malware. Out-of-date security is the most targeted way to break your security and steal data. Bitdefender or Cybersmart will help with this also, as they scan your system for vulnerabilities and out of date software.
Keep all the applications on your web account — for example, your domain account and your CMS, such as WordPress, etc —up-to-date with the latest security patches so hackers can’t exploit it. Any MySQL database used by those applications must also be kept updated to the latest version.
Step 3. Keep Your Registration Records Up-to-date
Keep your domain contact information accurate with your registrar. If you move, update your information immediately. It’s not only a legal requirement from ICANN, but keeping up-to-date records is also the best way to ensure your registrar has a way of contacting you if any suspicious activity occurs.
Make sure you are available to receive notifications so that your registrar will be able to immediately alert you if there are any changes made to your account. This forewarning gives you the chance to halt a pending transfer.
Whenever there are any changes to the contact details that you have been using for domain name transfer communications, let your registrar know.
Keep your emergency and business contact information up to date.
Step 4. Keep Track of Domain Renewals
The easiest way to lose a domain is by failing to renew it. After going through the process of buying a domain and creating a website, you will want to avoid your registration expiring. This is why you must make yourself fully aware of the renewal process for your domain. The most common arrangement is yearly renewal conducted automatically; however, it can vary from one registrar to another.
A simple way to avoid your domain being snapped up by someone else is by setting up a reminder. Many registrars allow you to renew domains for up to ten years in advance. The problem with anything you don’t regularly do is it is more likely to slip your mind. Consider setting a recurring reminder on your desktop annually. Another helpful tip is to synchronize domains, so they expire on the same date. Many domain registrars allow this, which makes things easier when you manage more than one.
Step 5. Add Domain Privacy
WHOIS is a public database the supplies its users with information regarding domain name ownership. All website owners are obliged to provide correct contact information to their registrar. The information provided with your domain registration is associated with the domain name, and a WHOIS record is created.
Anyone using the WHOIS search used to be able to access your contact information by searching the WHOIS database, however this is no longer legally allowed since the implementation of GDPR, but not all registrars follow the rules.
Thieves are after this information in particular because they can use your contact details to impersonate you and attempt to transfer your domain to a new owner. Alternatively, they might contact you to try fool you into revealing your account password.
If you don’t want this contact information available, opt for private domain registration. Domain privacy is a valuable add-on service most domain registrars provide for site owners who don’t want their contact information available publicly. The domain registrar will simply swap their contact details with yours. For example, if you are using Namecheap’s WhoisGuard, anyone wanting to contact you will have to talk to Namecheap first.
Step 6. Lock Up Your Domain
Permission to make changes – Most registrars offer a registry lock service to provide an extra level of security for domain name holders and their customers. Setting up a registrar lock (also known as domain lock and transfer lock) prevents anyone transferring your domain without your permission.Consider the worse case scenario: someone with bad intentions accesses the control panel used to activate your domain.
This area includes information about your domain’s nameservers, information which helps the DNS located your domain. If someone was to edit this information, they could drive traffic trying to reach your site somewhere else.For a small fee, your registrar can apply a registry lock. Using a registry lock is similar to identity theft protections that block anyone using your credit card, without the special authorization of the card owner.
Similarly, registrars are unable to make changes to your site’s DNS information without manual authorization from the registry.
Use a domain authorization code – An Extensible Provisioning Protocol, known as EPP, provides an extra layer of security at the time of domain name registration. A unique Authorization Information Code (AIC) is assigned by the registrar to the new domain owner. This code is needed to transfer the domain from one registrar to another. Keep your AICs secure and confidential for effective protection from unwanted domain transfers.
Step 7. Be Vigilant with Emails
People will use creative tactics to get your to disclose your domain account details. A popular method adopted by hackers is to send an email which looks just like one you would get from your domain registrar. The e-mail will ask your to click on a link that takes you to a close replica of your registrar’s website. Once you enter your information, it can be captured. If you log in through a phishing link, you might lose access to your account.
Avoid this by being vigilant about the following:
Be suspicious of emails claiming to be from your registrar
Don’t access your domain account directly from your email
Always enter the registrar’s address manually in your browser before logging in.
Step 8. Secure Your Site
SSL certification – SSL protection is one of the best-known security features you can get. Protect your customers against identity theft with an SSL Certificate. A customer’s sensitive information, such as their name, bank account information and billing address is encrypted during transmission from their computer to your domain web server.
This process ensures that their information can’t be stolen. TLS, the less well-known acronym, is a similar security protocol which succeeded SSL.Customers will see they have accessed a secure website as they will see https:// at the beginning of its URL. If you’re conducting ane-commerce business or have access to any sensitive customer information, SSL technology is a must.
Even casual internet users recognize it. You don’t need advanced computer knowledge to set this up, your host will likely provide shopping cart functionality to conduct secure transactions, for example. Another perk of SSL or TLS certificates installed on your computer is that it is a positive factor in how your site is viewed by Google.
Enable DNSSEC – DNSSEC is a complicated topic that relates to the domain name system used to translate domain names into numeric internet addresses.
When the DNS was first implemented, it wasn’t secure, and several vulnerabilities were discovered. The threat of name spoofing is an example. Name spoofing is when someone can intercept communication between you and a customer, and comes between the two parties hoping to victimize the customer.Domain name system security extensions (DNSSEC) were created to tackle this problem.
They are a set of protocols that add an extra layer of protection to the domain name system to prevent against unauthorized DNS hosts.
Reliable hosting – Hosting should be at the forefront of your battle against cyber crime. Check that your host is doing enough to ensure your site is secure from their side of things.
VPS – To be extra safe, use a VPS. Your domain exists on a slice of a much more powerful server in a secure data center. Unlike shared hosting, your domain is allotted a guaranteed amount of system resources.
Practice good server security habits – Performs regular updates on your CMS, disable unused services, plugins, widgets, etc., and control remote access.
Firewalls – Firewall the server so you can only access it from known safe locations/networks.
Step 9. Choose the Right Registrar
Don’t register your domain with the first registrar you come across. Be sure the registrar is authorized to sell domains, has a good reputation, and is trustworthy. When choosing a registrar, look beyond the price point alone; you need a quality service with good support.
Make sure your registrar provides additional security measures such as:
2-factor authorization.
Notification of account changes, such as a pending domain transfer, which gives you time to respond before a domain is moved.
Readily available, knowledgeable technical support to assist implementing your domain name security.
Trained customer service agents who screen callers so no one can impersonate anyone in order to access an account.
Unexpected events can disrupt an organization: natural or human-made disasters, cyberattacks, or system failures. In order to avoid significant revenue losses and customer attrition because of bad experiences caused by disasters, it is imperative to strategize and implement disaster recovery.
Disaster recovery plans and procedures should be tested continually so organizations can restore mission-critical applications and data reliably. When disasters strike, they can recover quickly from them and bring back mission-critical services and applications to mitigate the impact on business operations.
Disaster recovery relies heavily on backup processes and technologies. Accordingly, some organizations rely on continuous backup solutions to achieve better recovery point objectives—which is the amount of acceptable data loss measured in time units like hours or minutes—using machine or application snapshots for recovery before a disruption occurs. MSPs with hundreds of clients to support can find this particularly challenging. Backup and disaster recovery solutions should be scalable and encapsulated from disasters.
Listed below are 7 Great Disaster Recovery Solutions to help businesses prepare for disasters.
BackBlaze
Backblaze isn’t modest about promoting its popularity: on its homepage, it says that it stores more than an exabyte of data (that’s a million terabytes or eight million Galaxy S20 phones), and has recovered more than 50 billion files since it launched in 2007. It knows what it’s doing when it comes to cloud backup.
That’s all very reassuring when it comes to signing up for Backblaze, which offers a variety of paid-for packages for personal and business users – if you’ve got data that needs backing up, Backblaze will do it for you. It also offers unlimited cloud storage, so your cloud locker can keep growing indefinitely as the amount of data you’ve got keeps on growing.
Backblaze features
Backblaze takes the position that you don’t need to know the details of your backup plan, just that it is occurring: when you install the desktop client for the first time, it doesn’t ask you to pick out files and folders, but just grabs all the files and folders it considers important and starts transferring them to your Backblaze cloud storage.
By default, Backblaze copies everything that isn’t an ISO, DMG (Mac disk image), a virtual drive, system files or executables. You can exclude other file types if you wish, but unless exclusively told to ignore them all other file types will be included. It’s all very simple and straightforward, and you get peace of mind straight away that your entire computer can be recovered if needed.
This is very much a set-it-and-forget-it solution: Backblaze is there to help you recover data if your hard drive suddenly fails or your laptop falls in the bath. It’s not for syncing files between computers or getting at your music and video files in the cloud. You can include external hard drives and (on a business plan) servers in your backups, but networked drives can’t be included.
Backups can be continuous, once a day, or initiated manually. Some extra variety with those timescales would be nice, but we expect the majority of users will leave it set to continuous backup mode. It’s worth noting that while you can back up an unlimited amount of data, you are restricted to one computer for each Backblaze account, and mobile devices aren’t included.
Backblaze interface
The desktop client you get with Backblaze isn’t particularly innovative or intuitive – but then again, it doesn’t have to be. There are a limited number of options with a Backblaze package, so the software doesn’t have to do much except make sure that your files are getting continuously backed up in the background.
You can exclude certain files and folders from a Backblaze backup, but it’s not particularly straightforward to do. Considering you get an unlimited amount of space in the cloud, it’s easier to just let Backblaze back up everything, just in case. Transferring data from an entire computer to the web can take some time, but we were impressed with the speeds Backblaze managed (you can choose to pause or throttle the upload process if you think Backblaze is taking up too much bandwidth).
Like the desktop client, the web interface is also cut down and minimal, letting you review backed-up files and restore them if needed. There’s also a mechanism for sharing stored files to others that are exclusive to the web interface. Dropbox, Google Drive or iCloud certainly isn’t in terms of web functionality.
In the advent of a system failure or loss files can be downloaded in a zip file for free, or Backblaze will put them on a Flash drive or physical USB hard drive for an extra fee and send them to you. While it may not do much beyond suck up all the files on a computer and let you restore them, Backblaze does these core jobs very well.
Backblaze security
Backblaze scores highly from a security perspective: not only can you enable two-step authentication on your account, you can also rely on AES 128-bit encryption and an SSL connection to avoid your data being intercepted as it passes over the internet. It’s not full end-to-end encryption but it’s certainly going to be safe enough for most users.
You can, if you want, set up a private encryption key, known only to you, which adds an extra layer of protection to your data (if you’re worried about Backblaze staff prying into your affairs). However, if you set this up, Backblaze can’t help you if you forget the key, and you need to tell Backblaze what it is if you ever need to restore your data.
Backblaze pricing
You can try Backblaze for free for 15 days without giving up any credit card information, but there’s no free tier (as you would expect as you’re getting unlimited cloud storage). Personal plans cost from $6 a month, though you can sign up for a year for $60 (the equivalent of $5 a month) or for two years for $110 ($4.58 a month).
The pricing is actually the same for business customers, although you can contact Backblaze direct for different quotes on backing up multiple computers and servers, and on putting more of your data in the cloud for long-term storage (replacing tape backups, essentially). It’s good to see this sort of bespoke, flexible pricing, but it does make it more difficult to compare Backblaze against other services of course.
Backblaze verdict
Backblaze has a lot of users and a lot of fans, and it’s easy to see why – if you want to back up everything from one computer and its external drives, simply and securely, without spending too much, then it’s hard to beat. There are no limits on file sizes or the amount of data you can send to the cloud.
Just be certain you know exactly what Backblaze is before you part with any cash: it’s not for syncing files between computers or getting easy access to your files through a web browser. It’s a comprehensive, set-it-and-forget-it backup solution for protecting your data should the worst happen, and at that job it’s excellent.
Manage with MSP360
Servers are complicated, backing them up doesn’t need to be. MSP360 provides easy-to-use, advanced backup and disaster recovery solutions for businesses.
MSP360™ Managed Backup (MBS) is an easy-to-use backup solution for Managed Service Providers and IT departments that require a centralized license and job management, monitoring, and reporting. MBS allows you to leverage AWS, Microsoft Azure, Backblaze B2, and Wasabi cloud storage to drive more revenue and deliver best-in-class data protection to your customers.
Set it and forget it. Manage multiple servers with granular control from the web-based admin console.
Advanced backup features to protect your data. Flexible scheduling, compression, encryption, and ransomware protection.
Low-cost and high-performance cloud storage allows you to scale as you need and only pay for what you use. Migrate large data sets using the B2 Fireball with zero impact to your network.
How It Works
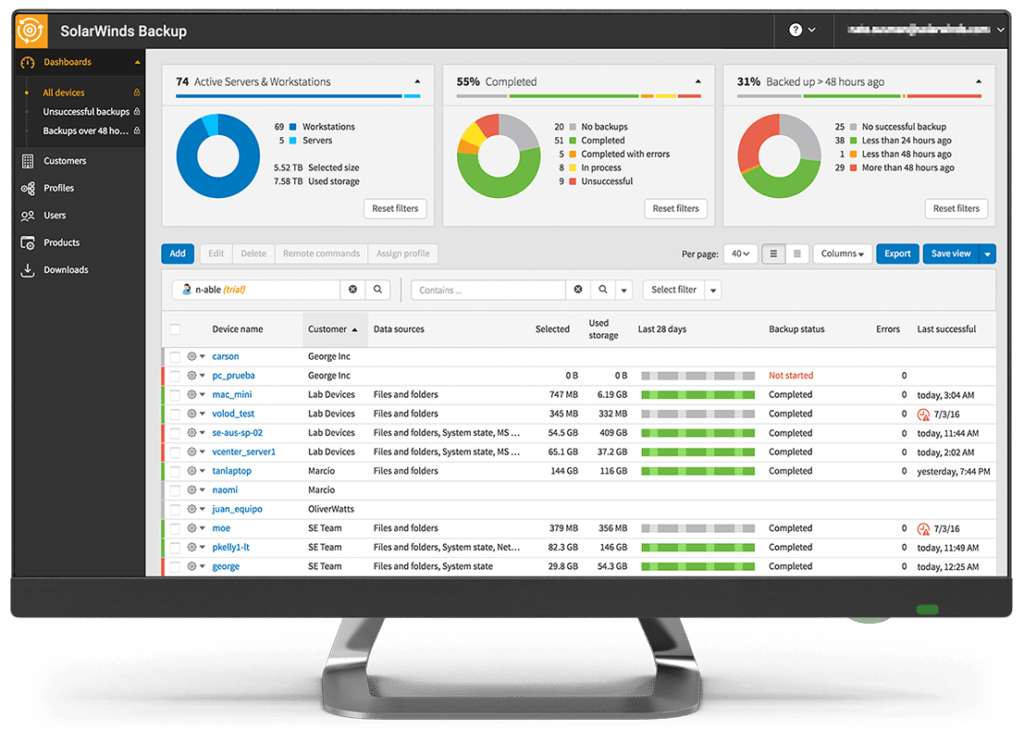
SolarWinds Backup
SolarWinds MSP Backup is a backup and disaster recovery solution that performs backups using an agent installed on physical or virtual servers.
In addition to backups, it also offers an archiving service for longer-term data storage, and it provides granular control over what to archive. Subsequently, this archived data can help in auditing, compliance demonstration, and other data retention purposes.
Besides, it doesn’t require maintaining a secondary data centre, as SolarWinds Backup stores and manages data in its private cloud, with 30 data centers across four continents. Moreover, these datacenters are either ISO- or SOC-compliant.
SolarWinds Backup uses AES 256-bit data encryption to encrypt data when stored and transferred. Additionally, SolarWinds Backup offers custom encryption keys that are privately held by the organization or MSP—in other words, it’s built so even SolarWinds MSP can’t unencrypt data.
Moreover, it gives the flexibility of maintaining standby servers with continuous restores, used to offer quick failover and drastically reduce downtime. SolarWinds Backup also allows replicating machines in a chosen local data center or Microsoft Azure.
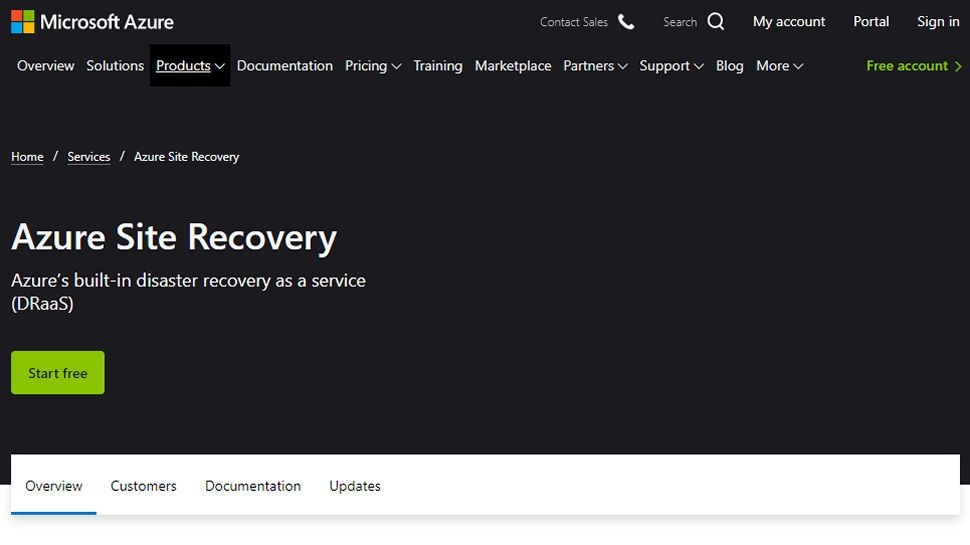
Microsoft Azure
Microsoft Azure offers Azure Site Recovery and Azure Backup that work in tandem to provide disaster recovery and backup. Azure Site Recovery helps to back up on-premises workloads to Azure and Azure workloads to different availability zones. In a disaster, organizations can quickly replicate on-premises workloads on Azure and perform failback procedures when the primary data centers recover.
Azure Site Recovery also helps in performing disaster recovery drills without impacting ongoing replication processes. And it allows running failovers for expected or unexpected disruption without losing any data.
Azure Backup allows organizations to back up files, VMs, and SQL databases, as well as SAP HANA databases running on Azure VMs. It offers storage redundancy in local, geo, and zone levels. Moreover, it can perform application-consistent backups that contain all the required data to restore an application.
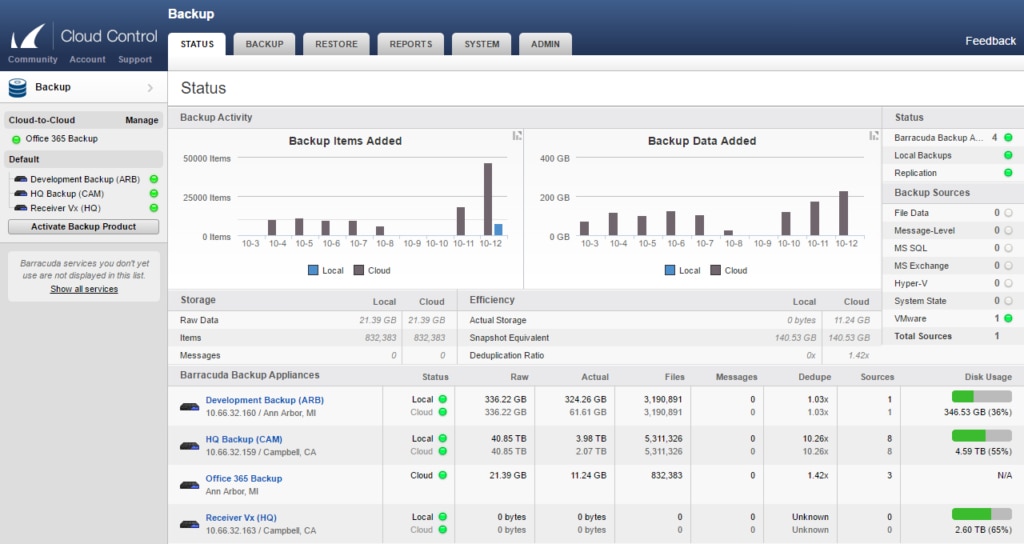
Barracuda Backup
Barracuda Backup can back up data from a wide range of sources, including physical and virtual machines, SaaS applications like OneDrive and SharePoint, and SQL databases. Further, it allows replicating backup data to other data centers, AWS, or Barracuda cloud storage. It supports machine recovery through snapshots and allows you to granularly recover only specific files depending on the situation. Barracuda Backup offers various solutions:
Barracuda Backup Appliance, a physical appliance for backups
Barracuda Cloud to Cloud helps to manage Microsoft 365 backups
Barracuda Virtual Backup for direct using it on an organization’s hardware
Full cloud-based management from one console
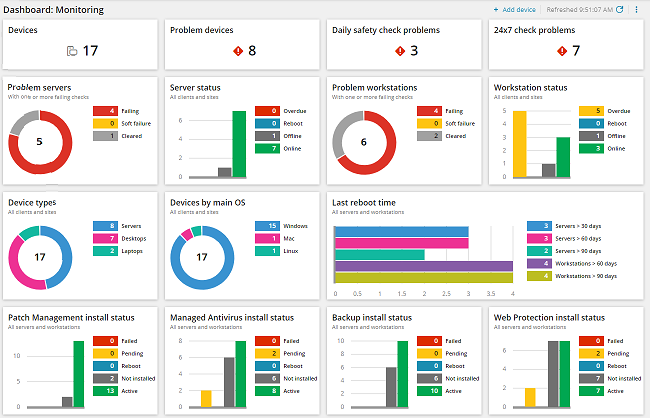
SolarWinds RMM and N-central
SolarWinds RMM is a comprehensive remote monitoring and management tool that also provides backup and recovery features. It uses TrueDelta™ technology that only stores changes from the last backup, quickening the backup process. Plus, it can back up individual files, servers, applications, and entire systems in a cloud environment and facilitate rapid recovery in the event of a disaster. Further, it’s built for secure data transfers and encrypts data using AES 256-bit encryption.
Similarly, SolarWinds N-central® is another remote monitoring and management tool that features Backup Manager, which facilitates data protection through backups and provides disaster recovery.
TierPoint
TierPoint offers fully managed, as well as self-service disaster recovery solutions. It facilitates cloud-to-cloud failover to TierPoint private or multitenant clouds. It also supports failover automation that helps teams recover from incidents in a shorter time. It also helps to perform replication and recovery to Azure and allows recovering physical servers to the cloud. Furthermore, TierPoint helps to perform disaster recovery setup and testing in accordance with regulatory compliances, such as HIPAA and PCI DSS.
Flexential DRaaS
Flexential DRaaS is a fully managed service for on-premises as well as cloud environments. Its Recovery Cloud aims to achieve low recovery time objectives and recovery point objectives. It also focuses on providing secure and compliance-based solutions and has five different DR locations across the U.S. It allows testing as needed and provides the flexibility of replicating to a Flexential recovery site or any other chosen data center.
Conclusion
Customer experience is the cornerstone of business growth and revenue generation, and disasters are among the most significant threats. A simple look at stats on disaster and cyberattacks reveal how frequently they occur:
Estimates suggest that ransomware attacks will cost USD 20 billion in 2020
As disasters represent severe threats to organizational operations, businesses must prepare for unforeseeable events by continually performing backups and testing disaster recovery strategies. This is even more critical for MSPs having hundreds of clients concentrated in a handful of geographic locations, as any disaster impacting one area can impact their customers adversely if recovery plans are not in place.
Hopefully, these 7 Great Disaster Recovery Solutions provided you with some useful insights.
What is the biggest threat to cybersecurity or IT infrastructure right now? According to one of Canada’s premier cybersecurity experts, if you answered malware or ransomware or crypto, you’d be wrong.
According to Calgary-based cybersecurity leader Sonya Goulet, the most significant risk is the end user. A team of hackers can unleash the most potent cocktail of malware on a system, but if no one opens it up, the attack is rendered useless. Or, another threat, she says, are weak passwords. A hacker may have the intent to deploy the most destructive malware on a system, but if the password is almost impenetrable, then the attack is neutralized.
“All cyber threats evolve quickly and often, yet the end user is still disregarding simple tips to keep an enterprise safe, for example, using proper passwords,” Goulet points out. Smarter MSP caught up with her to ask her about the most significant threats today and what MSPs can do to mitigate them.
Goulet advises that MSPs and CISOs should be focusing on proper password hygiene. She says a good password should follow guidelines set by the National Institute of Standards and Technology (NIST).
“I also recommend making a password a meaningful passphrase, at least ten complex characters long. My second piece of advice is to use a Password Manager, like LastPass,” Goulet says. But having an enterprise get to a point where everyone is on board takes time and training, she adds.
She goes on to point out that staff can let the password manager create passwords for the sites they visit, so they don’t have to think or remember any of the hundreds of passwords needed in their day-to-day life.
“They feel positive knowing they only have one password to remember going forward, and that password is to access their password manager account,” Goulet offers, adding that most people are relieved by the simplicity of it.
In Goulet’s work with companies to beef up their best practices, she finds that weak passwords are a prolific problem.
“I found that while I work with staff on cybersecurity practices, they all admit to me that they keep the same simple password and use that one password across all of their online websites. They also admit to never changing their passwords,” Goulet states.
At least 65 percent of people reuse passwords across multiple sites.
Around 13 percent of people use the same password for all accounts and devices.
About 80 percent of data breaches in 2019 were caused by password compromise.
Compromised passwords are responsible for 81 percent of hacking breaches.
The average person reuses each password 14 times!
An estimated 49 percent of employees only add a digit or change a character in their password when they’re required to update it.
Passwords were leaked in about 65 percent of the breaches that happened in 2019.
In today’s evolving and dynamic threat landscape, carelessness when it comes to passwords is a gaping hole in an organization’s defenses.
Passwords, however, are just one aspect of how an end user can compromise a network. Other problems can occur with improper data hygiene and becoming complacent with clicking links in emails. Such sloppy clicking can lead to the deployment of all sorts of malware. To head off some of these, Goulet recommends MSPs do the following:
Create easy steps to follow
Examples, Goulet says, include teaching staff what data is vital to protect, and showing staff how to look for phishing or vishing attempts, teach or review with staff to scan everything in emails and verify by a phone call if needed (using the old President Reagan phrase of “Trust, but verify”).
“In order for staff to care about what they are protecting, leadership has to guide them,” Goulet advises. That means making workers feel invested in the company or enterprise so that everyone has a stake in its survival. Show staff what the fallout could be from clicking a bad link. Businesses have had to shutter because of malware, and that should make everyone shudder.”
I found that most staff don’t care enough with what link they click, or what password they use, or what data they share with other staff members. All of those issues are an evident need for improved policies and procedures,” Goulet concludes.
The Domain Name System (DNS) is the phonebook of the Internet. Humans access information online through domain names, like nytimes.com or espn.com. Web browsers interact through Internet Protocol (IP) addresses. DNS translates domain names to IP addresses so browsers can load Internet resources.
Each device connected to the Internet has a unique IP address which other machines use to find the device. DNS servers eliminate the need for humans to memorize IP addresses such as 192.168.1.1 (in IPv4), or more complex newer alphanumeric IP addresses such as 2400:cb00:2048:1::c629:d7a2 (in IPv6).
How does DNS work?
The process of DNS resolution involves converting a hostname (such as www.example.com) into a computer-friendly IP address (such as 192.168.1.1). An IP address is given to each device on the Internet, and that address is necessary to find the appropriate Internet device – like a street address is used to find a particular home. When a user wants to load a webpage, a translation must occur between what a user types into their web browser (example.com) and the machine-friendly address necessary to locate the example.com webpage.
In order to understand the process behind the DNS resolution, it’s important to learn about the different hardware components a DNS query must pass between. For the web browser, the DNS lookup occurs “ behind the scenes” and requires no interaction from the user’s computer apart from the initial request.
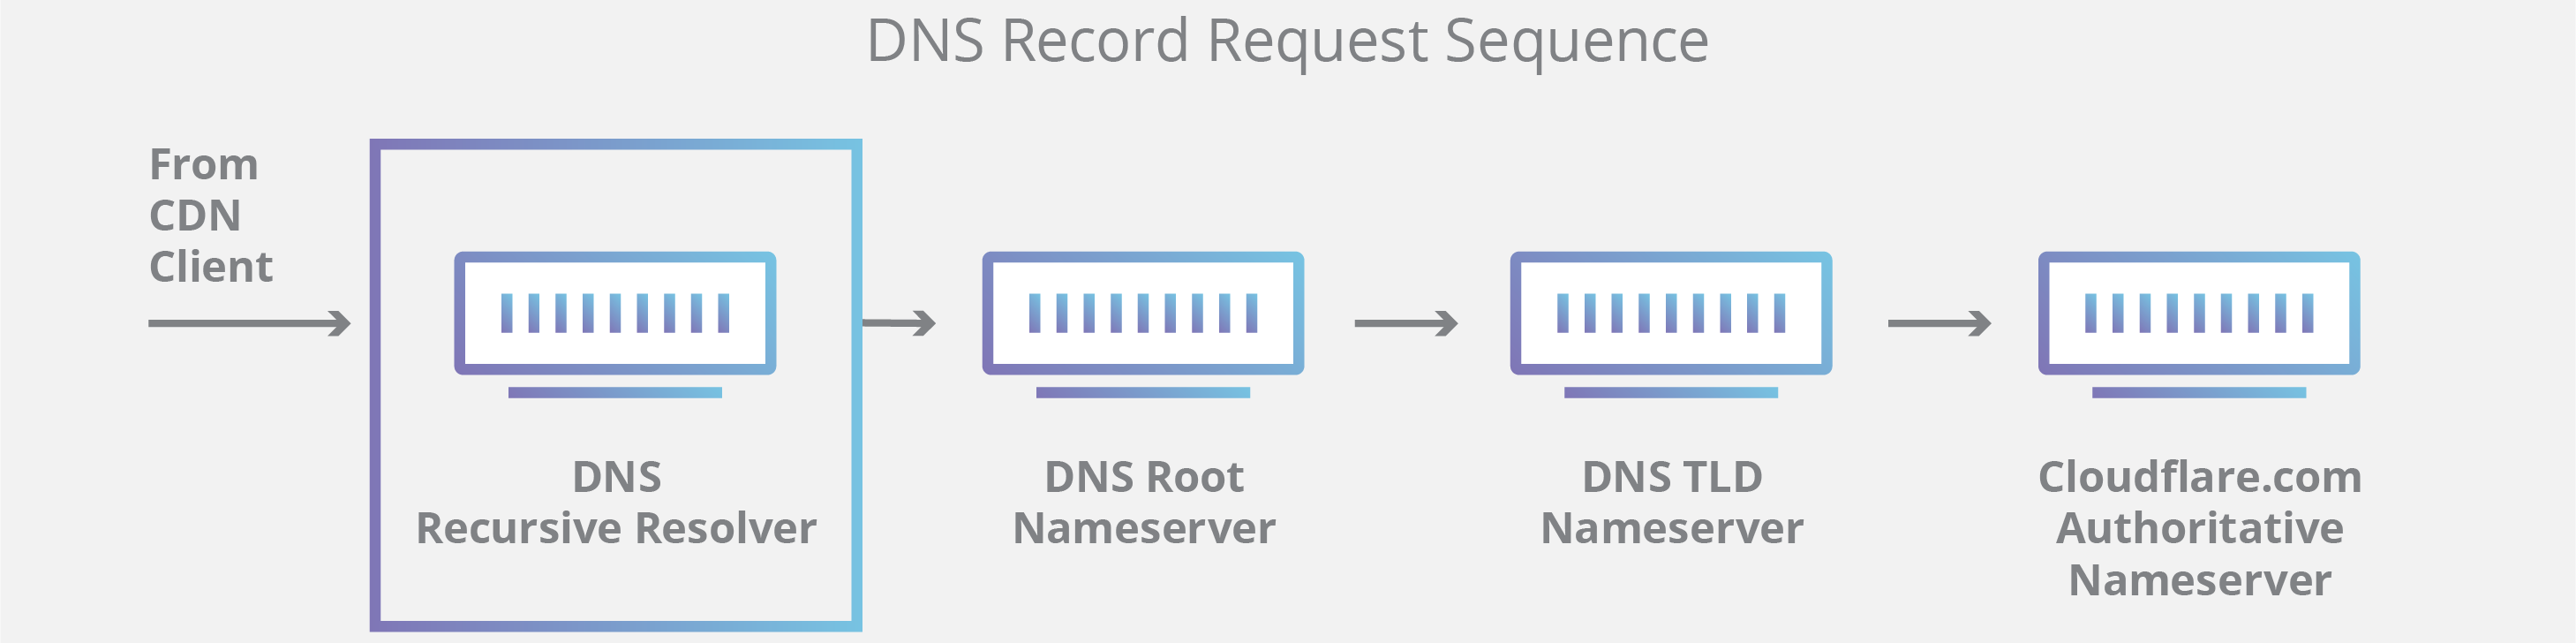
There are 4 DNS servers involved in loading a webpage:
DNS recursor – The recursor can be thought of as a librarian who is asked to go find a particular book somewhere in a library. The DNS recursor is a server designed to receive queries from client machines through applications such as web browsers. Typically the recursor is then responsible for making additional requests in order to satisfy the client’s DNS query.
Root nameserver – The root server is the first step in translating (resolving) human readable host names into IP addresses. It can be thought of like an index in a library that points to different racks of books – typically it serves as a reference to other more specific locations.
TLD nameserver – The top level domain server (TLD) can be thought of as a specific rack of books in a library. This nameserver is the next step in the search for a specific IP address, and it hosts the last portion of a hostname (In example.com, the TLD server is “com”).
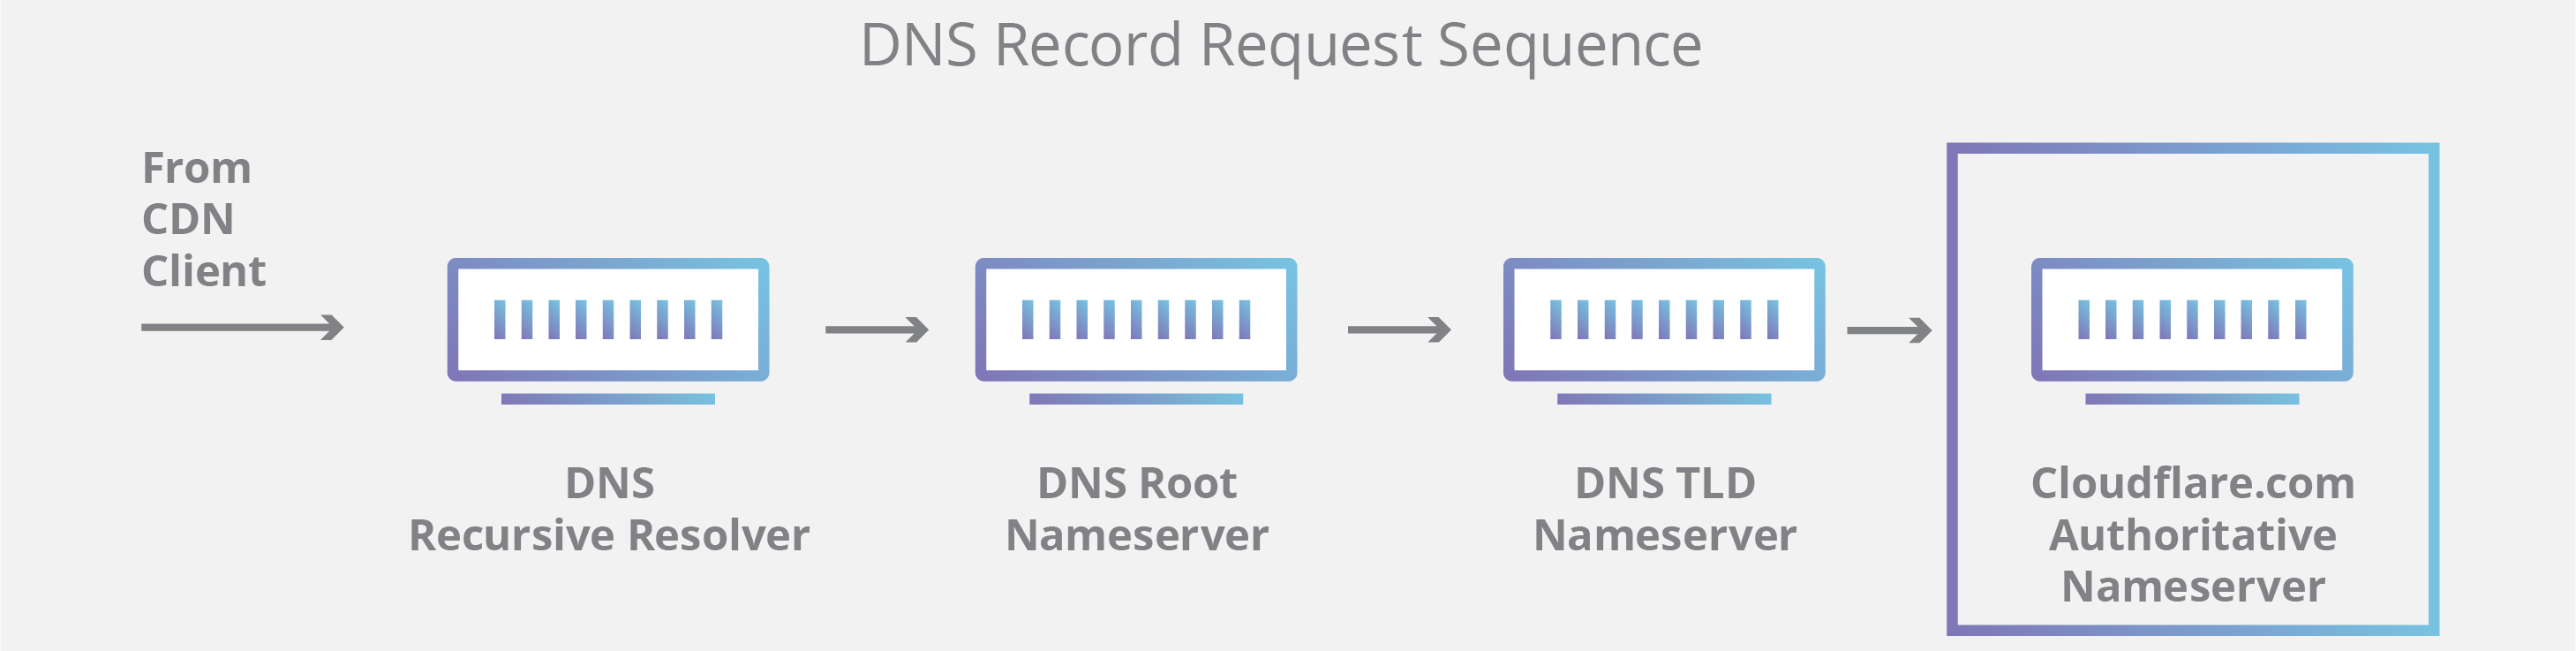
Authoritative nameserver – This final nameserver can be thought of as a dictionary on a rack of books, in which a specific name can be translated into its definition. The authoritative nameserver is the last stop in the nameserver query. If the authoritative name server has access to the requested record, it will return the IP address for the requested hostname back to the DNS Recursor (the librarian) that made the initial request.
What’s the difference between an authoritative DNS server and a recursive DNS resolver?
Both concepts refer to servers (groups of servers) that are integral to the DNS infrastructure, but each performs a different role and lives in different locations inside the pipeline of a DNS query. One way to think about the difference is the recursive resolver is at the beginning of the DNS query and the authoritative nameserver is at the end.
Recursive DNS resolver
The recursive resolver is the computer that responds to a recursive request from a client and takes the time to track down the DNS record. It does this by making a series of requests until it reaches the authoritative DNS nameserver for the requested record (or times out or returns an error if no record is found). Luckily, recursive DNS resolvers do not always need to make multiple requests in order to track down the records needed to respond to a client; caching is a data persistence process that helps short-circuit the necessary requests by serving the requested resource record earlier in the DNS lookup.
Authoritative DNS server
Put simply, an authoritative DNS server is a server that actually holds, and is responsible for, DNS resource records. This is the server at the bottom of the DNS lookup chain that will respond with the queried resource record, ultimately allowing the web browser making the request to reach the IP address needed to access a website or other web resources. An authoritative nameserver can satisfy queries from its own data without needing to query another source, as it is the final source of truth for certain DNS records.
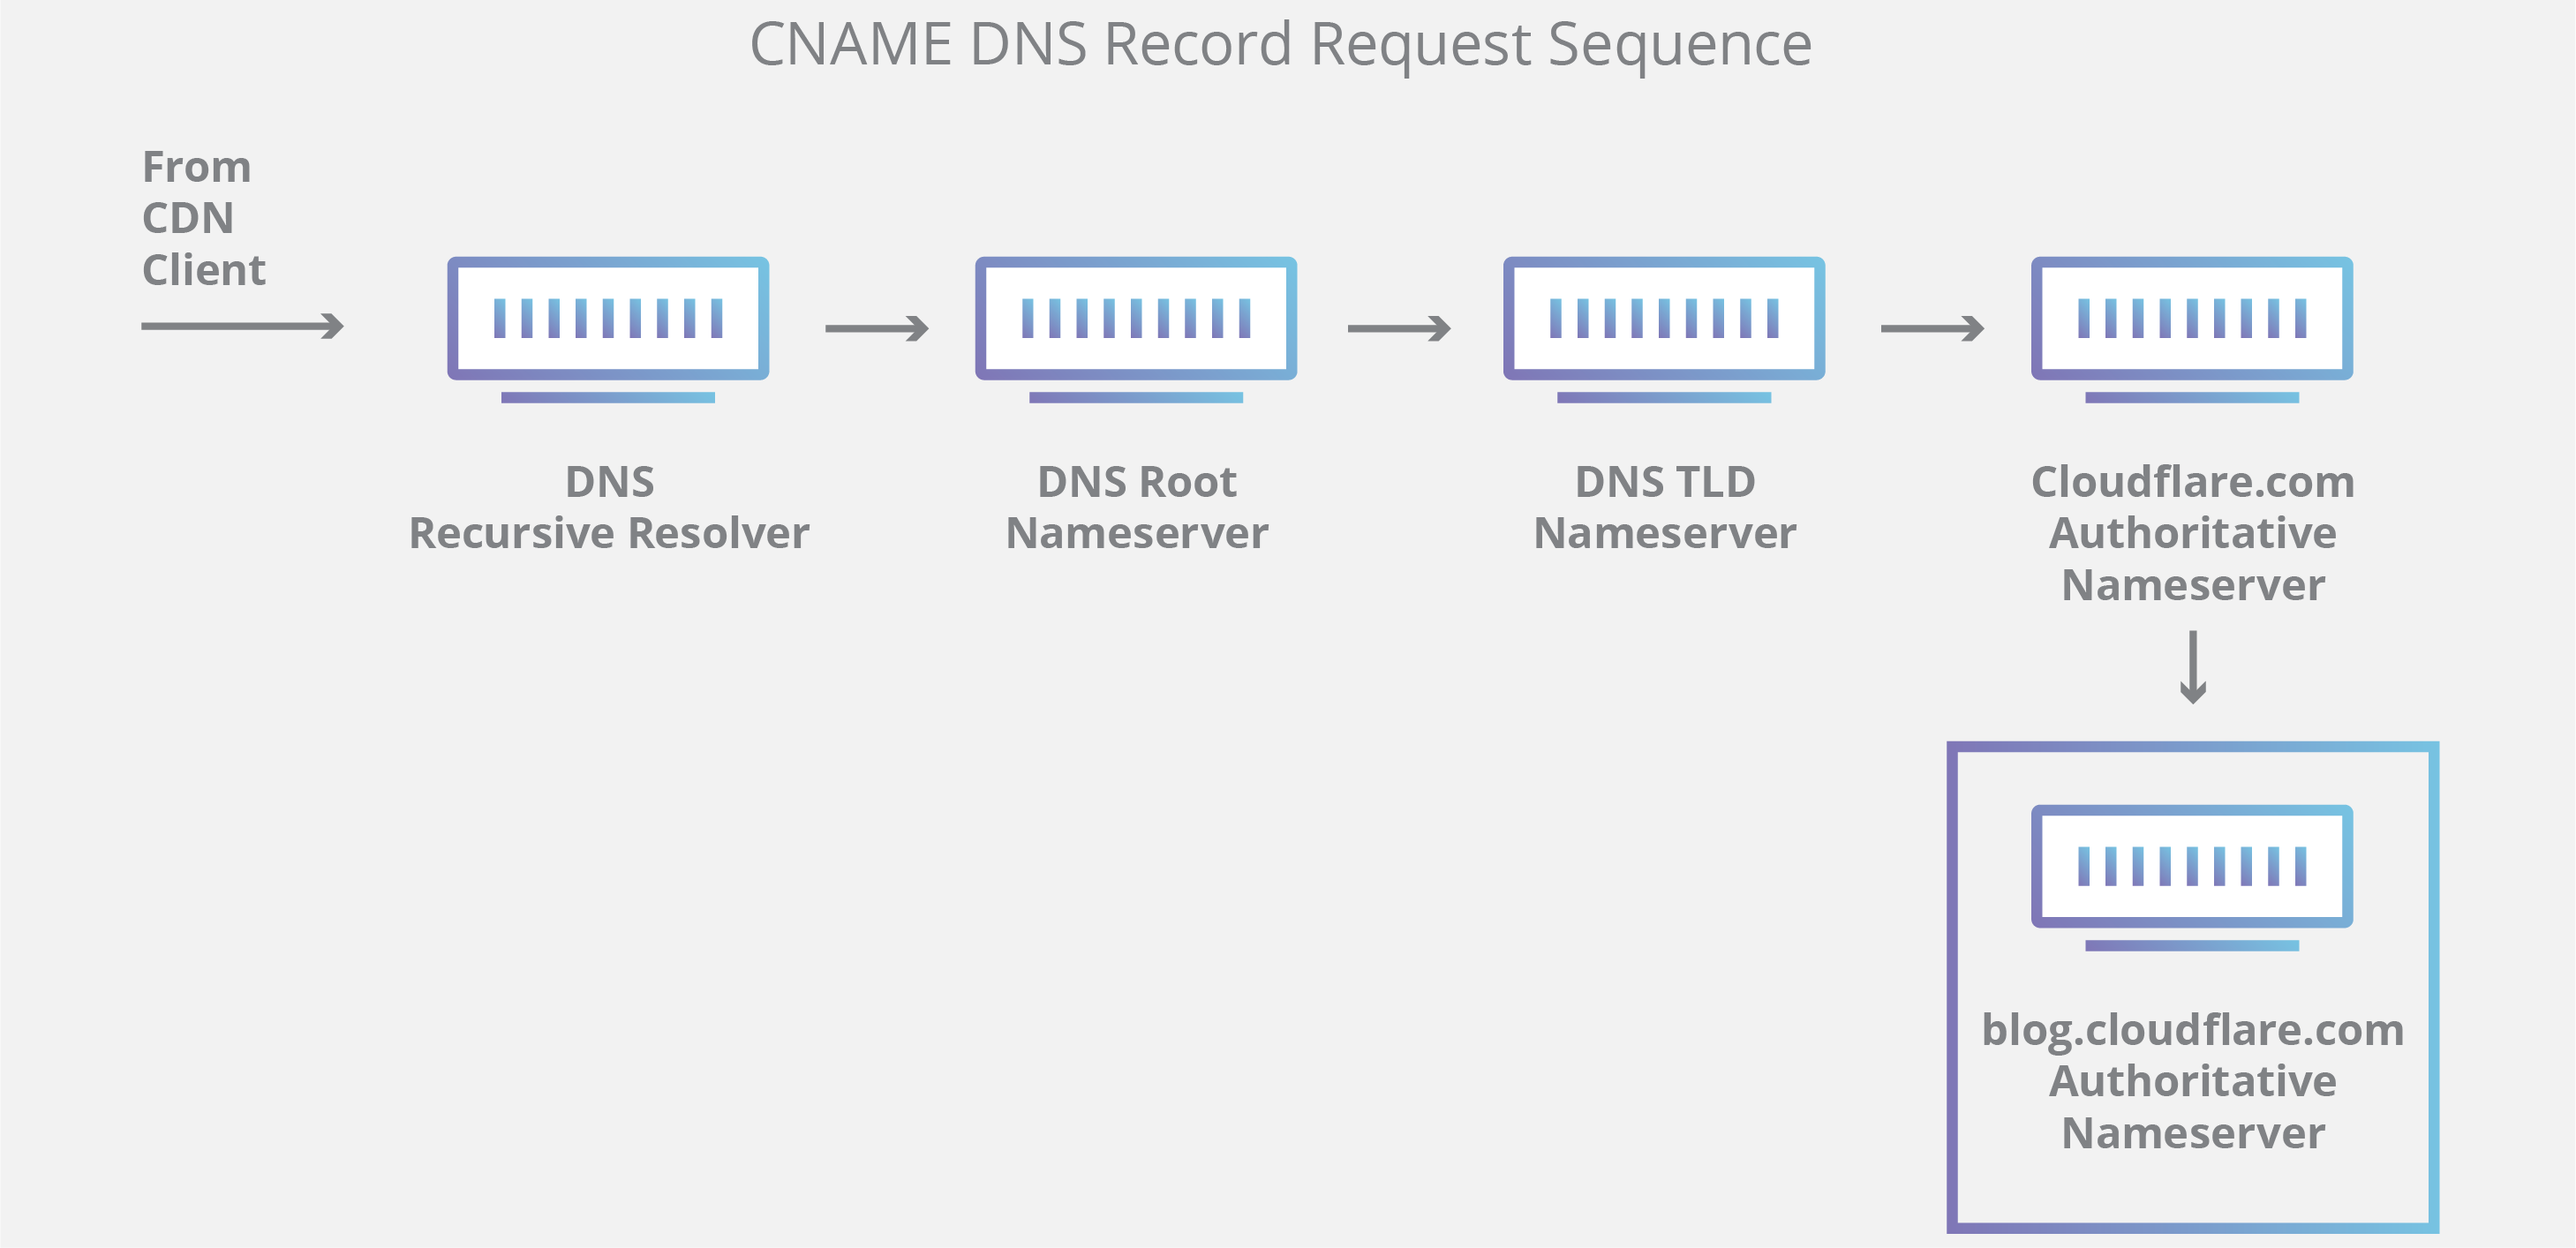
It’s worth mentioning that in instances where the query is for a subdomain such as foo.example.com or blog.cloudflare.com, an additional nameserver will be added to the sequence after the authoritative nameserver, which is responsible for storing the subdomain’s CNAME record.
There is a key difference between many DNS services and the one that Cloudflare provides. Different DNS recursive resolvers such as Google DNS, OpenDNS, and providers like Comcast all maintain data center installations of DNS recursive resolvers. These resolvers allow for quick and easy queries through optimized clusters of DNS-optimized computer systems, but they are fundamentally different than the nameservers hosted by Cloudflare.
Cloudflare maintains infrastructure-level nameservers that are integral to the functioning of the Internet. One key example is the f-root server network which Cloudflare is partially responsible for hosting. The F-root is one of the root level DNS nameserver infrastructure components responsible for the billions of Internet requests per day. Our Anycast network puts us in a unique position to handle large volumes of DNS traffic without service interruption.
What are the steps in a DNS lookup?
For most situations, DNS is concerned with a domain name being translated into the appropriate IP address. To learn how this process works, it helps to follow the path of a DNS lookup as it travels from a web browser, through the DNS lookup process, and back again. Let’s take a look at the steps.
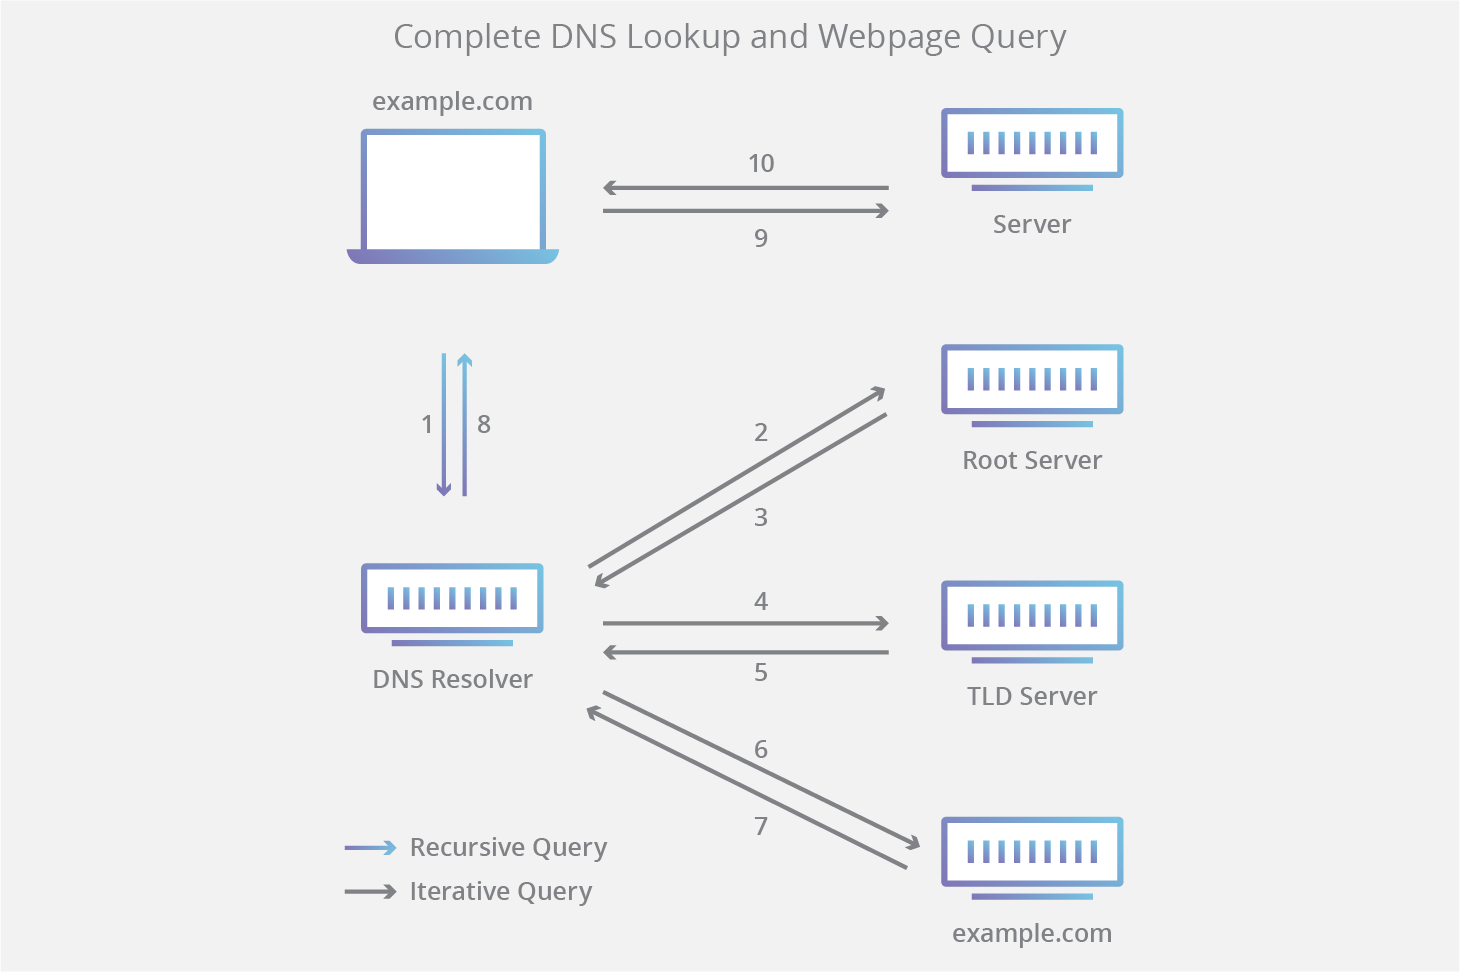
Note: Often DNS lookup information will be cached either locally inside the querying computer or remotely in the DNS infrastructure. There are typically 8 steps in a DNS lookup. When DNS information is cached, steps are skipped from the DNS lookup process which makes it quicker. The example below outlines all 8 steps when nothing is cached.
The 8 steps in a DNS lookup:
A user types ‘example.com’ into a web browser and the query travels into the Internet and is received by a DNS recursive resolver.
The resolver then queries a DNS root nameserver (.).
The root server then responds to the resolver with the address of a Top Level Domain (TLD) DNS server (such as .com or .net), which stores the information for its domains. When searching for example.com, our request is pointed toward the .com TLD.
The resolver then makes a request to the .com TLD.
The TLD server then responds with the IP address of the domain’s nameserver, example.com.
Lastly, the recursive resolver sends a query to the domain’s nameserver.
The IP address for example.com is then returned to the resolver from the nameserver.
The DNS resolver then responds to the web browser with the IP address of the domain requested initially.
The browser makes a HTTP request to the IP address.
The server at that IP returns the webpage to be rendered in the browser (step 10).
What is a DNS resolver?
The DNS resolver is the first stop in the DNS lookup, and it is responsible for dealing with the client that made the initial request. The resolver starts the sequence of queries that ultimately leads to a URL being translated into the necessary IP address.
Note: A typical uncached DNS lookup will involve both recursive and iterative queries.
It’s important to differentiate between a recursive DNS query and a recursive DNS resolver. The query refers to the request made to a DNS resolver requiring the resolution of the query. A DNS recursive resolver is the computer that accepts a recursive query and processes the response by making the necessary requests.
What are the types of DNS Queries?
In a typical DNS lookup three types of queries occur. By using a combination of these queries, an optimized process for DNS resolution can result in a reduction of distance traveled. In an ideal situation cached record data will be available, allowing a DNS name server to return a non-recursive query.
3 types of DNS queries:
Recursive query – In a recursive query, a DNS client requires that a DNS server (typically a DNS recursive resolver) will respond to the client with either the requested resource record or an error message if the resolver can’t find the record.
Iterative query – in this situation the DNS client will allow a DNS server to return the best answer it can. If the queried DNS server does not have a match for the query name, it will return a referral to a DNS server authoritative for a lower level of the domain namespace. The DNS client will then make a query to the referral address. This process continues with additional DNS servers down the query chain until either an error or timeout occurs.
Non-recursive query – typically this will occur when a DNS resolver client queries a DNS server for a record that it has access to either because it’s authoritative for the record or the record exists inside of its cache. Typically, a DNS server will cache DNS records to prevent additional bandwidth consumption and load on upstream servers.
What is DNS caching? Where does DNS caching occur?
The purpose of caching is to temporarily stored data in a location that results in improvements in performance and reliability for data requests. DNS caching involves storing data closer to the requesting client so that the DNS query can be resolved earlier and additional queries further down the DNS lookup chain can be avoided, thereby improving load times and reducing bandwidth/CPU consumption. DNS data can be cached in a variety of locations, each of which will store DNS records for a set amount of time determined by a time-to-live (TTL).
Browser DNS caching
Modern web browsers are designed by default to cache DNS records for a set amount of time. the purpose here is obvious; the closer the DNS caching occurs to the web browser, the fewer processing steps must be taken in order to check the cache and make the correct requests to an IP address. When a request is made for a DNS record, the browser cache is the first location checked for the requested record.
In chrome, you can see the status of your DNS cache by going to chrome://net-internals/#dns.
Operating system (OS) level DNS caching
The operating system level DNS resolver is the second and last local stop before a DNS query leaves your machine. The process inside your operating system that is designed to handle this query is commonly called a “stub resolver” or DNS client. When a stub resolver gets a request from an application, it first checks its own cache to see if it has the record. If it does not, it then sends a DNS query (with a recursive flag set), outside the local network to a DNS recursive resolver inside the Internet service provider (ISP).
When the recursive resolver inside the ISP receives a DNS query, like all previous steps, it will also check to see if the requested host-to-IP-address translation is already stored inside its local persistence layer.
The recursive resolver also has additional functionality depending on the types of records it has in its cache:
If the resolver does not have the A records, but does have the NS records for the authoritative nameservers, it will query those name servers directly, bypassing several steps in the DNS query. This shortcut prevents lookups from the root and .com nameservers (in our search for example.com) and helps the resolution of the DNS query occur more quickly.
If the resolver does not have the NS records, it will send a query to the TLD servers (.com in our case), skipping the root server.
In the unlikely event that the resolver does not have records pointing to the TLD servers, it will then query the root servers. This event typically occurs after a DNS cache has been purged.
There are loads of password generator out there which will generate strong passwords for you, this is nothing new, but I came across this very handy tool today called “Hardest PW” which does something else useful.
Aside from generating a strong password, it will also generate a one-time link to that password which stays active for 7 days or until the link is clicked on, and will then reveal the password to the person who clicked the link.
In case you do not know why this is useful, let me explain.
One of the biggest security dilemmas of all time when it comes to passwords is how to securely deliver it to the end user without creating a potential security risk / easy access point for criminals.
Sending passwords out via email has always been the norm, but the problem is when the recipient of that email then leaves it in their inbox and uses that email as their permanent reference to that password instead of writing it down somewhere safe or using a password manager and then deleting the email.
Thankfully, this practice has finally started to change and a lot of sites now ask the user to choose a password during the signup process and do not send it out via email, so the user is expected to write it down or remember it. But the majority of sites are still doing things the old/insecure way.
One of the primary targets for cyber criminals and hackers is a users email account. This is because once they get into your email, they can pretty much access everything. If you have emails in your inbox with passwords in them, you have just handed it to the criminals on a platter.
For everything else, the hacker can perform a password reset request on any website, which will send a password reset link to your email address, which the hacker now has access to. They will then click the link, and reset your password and then delete the email and all evidence of their actions. This is why it is critical to also use a password manager along with 2 factor authentication.
So by using this one-time link you can at least avoid the issue of the password sitting around in someone’s inbox for eternity waiting for someone to find it. Just generate a password and send the link to your client, advising them to store it securely in a password manager.

















Recent Comments