When you’re searching for a domain name, there are all kinds of terms that you’ll come across. All of this can be a little overwhelming when you’re just getting started, one of those is the concepts of domains vs subdomains.
All you want to do is build a website as quickly as possible. But, by taking the time to learn a little bit about the technical elements of your website, you’ll make it much easier to manage, build, and troubleshoot your website.
For most people, the quest to get a website online will begin with choosing a domain name.
Below you’ll learn the differences between a subdomain vs. a domain so that you can make the right decision for your next online project. Although they both serve different purposes on the web, domains and subdomains are related, as you’ll soon learn below.
What is a Domain?
To have a website that lives on the internet, you’re going to need a domain name. Without a domain name, there’s no way for visitors to access your website!
Before domain names were invented, you needed to type in the IP address for a given website to access it. Today, domain names act as a placeholder for the complex string of numbers known as an IP address. So, instead of typing in a series of numbers like 123.45.67.891 you type in domainadmintools.com into your browser.
This makes things much easier and makes the consumer internet much more user-friendly.
When you’re trying to find the perfect domain name, you’ll not only have to come up with the perfect domain name, but you’ll need to choose a domain extension as well.
This is the “.com,” “.net,” “.org” portion of a domain name. The domain name extension you choose will influence how your visitors perceive your domain, so choose wisely.
When Do You Use a Domain?
Luckily, this question is easy to answer.
If you want to have a website that’s accessible via the internet, then you’re going to need a domain name. The most challenging part about the process is choosing a domain name you like and finding the right domain name extension, or top-level domain (TLD).
In some cases, you can get away with using a subdomain to build a website. For example, when you create a free website using WordPress.com, Tumblr, or Blogger, you’ll be doing so with a subdomain.
This might work if you’re playing around and experimenting with a new platform. But, if you’re serious about your website, or building an online business, then you’ll want your own domain.
Overall, a domain is an inexpensive investment that claims your piece of virtual real estate on the internet.
What is a Subdomain?
A subdomain is an add-on to your primary domain name. For example, when you’re using the site Craigslist, you’re always using a subdomain like reno.craigslist.org, or sfbay.craigslist.org. You’ll automatically be forwarded to the subdomain that corresponds to your physical location.
Essentially, a subdomain is a separate part of your website that operates under the same primary domain name. For example, your primary domain name could be “bestwebdesigner.com,” while you could add a subdomain to that domain called “blog.bestwebdesigner.com.”
However, to create a subdomain, you must first have a primary domain name. Without a primary domain name, there’s no way to add a subdomain onto it.
Subdomains give you the freedom of creating an entirely new website, while still using the same domain name. Plus, you can usually create an unlimited number of subdomains for every domain you own.
As you’ll soon learn below, there are a few scenarios when using a subdomain makes sense.
When to Use a Subdomain
There are a ton of different reasons to use a subdomain. However, here are the most common situations where utilizing a subdomain makes sense:
1. Creating a Site Resource or Support Page
If your website requires an extensive support, documentation, or a tutorial section, then you might find a subdomain useful.
When you’re trying to create and structure a ton of different content, you’ll need to think about how you can organize this content, so it’s easy to access and digest.
For example, you’ll find a separate support section at Google that’s using a subdomain.
Other types of websites might create a separate tutorials section, a knowledge base, or any other aspect of your site that requires extensive content management outside of a traditional blog.
2. Hosting a Company Blog
Some website owners may want to isolate their company blog from the rest of their site. Usually, this is done when the main website isn’t equipped with the right features or software to effectively manage a blog.
For example, maybe your main website is built around trying to get people to download an app. But, you want to create a company blog for content marketing purposes. The only issue is you don’t want to redesign your website with a new framework.
In this case, using a subdomain makes sense. Just create the subdomain of “blog.myappsite.com,” and you can install a CMS like WordPress on your new subdomain. Then, your only goal should be to try and mirror your existing design as close as possible.
This is a common approach that a lot of startups take. The blog isn’t the main focus of their company, so they operate it like a separate entity.
For another example, we can check out the Grammarly app. The main site is located on the primary domain, but the web app uses a subdomain. Here’s what the homepage looks like when you visit the site:
And here’s the backend when you’re logged into the grammar editor. Notice the change in domain up at the top:
3. Creating an eCommerce Store
eCommerce stores require more strict security guidelines and protocols in place to protect sensitive financial information. This might require that you install specific software, or even upgrade your SSL certificate.
You might not require this across the rest of your site, so you can host your eCommerce store on a subdomain instead, like “store.mydomain.com” or “shop.mydomain.com.”
By hosting your eCommerce store on a subdomain you also give yourself the opportunity to design a high converting storefront. By being able to pick an eCommerce specific theme you’ll have an online store that’s built from the ground up to help you sell more products. Instead of having to hack together a presentable design from your existing site.
4. Redesigning Your Site
When you’re going through a website redesign, it can be helpful to be able to see a live version of it. To do this, you can create a subdomain that allows you to build a new website entirely from scratch.
This way, you’ll be able to insert links, images, videos, and more and see how your website works completely in real-time.
You can even send traffic to your subdomain to see how users interact with your new site as well. Gaining real-time user feedback can be invaluable and help you avoid launching a new site that doesn’t align with their needs and expectations.
When you’re ready to make your new site live, just transfer over your redesigned site to your primary domain.
You can even password protect the subdomain you’re using to redesign your site, so your visitors won’t be able to view your unfinished site accidentally.
5. Testing New Products/Features
Do you have a new market you want to expand into, a new product you want to test, or a new idea you have for your site, but want to check it first?
Whatever your reason, a subdomain allows you to do all of these things and more.
When you create a subdomain, you’re giving yourself a clean slate. You essentially have a brand new website to work with, without the hassle of setting up a new domain.
Now, you can create a mini-site to test your new idea. Then, if it works, you can add this section to your existing site. A subdomain can give you creative freedom without having to sacrifice the existing user experience.
Subdomain vs. Subfolder
Another common distinction you’ll need to make when it comes to subdomains is the difference between a subdomain and a subfolder.
By now, you already know what a subdomain is, but a subfolder is a bit different. With a subfolder, you’re adding a folder to your existing domain.
So, instead of creating a new subdomain for your blog like “blog.mysite.com,” you’ll use a subfolder instead “mysite.com/blog.”
For example, here at DomainAdminTools you can access the blog by navigating to “https://domainadmintools.com/blog” , not “blog.domainadmintools.com”.
When you’re thinking about using a subdomain, you should really view it as creating a separate website. Although subdomains branch off of an existing domain name, they do take more work to build, grow, and maintain.
A subfolder is a way to organize your site more easily. Think of it as creating categories for your blog and blog posts. If you have a sports website, you could create subfolders for each sport you cover. So, you’d end up with a URL structure something like the following: “sports.com/basketball,” “sports.com/football,” “sports.com/hockey,” and on and on. Each page could operate as its own separate sports-specific blog with each page filled with unique content about that sport.
Domains, Subdomains, and URL Structure
Now that you have a better understanding of what domains vs. subdomains are let’s examine how they work together.
Your URL structure should be something you take into account whenever you’re building out your website. With the wrong URL structure, you’ll make it much more difficult for your site to rank in the search engines, plus you’ll make it harder for your visitors to navigate as well.
For example, let’s say you want to start a new blog. You’ll have three different options regarding your domain name.
Create an entirely new website: mynewblog.com
Use a subdomain: blog.mywebsite.com
Use a subfolder: mywebsite.com/blog
By using the first option, you’re going to have to register a new domain name and build an entirely new website from scratch. If you’re creating a blog that’s part of your existing website, then it probably doesn’t make sense to utilize an entirely new domain.
So, we have options two and three left. We’re either going to host our blog on a subdomain or use a subfolder.
By choosing a subdomain, we’ll have more freedom to design the layout of the blog, select a new CMS, and more. We’ll be using the trust of the main domain to create a separate site.
The final option is using a subfolder. A folder helps to organize your site better and make it easier to navigate. In terms of SEO (search engine optimization), this will help to pass more trust from your primary domain.
Overall, the strategy you choose will depend on your goals and the reason you’re thinking about creating a subdomain in the first place.
In Closing: How Domains and Subdomains Work Together
As you can see the domain name ecosystem has a ton of different moving pieces. Taking the time to understand how it all fits together does take more time, but it’ll give you a leg up on the rest of your competition.
Hopefully, by now, you have a better understanding of how domain names and subdomains work, as well as the situations when you’ll use a domain or subdomain.
To put things simply, you’ll need a domain name whenever you want to create a website that’s accessible via the internet. Subdomains are an extension of your primary domain name and are used for site organization or redesign purposes, or even to host your blog or eCommerce store.
A hacker attack occurs every 39 seconds in the US, affecting one in three Americans every year.
Don’t leave the front door of your site wide open! You need to secure your website, which means putting protection in place to keep out hackers, bugs, and other online nasties. Otherwise, your data could be at risk, your site could crash, or you could even lose money.
Here’s 7 Tips to make your website secure:
Install SSL – buying a simple Secure Sockets Layer certificate is a crucial first step.
Use anti-malware software – to scan for and prevent malicious attacks.
Make your passwords un-crackable – 123456 won’t cut it!
Keep your website up to date – using out-of-date software is like leaving your back door unlocked.
Don’t help the hackers – look out for phishing emails and other scams.
Manually accept on-site comments – keep control over potentially dodgy comments.
Run regular backups – to prepare for the worst case scenario.
Security is important for everyone…
…and our research confirms that. We spoke to 425 users, some choosing their first web host and others switching providers, about which features they value the most. 25% of all respondents named security as their number one priority.
But I’m not even making money through my website. It’s just a small blog. Why would anyone hack me? Why does it even matter if a hacker gets in anyway?
Apart from losing money, hacking can result in huge losses in traffic, your site being suspended or crashing, and even identity theft. Your personal data, and that of your visitors, could be at risk.
But how am I supposed to fight off hackers? I’m not that technically skilled!
This is another common worry, but luckily, you don’t need fearsome tech skills in order to secure your website. All of these steps are simple to implement, and we’ll walk you through each part of the process.
Before we get into the details of how to prevent your website getting hacked, we should probably talk about what a hacked website looks like.
While there’s no set way that a website will look after being hacked, there are patterns. And we should tell you now, if your site has been hacked, you’ll be in no doubt about it because something will be very wrong. Here are some common ways hacking presents itself:
Ransomware. The hacker will threaten to publish your data and/or withhold access to your site unless a ransom sum is paid.
Gibberish hack. You’ll spot loads of auto-created pages filled with keywords and gibberish, with the aim of getting them to rank on Google for key terms. When clicked on, they’ll redirect to a dodgy site.
Cloaked keywords hack. As above, but slightly more sophisticated – at first glance, these will look like your site’s pages, as only the written content is altered.
Japanese keywords hack. Creates random pages in Japanese full of affiliate links to stores selling fake merchandise.
Malicious code/viruses. If malicious code or a virus is inserted into your site, your site may well go down, or you could be unable to access it. You may find that all your hardware is also affected.
Denial of Service (DoS). Hackers use bots to overload a website with requests and crash the server it’s on.
Phishing. Scammers contact your clients pretending to be part of your business and using your branding in the hope of finding personal information.
“Outdated software. Website owners need to stay on top of updates to WordPress and other CMS’, plugins, and anything else that requires an update. In addition to fixing bugs or glitches, software updates typically include security improvements or patches. Hackers will always be searching for ways to capitalize on software vulnerabilities. These days, many cyber attacks are automated. Criminals use bots to scan websites that are vulnerable. So, if you’re not staying up to date on the latest software versions, it will be easy for hackers to identify your website before you can do anything about it.”
So now you know what a hacked website looks like, it’s time to look at the seven ways to prevent yours becoming one:Go to the top
One of the easiest things you can do to protect your website, yourself, and your users, is to install an SSL (Secure Sockets Layer) certificate. You may not realize it, but you come across SSL all the time when you browse the web – it’s the reason for the “s” in “https”, and the padlock in the address bar.
Good to know…
SSL stands for Secure Sockets Layer. You install an SSL certificate on your website, and it encrypts data (such as login details) passing between your site and your visitors. There are different levels of SSL – ecommecre sites processing payment details, for example, should use a more advanced version.
SSL encrypts information passing between your website and your visitors. Google now warns visitors when they’re entering a site without SSL, and even “discriminates” against those sites in its search results.
It’s especially important to have SSL security if you’re accepting payments through your site, asking for login details, or transferring files. Without it, the data is unprotected, and vulnerable to hackers.
Krys Lambiase emphasizes the importance of SSL for securing websites – especially online stores:
“An SSL certificate is a must-have if you run an eCommerce store or collect visitor information, like emails, on your site. In addition to boosting SEO, SSL certificates prove that any data your visitors send to your site is using an encrypted channel, so hackers can’t see it while it’s in transit.”
The hosting provider HostGator includes free SSL security on all its plans. Here, it shows the importance of SSL.
It’s not important for you to know the technical ins and outs of SSL security, so don’t worry if you don’t really get how it works. The most important thing is to know that your site needs SSL, and how to go about getting it.
There are multiple ways to install SSL. The three main ways we suggest are:
Choose a good quality website builder that includes SSL for free
Choose a hosting provider (such as GURU) that provides a free SSL with all plans (if you’re building your site with a content management system, such as WordPress.org)
If you want a much higher level of security, you’ll need to pay for an advanced SSL certificate. These vary in price, and you can buy them from hosting providers, or registrars such as GURU. Unless you’re running a large online store, or handling large amounts of sensitive data, the free version of SSL will probably be sufficient.Did you know?
Hacking is the number one method of data breaches online, accounting for 61.9% of lost information. More than 8 billion records have been lost because of hacking.
“Anti-malware software” might sound like a lot of jargon, but the good news is that anti-malware software actually does the hard work for you – so you don’t need to worry about any of the technical stuff.
There are plenty of different anti-malware options out there. Some have free plans – like Bitdefender – while others you have to pay for, such as SiteLock or Sucuri.
SiteLock is used by over 12 million websites, and offers different packages that provide varying levels of protection. This means you can tailor your security to your site’s needs, as well as your budget. Some of the security services it provides include:
Web scanning
Malware detection and removal
Web application firewall
Vulnerability patching
DDoS protection
PCI compliance
If you don’t know what all this means, that’s okay – that’s what anti-malware software is there for!
SiteLock is the global leader in website security, and is a popular anti-malware software that often comes included in hosting plans.
A good quality website builder or hosting provider should look after your site’s security for you. Hosting providers often include anti-malware software as part of their plans – some even throw in paid services like SiteLock for free!
Other providers include a built-in set of tools – GURU, for example, includes a security suite on even its cheapest plan. This is made up of:
Free SSL
Hack protection
Automatic backups
DDoS protection
These are the security basics for your site, and the features you should look for whenever you’re looking at picking a hosting provider. Whether your provider comes with tools built-in, or offers extra freebies such as SiteLock, anti-malware software gives you a welcome extra layer of protection.
Good website security starts with a good web host, as Krys Lambiase points out:
“Web hosts are the backbone of your website. They help you get online and often provide additional tools for your website giving you the power to build a website with the look and feel you need. Quality website hosting providers have protocols in place to protect WordPress, and other content management systems, they host such as automatic security patches and updates. It’s the hosting provider’s job to maintain their servers and to implement essential security monitoring.”
Did you know?
A DDoS attack could cost a small business up to $120, 000 – and if you’re in finance or retail then you’re especially at risk. Nobody is safe, though, with DDoS attacks expected to reach a whopping 14.5 million globally by 2022!
Make Your Passwords Uncrackable
Passwords. They’re so familiar that we can sometimes forget just how important they are. It’s easy to overlook the fact that often, your password is all that’s standing between a hacker and your personal information.
Not only are passwords a vitally important step, but they’re also one of the easiest things you can change to increase the security of your website. Spend just 20 minutes today making your passwords stronger, and you’ll be on your way to a more secure site. Did you know?
40% of surveyed small business respondents said that their company suffered an attack due to employees’ passwords being compromised. The average cost of each attack was just over $380 thousand!
A survey carried out by the UK’s National Cyber Security Center analyzed the most common passwords used by accounts that had been breached across the world. They then put together a list of the top 10 most hacked passwords – if you’re using any of the following, it’s time to change it (like, right now)!
123456
123456789
qwerty
password
111111
12345678
abc123
1234567
password1
12345
Instead of using easy to guess phrases, here are some things you should do instead:
Combine three random, unrelated, but memorable phrases
Use a randomly generated sequence of characters
Don’t reuse passwords – use a password manager to keep track of them all
Make your password long
Never use personal information in your password – it’s the first thing hackers will try!
There’s a seemingly endless list of password tips out there, and you should combine a few of these tactics to create uncrackable passwords. Once you’ve got your shiny new bulletproof passwords, be careful with them – do not share them around, even with friends, and do change them regularly (about once every quarter).Go to the top
Keep Your Website Up to Date
We’re not talking about posting the latest gossip, or keeping your visitors in the loop with your newest product. This is about the importance of keeping your website’s software up to date.
If you use a website builder, you don’t need to worry about this so much, because most builders will handle software updates and security issues for you. However, if you’re using a platform such as WordPress, you need to be totally on top of things and running updates when necessary.
You need to run updates for your WordPress core software, as well as any plugins you’ve installed. If you don’t, then it can all become outdated and vulnerable to bugs, glitches, and – worst of all – hackers wielding malicious code.Did you know?
Cybercrime will cost the world in excess of $6 trillion annually by 2021 – that’s a 100% increase from 2015!
The good news is, you should be able to set these updates to happen automatically in your dashboard – but it’s still worth keeping an eye on and making sure everything is running smoothly. Letting your site become outdated can be a fatal blow in terms of security, so it doesn’t hurt to be vigilant about staying on top of updates.Good to Know… When you’re choosing plugins for your WordPress website, be careful about the quality. Plugins can be built by anyone, and poor quality ones can contain bugs or malicious code. Read reviews, look for trusted developers, and check out the plugin thoroughly before clicking Install.
Find out more
If you’re using WordPress, it’s essential to keep your site up to date and secure. Discover the Best WordPress Hosting Providers to give your site the best start in life.
Read my detailed hosting Reviews to find out why WordPress itself recommends it for your WordPress website – and why we do, too!
Don’t Help the Hackers
We know, this sounds like a total “duh” moment. Well, obviously I’m not going to hand over my details and let my site get hacked – that’s the whole reason I’m reading this article! The trouble is, people are still – through no fault of their own – falling prey to scammers and unknowingly giving away important information about themselves.
Did you know that 92.4% of malware is delivered via email? That makes it the number one method of attack, and means you should always be on the lookout for anything unusual in your inbox.
There’s always more tech you can put in place to protect your website, but you mustn’t forget that 95% of cybersecurity breaches are due to human error. Protect your website by being on your guard, and being suspicious of texts, emails, or phone calls asking for personal information.
It sounds simple enough, but scams are growing ever-more sophisticated. Here are five things you can do to make sure your website doesn’t open the door to unwelcome visitors:
Beware of public or open internet connections if you’re working in a shared space like a cafe – they won’t be secure!
Never click on links in emails that seem suspect – delete the email straight away! This is still important if you’re using a professional email connected to your website, rather than a personal one.
Be careful who you grant access to your website – check admins are people you can trust, and make sure they’re security-conscious.
Change the default settings, passwords, and usernames of your site as soon as you’ve set up your account – this is especially important for WordPress sites.
Only trust verified professionals to access your site. For example, scammers sometimes want to take control of your screen under the pretense of fixing a technical issue.
You get the idea. We know this seems like common sense, but phishing emails are becoming increasingly realistic – so stay on high alert!
Manually Accept On-Site Comments
Is there a better feeling than hitting publish on your site and then seeing comments start to roll in? It’s proof that people have actually visited your site – and enjoyed it.
Comments are the perfect way to measure engagement, provide social proof to other visitors, connect with other people in your niche, and even take on constructive feedback. We love receiving comments, and you should too!
However, there are always those comments that aren’t quite so fun. Bots, fake accounts, and trolls are ready and waiting with a silly comment or spammy link. At best, it’s annoying – at worst, it can pose a security risk to you and your users.
If people can post comments directly to your website, there’s a chance that malicious links might sneak into the comments section. This is particularly dangerous for your website’s visitors, who might click on the link and risk exposing personal data or accidentally install malware.Did you know?
One in ten URLs are malicious – and this number’s on the up.
To combat this, you can change your site’s settings so that you need tomanually approve comments before they appear on your site, giving you the chance to delete any spam. Other ways to reduce these malicious links include:
Use an anti-spam software or plugin (such as Akismet for WordPress users)
Ask visitors to register before they can start commenting
Turn off comments on posts after a month or two
These tactics should keep your comments section a safe, fun, and happy place for both you and your visitors, and keep hackers and their malicious links on the outside.
Run Regular Backups
Following each of the steps we’ve outlined so far will help you to stop hackers in their tracks. But don’t take your site’s security for granted – just like having a safety net beneath you is a good idea when walking a tightrope, running regular backups of your site just makes sense.
Creating backups of your website ensures that if the worst were to happen, you’d still have a recent version of your site stored safe and sound, and ready to be relaunched.
A backup is essentially a copy of your website data – such as files, content, media, and databases. If you have a large or complicated website, you’ll need a larger amount of backup storage to save all of your data.
Krys Lambiase explains why backups are a good idea:
“If your business website site is hacked, you need a way to get up and running again fast so you don’t miss out on customers. Get an automatic site backup service like CodeGuard, and you can quickly restore the most recent uncorrupted version of your site if something goes wrong. Make sure that whichever service you choose runs daily backups, so you don’t have to go back to an out-of-date site version in case of a crash.”
So, how can you go about backing up your site to keep things running smoothly? Well, there are multiple ways to backup your website, including:
Use a backup service such as CodeGuard or Sucuri, which does the work for you at a price.
Use a web host that includes backups in its plans, like GURU, Kinsta , Hostek or Flywheel. Some hosts have backup software built-in, or available as add-ons. However, these can have limited storage, so we usually recommend not relying on them for all your backup needs.
Use a WordPress plugin such as UpdraftPlus or VaultPress. WordPress users can simply install their chosen plugin and manage their own backup preferences.
Using a backup service is usually the safest and most reliable way to go. Still, whichever backup method you choose, there are some important things that you should always look for:
Off-site backups – this keeps your data far away from hackers in a secure, off-site location rather than in a normal server. This also protects your backups from hardware failure.
Automated backups – remember when we said that 95% of security breaches were through human error? Don’t forget to create backups and pay the price – by automating this process you can simply sit back and relax.
Redundant backups – this means your website’s data is stored in not just one, but multiple server locations. Think of it like having backups or your backups!
Regular backups – it’s no good if you’re only running backups once per year. If a hack attack strikes, you’ll be left with an outdated version of your site. You should aim for weekly backups at the very least.
The more frequently you update your website, the more frequent your backups should be. We recommend erring on the side of caution, though – if you come under attack, you’ll never be sorry that you backed up your site too much!Go to the top
Why Cybersecurity Is Important – 3 Case Studies
#1. Zynga: 172.9 million records hacked
On September 12th 2019, Zynga – the mobile game producer responsible for “Farmville” – was hacked.
The hacker accessed login details for players of the popular games “Words With Friends” and “Draw Something”, including:
Usernames
Passwords
Log-in and Facebook IDs
Phone numbers
Zynga account IDs
This hack was originally thought to have affected 218 million people, because of claims by the actual attackers. But the final figure was estimated around 173 million by the breach monitoring site Have I Been Pwned.
In response to the attack, Zynga advised its users not to use the same password for multiple accounts – this reinforces the importance of having unique, secure, and separate passwords for different online accounts.
#2. 7-Eleven, Japan: $500,000 of customers’ money lost
If you think that waiting one day more to sort out your security won’t make a difference, think again.
7-Eleven Japan introduced a new payment app for its customers, but left a major flaw in the form of an easy password reset that could be requested by just about anyone.
The app was launched on Monday, July 1 2019, and was shut down two days later on July 3 due to customer complaints – it only took hackers this long to break into around 900 accounts and steal ¥55 million ($510, 000).
Hacker attacks are frequent, and if they find a weakness you can bet they won’t hang around to exploit it. Don’t wait to sort out your security – your users’ data is at as much risk as yours if your site comes under attack!
#3. Marriott: 500 million guests’ data exposed
Hotel company Marriott International was compromised by a hack that started as far back as 2014 – and went unnoticed until 2018. It was still hitting headlines last year, as Marriott continued to deal with the fallout.
It was initially thought that around 500 million customers were affected by the hack, which leaked:
Names
Addresses
Phone numbers
Email addresses
Passport numbers
Date of birth
Genders
Encrypted payment details
Since then it’s been suggested that the number of people affected was actually much lower – around 383 million. Still, with 5.25 million unencrypted passport numbers having been exposed, that’s still a pretty huge cybersecurity fail.
Despite this, one of the main things that Marriott has been criticized for is its response to the attack – mostly due to a lack of communication, as well as further security concerns over its email domain.
If you’re running a business website, or even a personal blog, and it gets hacked, make sure you communicate clearly with your audience. Be quick to fill them in on what’s happened, give them the facts, and also empathize with them about how they might be feeling.
Learn from where businesses like Marriott got it wrong!
Good website security starts with you – choosing a reliable website builder or hosting provider, making sensible choices about how you run your site, and putting in the extra effort to make passwords secure.
And we’re here to help you along the way!
Hopefully you’ve learned how to secure a website, and have found it’s not as hard as you first thought. You don’t need tech skills or a huge budget to make your website secure – as our list has shown!
We’ve outlined the seven steps you can take to start securing your website. This is by no means an exhaustive list, however – there are plenty more tips, tricks, and tools you can use to better protect your website.
If you’re a WordPress user, for example, you can find plenty of security tips in WordPress’ support pages. Sucuri is another great resource, with a huge wealth of guides, infographics, and courses to help you confidently secure your website.
For now though, start out by following our simple steps…
How to Secure a Website: 7 Simple Steps
Install SSL. An SSL certificate is an essential for any site. It encrypts information passing between your website and your visitors.
Use anti-malware software. Use a software like SiteLock to scan and protect your site from malicious code.
Make your passwords uncrackable. Use a random combination of letters, numbers and symbols when possible.
Keep your website up to date. Install any software or plugin updates as soon as they become available.
Don’t help the hackers. Watch out for phishing emails.
Manually accept comments. This allows you to trash any that are spam before they go live.
Run regular backups. If your site does get hacked, this way you’ll have a recent version to reinstall.
Are you looking for better search engine rankings?
Of course, you can spend your way to success on Google. But that comes with some serious downsides—namely, it’s expensive and the traffic evaporates as soon as you stop spending.
Instead, if you’re low on funds, focus your efforts on organic search engine traffic through SEO, or search engine optimization.
Thankfully, Google has given us a simple tool to understand how it sees your site, what issues might be affecting your traffic, and how you can improve the site for better rankings and results.
That tool is known as Google Search Console and this is a beginners guide to Google search console.
The tool has been around for a while, and it used to be known as Google Webmaster Tools, and Google Webmaster Central before that.
In 2015, Google rebranded it as Google Search Console—so if you’ve seen different terms, don’t worry. They’re all different names for essentially the same thing.
The great thing about Google Search Console, or GSC, is that it’s completely free. And it’s made by Google itself, so the advice comes straight from the source.
Here’s how you can use GSC to maximize your SEO results.
Adding your website
To start things off, you’ll need to set up a free account with GSC. Then you’ll need to verify that you actually own the site you’re going to analyze.
(Unfortunately, there isn’t a way to check up on your competitor’s sites with this tool. You must prove ownership to inspect a site.)
Start by clicking the “add property” button on the left-hand dropdown.
From there, just enter your site name. Remember that it’s a strict entry, meaning http: and https: are counted as different sites.
Next, you’ll need to verify that you own the site. Google provides a few different ways of doing this.
The recommended method is to add an HTML file to your server. But you can also add a meta tag, edit your DNS settings, or connect to your Google Analytics or Google Tag Manager account.
Dashboard
Once your site is verified you’ll start seeing data on your website. Sometimes it can take a few hours before you see any data, but it’ll start rolling in.
Once it does, you can use a few different tools to explore what Google sees—overview, performance, and URL inspection.
Overview gives you a rough overview of everything from what keywords you are ranking for to how much traffic you are getting.
In addition to that you’ll see if the Google bot is experiencing any crawl errors when going through your website, the number of sites linking to yours, and how many pages Google has indexed.
With Performance, you can see a more detailed breakdown of your site’s performance on Google.
And with URL inspection, you can explore any single URL. Just type it into the search bar at the top of the screen, and you’ll be presented with a quick report on how Google sees the URL, like this.
Site index
Just like everything else, Google isn’t perfect. So configuring your site can help them do a better job of ranking your website.
When configuring there are a few areas that you should be familiar with.
Coverage
There will be some pages on your website that you just don’t want Google to index. These could be private login areas, RSS feeds, or crucial data that you don’t want people accessing.
On the coverage tab you can see a basic report of pages on your site.
It’s broken into a few categories—pages with an error, valid with warnings, valid, and excluded. You should try to have zero pages with errors or warnings.
The number of valid and excluded pages depends on what you’d like Google to index, and what you want to keep private.
By creating a robots.txt file you can block not just Google, but all search engines from accessing web pages that you don’t want them to get their hands on.
However, for highly sensitive areas of your website you may want to consider password protecting all relevant directories.
Through a robots.txt generator and tester, not only will you be able to create a robots.txt file, but you will be able to see if it is done correctly before you upload it to your server.
It’s wise to do because the last thing you want to do is make a mistake and tell them not to index your whole website.
And if you accidentally mess up and find Google indexing pages that you don’t want them to index, you can request them to remove it through this section.
Sitemaps
Next up is sitemaps. This is basically a “table of contents” for your site that can help Google find every page on your site and understand its hierarchy.
Submitting a sitemap will help Google determine what pages you have on your website so they can index them.
If you don’t submit a sitemap they may not index all of the pages on your website, which means you won’t get as much traffic.
Sitemaps have to be submitted in an XML format and they can’t contain more than 50,000 URLs or be larger than 10 megs.
If you exceed any of those limits, you need to split up your sitemap in multiple files and then submit them.
If you aren’t technical, you can go to XML Sitemaps to create a sitemap. All you have to do is enter in your URL of your homepage and click “start”.
Once your sitemaps have been uploaded, Google will tell you how many of your URLs are being indexed. Don’t worry, it is common for them to not index all of your web pages.
But your goal should still be to get as many pages indexed as possible.
Typically if pages aren’t being indexed it’s because the content on those pages isn’t unique, the title tags and meta descriptions are generic, and not enough websites are linking to your internal pages.
Enhancements
Right now, the only option under “Enhancements” is “Mobile Usability.”
Ideally, you’ll want every page on your site to work on mobile with zero errors.
Other
There are a few more options at the bottom of the menu bar. Let’s dive into those next.
Manual actions
First up is manual actions, a rather confusingly-named category. According to Google’s own support team, it basically just means “flagged as spam by a human.”
In their own words:
“Google’s algorithms can detect the vast majority of spam and demote it automatically; for the rest, we use human reviewers to manually review pages and flag them if they violate the guidelines.”
So if your site seems spammy, you’ll get a notification here.
The only thing you should see on this page is a “No issues detected” notification—anything else means you’ve done something wrong, and you need to fix it immediately.
Links
The links report provides a wealth of data about where your site is receiving links, what those links say, and where they’re linking to.
It’s broken up into two main categories—internal and external links.
Internal links are from within your site, which is a great way to get more Google love.
When you link to a page from another page, it tells Google that page is important to your site. For example, I link to my SEO tools at the bottom of every page of NeilPatel.com.
Since every single page is linking to those tools, Google realizes they’re important and is more likely to rank them higher in search results.
If you don’t link to your internal pages, they will not get as much PageRank and they won’t place as well in the search listings.
The second category is external links. These are links to your website from other sites.
As you can imagine, these are harder to get but much more valuable. In fact, these external links—also known as backlinks—are often considered to be the top ranking factor Google uses.
The best way to increase your rankings on Google is to get more sites to link to you.
This can sometimes happen just by posting great content, but it’s usually a good idea to promote it to others in your industry so they know about it.
Either way, you can see your complete link profile here and work on weak areas to get better search result placings in the future.
Conclusion
If you’re looking to grow your SEO reach and start doing better on Google, you need to play by their rules.
And if you’re going to do that, the best way is to follow their advice. Start paying attention to Google’s recommendations and making your site fit their requirements and expectations.
The simplest way is with the free Google Search Console. In just a few minutes, you can start understanding your website from Google’s point of view.
How will you improve your site with Google Search Console?
The term ‘database’ is defined as any collection of electronic records that can be processed to produce useful information. The data can be accessed, modified, managed, controlled and organized to perform various data-processing operations. The data is typically indexed across rows, columns and tables that make workload processing and data querying efficient. Different types of databases include: object-oriented, relational, distributed, hierarchical, network, and others.
In enterprise applications, databases involve mission-critical, security-sensitive, and compliance-focused record items that have complicated logical relationships with other datasets and grow exponentially over time as the userbase increases. As a result, these organizations require technology solutions to maintain, secure, manage, and process the data stored in databases. This is where Database Management System come into play.
What is DBMS?
Database Management System (DBMS) refers to the technology solution used to optimize and manage the storage and retrieval of data from databases. DBMS offers a systematic approach to manage databases via an interface for users as well as workloads accessing the databases via apps. The management responsibilities for DBMS encompass information within the databases, the processes applied to databases (such as access and modification), and the database’s logic structure. DBMS also facilitates additional administrative operations such as change management, disaster recovery, compliance, and performance monitoring, among others.
In order to facilitate these functions, DBMS has the following key components:
Software. DBMS is primarily a software system that can be considered as a management console or an interface to interact with and manage databases. The interfacing also spreads across real-world physical systems that contribute data to the backend databases. The OS, networking software, and the hardware infrastructure is involved in creating, accessing, managing, and processing the databases.
Data. DBMS contains operational data, access to database records and metadata as a resource to perform the necessary functionality. The data may include files with such as index files, administrative information, and data dictionaries used to represent data flows, ownership, structure, and relationships to other records or objects.
Procedures. While not a part of the DBMS software, procedures can be considered as instructions on using DBMS. The documented guidelines assist users in designing, modifying, managing, and processing databases.
Database languages. These are components of the DBMS used to access, modify, store, and retrieve data items from databases; specify database schema; control user access; and perform other associated database management operations. Types of DBMS languages include Data Definition Language (DDL), Data Manipulation Language (DML), Database Access Language (DAL) and Data Control Language (DCL).
Query processor. As a fundamental component of the DBMS, the query processor acts as an intermediary between users and the DBMS data engine in order to communicate query requests. When users enter an instruction in SQL language, the command is executed from the high-level language instruction to a low-level language that the underlying machine can understand and process to perform the appropriate DBMS functionality. In addition to instruction parsing and translation, the query processor also optimizes queries to ensure fast processing and accurate results.
Runtime database manager. A centralized management component of DBMS that handles functionality associated with runtime data, which is commonly used for context-based database access. This component checks for user authorization to request the query; processes the approved queries; devises an optimal strategy for query execution; supports concurrency so that multiple users can simultaneously work on same databases; and ensures integrity of data recorded into the databases.
Database manager. Unlike the runtime database manager that handles queries and data at runtime, the database manager performs DBMS functionality associated with the data within databases. Database manager allows a set of commands to perform different DBMS operations that include creating, deleting, backup, restoring, cloning, and other database maintenance tasks. The database manager may also be used to update the database with patches from vendors.
Database engine. This is the core software component within the DBMS solution that performs the core functions associated with data storage and retrieval. A database engine is also accessible via APIs that allow users or apps to create, read, write, and delete records in databases.
Reporting. The report generator extracts useful information from DBMS files and displays it in structured format based on defined specifications. This information may be used for further analysis, decision making, or business intelligence.
DBMS system schematic
The following diagram illustrates the schematic of a DBMS system:
Benefits of DBMS
DBMS was designed to solve the fundamental problems associated with storing, managing, accessing, securing, and auditing data in traditional file systems. Traditional database applications were developed on top of the databases, which led to challenges such as data redundancy, isolation, integrity constraints, and difficulty managing data access. A layer of abstraction was required between users or apps and the databases at a physical and logical level.
Introducing DBMS software to manage databases results in the following benefits:
Data security. DBMS allows organizations to enforce policies that enable compliance and security. The databases are available for appropriate users according to organizational policies. The DBMS system is also responsible to maintain optimum performance of querying operations while ensuring the validity, security and consistency of data items updated to a database.
Data sharing. Fast and efficient collaboration between users.
Data access and auditing. Controlled access to databases. Logging associated access activities allow organizations to audit for security and compliance.
Data integration. Instead of operating island of database resources, a single interface is used to manage databases with logical and physical relationships.
Abstraction and independence. Organizations can change the physical schema of database systems without necessitating changes to the logical schema that govern database relationships. As a result, organizations can upgrade storage and scale the infrastructure without impacting database operations. Similarly, changes to the logical schema can be applied without altering the apps and services that access the databases.
Uniform management and administration. A single console interface to perform basic administrative tasks makes the job easier for database admins and IT users.
For data-driven business organizations, DBMS can turn into extremely complex technology solutions that may require dedicated resources and in-house expertise. The size, cost and performance of a DBMS vary with the system architecture and use cases, and should, therefore, be evaluated accordingly. Also, a DBMS failure can incur significant losses to organizations that fail to maintain optimal functionality of a DBMS system.
Think that speeding up your website isn’t important? Think again.
A one-second delay in page load time yields:
11% fewer page views
16% decrease in customer satisfaction
7% loss in conversions
A few extra seconds could have a huge impact on your ability to engage visitors and make sales.
This means that having a fast site is essential — not just for ranking well with Google, but for keeping your bottom-line profits high. Learn 20 ways to speed up your website.
How website speed optimization influences conversions
In fact, 47% of consumers expect websites to load in two seconds or less — and 40% will abandon a page that takes three or more seconds.
This means that if your site takes more than three seconds to load, you lose almost half of your visitors before they even arrive on your site.
That alone is a huge blow to your potential conversions.
And for the visitors that decide to stick around, your slow load times can deter them from returning in the future. In one survey, 79% of customers said they would not return to a site with poor performance.
In that same survey, 52% of shoppers said that quick page loading is important to their site loyalty and 44% said they tell their friends about poor site experiences.
This survey also discovered that a one-second delay can decrease customer satisfaction by about 16%.
One of the best examples of this is Walmart’s improvement in conversions and revenue after increasing their site speed.
During their initial analysis, they found that visitors who converted had received pages that loaded two times as fast as the visitors who did not convert.
This showed that the faster a page, the more likely a visitor was to make a purchase.
For every one second of site speed improvement they experienced up to a 2% increase in conversions.
For every 100 ms of improvement, they grew incremental revenue by up to 1%.
In another study, the relationship between load times and conversion rates showed a 25% decrease in conversion rates with just one extra second of load time.
It’s clear that putting in the effort to increase your site speed — even by one second — could have a major impact on conversions
Still not convinced?
Consider that Google once experienced a 20% drop in traffic because of an extra .5 seconds in load time.
Along the same lines, Amazon once ran A/B tests in which they delayed pages in increments of 100 milliseconds. They found that even small delays resulted in “substantial and costly” decreases in revenue.
These are two of the most well-known and reputable sites in existence — so if users aren’t willing to wait an extra second for them to load, they probably won’t wait for you.
Now that Google takes speed into consideration when ranking sites, your load times can also influence how easily users can find you in the first place.
This is especially true now that it is rolling out its mobile-first index. As of December 2017, the search engine has started ranking all search results based on the mobile versions of pages.
Mobile searches outnumbered desktop searches for the first time in 2015, and its share of overall search only continues to grow.
This means that it’s in Google’s best interest to cater its search results to mobile users. They don’t want to direct their users to sites that won’t load or function well on their devices.
As a result, mobile user experience will now play a major role in search rankings — even in desktop search results.
User experience has long been a factor in rankings, but prior to this shift, it only took desktop experience into consideration. So even if a site provided a poor mobile experience, it still had a shot at ranking on page one.
This is no longer the case.
Now, pages are indexed and ranked based on the experience they provide mobile users.
So if you want to maintain (or improve) your rankings and visibility, it’s essential to know how to reduce loading time of website. You must have a site that provides a quick, easy user experience — on any browser or screen size.
Why is my website slow?
You’ve conducted a site speed test and found your load time is pretty slow. (If you don’t know how to do a site speed test, I will explain later on in this post).
There could be a number of reasons why your site load time is lagging. It could be anything from server load time to image size to the number of redirects you have.
That means there are a whole bunch of steps you can take to improve page speed. We’ll look at 20 of them. But before you start troubleshooting to improve website performance, you need to have something to aim for.
Let’s take a look at what’s considered a good load time, to give you something to shoot for.
What is a good page load time?
Before you start working on your site’s speed, it’s a good idea to set a goal for where you want it to be.
That can be difficult if you aren’t sure what acceptable page speed is.
According to Google, the best practice is three seconds. Unfortunately, according to its recent benchmark report findings, most sites are nowhere near that.
In an analysis of 900,000 mobile ad landing pages spanning 126 countries, Google found that 70% of the pages analyzed took nearly seven seconds for the visual content above the fold to display.
Of all the industries they included, none had an average even close to their recommended best practice of three seconds.
The average time it takes to fully load a mobile landing page is 22 seconds, but 53% of visits are abandoned if a mobile site takes longer than three seconds to load.
Plus, as page load time goes from one to ten seconds, the probability of a mobile user bouncing increases by 123%.
This means that site owners, in general, have a lot of work to do to get their sites up to par in Google’s eyes.
But on the upside, it also means that if you put in the work to get your site speed to an acceptable level, you’re well ahead of the pack in terms of user experience.
As you improve your site, you can use Google’s recommendations and benchmarks to set your goals and measure your performance.
After all — as the largest search engine in the world, Google can have a major impact on your success. So using their standards as your standards is never a bad idea.
How to speed up your website in 2020
There are tons of factors that influence how long each page on your site takes to load, so there are many different steps you can take to increase your speed and improve user experience.
In this post, we’ll go over 20 tips and best practices you can use to decrease your load times and improve your site’s performance.
And if that number sounds overwhelming — don’t worry.
While all of these tips can help you improve your site speed, you don’t need to do all of them today.
In fact, if you’ve worked on your site speed in the past, your site may already be in line with some of these best practices.
With that in mind, let’s get started.
1. Minimize HTTP requests
According to Yahoo, 80% of a Web page’s load time is spent downloading the different parts of the page, like images, stylesheets, and scripts.
An HTTP request is made for each one of these elements, so the more on-page components, the longer it takes for the page to render.
The first step to minimizing your requests is to figure out how many your site currently makes, to use as a benchmark.
If you use Google Chrome, you can use the browser’s Developer Tools to see how many HTTP requests your site makes.
Right-click on the page you want to analyze, and click “Inspect,” then click the “Network” tab. (If you don’t see the “Network” tab, you may need to expand the Developer Tools sidebar by dragging the left border to the left.)
The “Name” column shows all of the files on the page, the “Size” column shows the size of each file, and the “Time” column shows how long it takes to load each file.
In the bottom left corner, you’ll also see the number of total requests the site makes.
Reducing this number of requests will speed up your site, look through your files and see if any are unnecessary.
You may not notice anything immediately, but some of them are likely prime candidates for combining — which we’ll get to in the next steps.
2. Minify and combine files
Now that you know how many requests your site makes, you can get to work on reducing that number. The best place to get started is with your HTML, CSS, and JavaScript files.
These are extremely important files, as they determine your site’s appearance.
They also add to the number of requests your site makes every time a user visits it.
You can reduce this number by “minifying” and combining your files. This reduces the size of each file, as well as the total number of files.
This is especially important if you use a templated website builder. These make it easy to build a website, but they sometimes create messy code that can slow your site considerably.
Minifying a file involves removing unnecessary formatting, whitespace, and code.
Since every unnecessary piece of code adds to the size of your page, it’s important that you eliminate extra spaces, line breaks, and indentation. This ensures that your pages are as lean as possible.
Combining files is exactly what it sounds like. If your site runs multiple CSS and JavaScript files, you can combine them into one.
There are several ways to minify and combine files, and if your site runs on WordPress, plugins like WP Rocket make the process fairly simple.
If you have this plugin installed, go the “Static Files” tab and check the files you want to minify and combine.
This can include HTML, CSS, and JavaScript files, as well as Google Fonts.
Then, hit “Save Changes” to complete the process. You can reload your page and look at Developer Tools again to see the impact that your changes made.
When it comes to your website, leaner is better. The fewer elements on a page, the fewer HTTP requests a browser will need to make the page render — and the faster it will load.
3. Use asynchronous loading for CSS and JavaScript files
Once you’ve minified and combined some of your files, you can also optimize the way that they load on your pages.
Scripts like CSS and JavaScript can be loaded in two different ways: Synchronously or Asynchronously.
If your scripts load synchronously, they load one at a time, in the order they appear on the page. If your scripts load asynchronously, on the other hand, some of them will load simultaneously.
Loading files asynchronously can speed up your pages because when a browser loads a page, it moves from top to bottom.
If it gets to a CSS or JavaScript file that is not asynchronous, it will stop loading until it has fully loaded that particular file. If that same file were asynchronous, the browser could continue loading other elements on the page at the same time.
Using the same “Static Files” tab of the WP Rocket plugin, check the options next to “Render-blocking CSS/JS.”
Click “Save Changes,” then test your site to make sure that everything loads correctly.
4. Defer JavaScript loading
Deferring a file means preventing it from loading until after other elements have loaded. If you defer larger files, like JavaScript, you ensure that the rest of your content can load without a delay.
If you have a WordPress site, you can the WP Rocket plugin mentioned above to easily enable deferred JavaScript loading. Simply check the box next to “Load JS files deferred,” and you’re good to go.
If you have an HTML site, you’ll need to place a call an external JavaScript file just before the </body> tag, which looks something like this:
In addition to the amount of time it takes for your page to fully load, you’ll also want to take a look at the amount of time it takes to start loading.
Time to first byte, or TTFB, is the amount of time a browser has to wait before getting its first byte of data from the server. Google recommends a TTFB of less than 200 ms.
Unlike a lot of the front-end performance factors most site owners focus on, this is a server-side concern.
When a user visits your site, their browser sends an HTTP request to the server that hosts it. There are three steps that need to happen between that initial request and the first byte of data:
DNS lookup
Server processing
Response
You can see how long this process takes for your site using either Chrome’s Developer Tools or a third-party tool.
If you use Developer Tools, it’s important to remember that response time can be affected by your Internet connection. So the slower your own connection, the slower your server response will appear.
To access this information in Developer Tools, click the “Network” tab and mouse over the top item in the “Waterfall” column.
You can also use any number of free third-party tools like WebPageTest test your site from a data center.
If your TTFB is under 200ms, you’re in good shape.
If not, there could be a few different issues at the root.
In general, most issues with slow TTFB are caused by either network issues, dynamic content creation, web server configuration, and traffic.
Of these four factors, you have control over two: Dynamic content creation and server configuration.
Unlike with static pages, a server needs to “build” a dynamic file before responding.
If you have a WordPress site, your pages are most likely dynamic. This means that they need to interact with a database to be “built” with PHP before they are delivered.
You can reduce the time that this takes by enabling caching — which we’ll get to in a minute.
6. Reduce server response time
One of the biggest factors in how quickly your page loads is the amount of time your DNS lookup takes.
A DNS, or domain name system, is a server with a database of IP addresses and their associated hostnames. When a user types a URL into their browser, a DNS server is what translates that URL into the IP address that indicates its location online.
A DNS lookup, then, is the process of a finding a specific DNS record. You can think of it as your computer looking up a number in a phone book.
For example, let’s say you wanted to visit the URL ubnt.com. You’d type this into your browser — but that means very little to your computer.
Your ISP will perform a DNS lookup to find the IP address associated with that URL.
It will get an IP address like 52.40.57.158.443, which tells it where to find the site you’re looking for. This step prevents users from needing to memorize long strings of numbers to access information online.
The amount of time this step takes depends on how fast your DNS provider is. If not, it may be time to switch to a faster DNS provider.
You can check out this DNS speed comparison report, which is updated monthly, to get an idea of where your provider stacks up, and see which providers offer higher speeds.
If you’re using a slow DNS, this increases the time it takes for browsers to locate your site. Switching to a faster DNS provider can speed up the process.
7. Choose the right hosting option for your needs
Most new site owners choose the cheapest possible option for hosting. While this is often enough in the beginning, you’ll likely need to upgrade once you start getting more traffic. Don’t skimp on your host, get one that you can trust. There are a great set of the reviews on the best web hosts here.
When looking at hosting, you have three different options:
Shared hosting
VPS hosting
Dedicated server
Shared hosting is the cheapest option and you can often get it for about five dollars per month. While it’s fine for low-traffic sites, shared hosting does struggle to keep up with traffic spikes and high-volume sites. And it is possible for your site to be impacted by traffic spikes from other sites using the same server as you.
With shared hosting, you share certain resources like CPU, disk space, and RAM with other sites hosted on the same server.
With VPS hosting, you still share a server with other sites, but you have your own dedicated portions of the server’s resources. This is a good in-between option. It protects your site from everyone else on your server without the cost required for dedicated hosting.
When you live in an apartment, you share certain facilities like laundry rooms and parking lots and have access to the building’s maintenance team.
When you live in a condo, on the other hand, you don’t use common spaces, and you’re responsible for certain repairs and maintenance. There are also fewer residents in the building.
You can look at dedicated hosting, then, as owning a home. You don’t share resources with anyone else, and you’re responsible for all maintenance.
With a dedicated server, you have much more space — but you also have more work to do with configuration and technical setup.
If you need tons of space and want complete control over your hosting, this is your best bet.
As you may have guessed, though, it’s the most expensive option.
If you’re at a point where your traffic levels are slowing down your server response times, it may be time to switch from shared hosting to a VPS, or from a VPS to a dedicated server.
8. Run a compression audit
It’s in your best interest to get your files to the smallest they can be, without sacrificing quality. The smaller your files, the faster they’ll load — and the lower your overall load times will be.
Pages with lots of images and other content can often end up being over 100KB in size. As a result, they’re bulky and slow to download.
You can speed up download times by compressing them.
To get a sense of how compression could speed up your site, you can use GIDNetwork to run a compression audit.
Just enter your URL and click “Check.” If the page you enter isn’t compressed, you’ll see something like this:
This tells you the uncompressed size of your page, which you can later use as a benchmark to measure the results of compression.
Below that, you’ll see an analysis of how much you could potentially reduce the page’s size in terms of both size and percentage using a tool like Gzip (which we’ll get to in the next step).
This compression involves HTML, CSS, JavaScript, plain text, and XML files.
9. Enable compression
The smaller your files, the faster your pages will load. Compressing files is one of the easiest ways to reduce load times, and today, enabling compression with Gzip is considered standard practice.
Gzip is a file format and software application that essentially locates strings of similar code in your text files, then temporarily replaces them to make the files smaller.
This works well with CSS and HTML, because these files typically have repeated code and whitespace.
Most web servers can compress files in Gzip format before sending them for download, either by calling a third-party module or using built-in routines. According to Yahoo, this can reduce download time by about 70%.
And since 90% of today’s Internet traffic travels through browsers that support Gzip, it’s a great option for speeding up your site.
If you’re not sure if your site has Gzip enabled, you can use checkgzipcompression.com to see. Just enter your site’s URL, and if you have Gzip enabled, you’ll see something like this:
If you don’t have Gzip enabled, however, you’ll want to fix this as soon as possible.
If your site runs on WordPress, both WP Rocket and W3 Total Cache plugins support enabling Gzip.
In W3 Total Cache, all you need to do is check the box next to “Enable HTTP (gzip) compression.”
If you have a static HTML site, however, you’ll need to enable Gzip in your .htaccess file. The exact code you need depends on your server but if your site runs on Apache, for example, it looks like this:
When you visit a website, the elements on the page you visit are stored on your hard drive in a cache, or temporary storage.
This means that the next time you visit the site, your browser can load the page without having to send another HTTP request to the server.
Here’s how Tenni Theurer, formerly of Yahoo, explains it:
The first time someone comes to your website, they have to download the HTML document, stylesheets, javascript files and images before being able to use your page. That may be as many as 30 components and 2.4 seconds.
Once the page has been loaded and the different components stored in the user’s cache, only a few components needs to be downloaded for subsequent visits.
In Theurer’s test, that was just three components and .9 seconds, which shaved nearly 2 seconds off the load time.
Theurer says that 40-60% of daily visitors to your site come in with an empty cache, so it’s critical that you make your page fast for these first-time visitors. But enabling caching can shave off a significant amount of time of returning visitors and provide a better user experience.
The way you set up caching depends on whether you run your site with WordPress or static HTML.
Increase your website speed in WordPress with W3 Total Cache
If you run a WordPress site, you can use a plugin like W3 Total Cache to easily enable caching.
Once you’ve installed it, navigate to “Page Cache” under “General Settings” and check the box next to “Enable.”
This simple step on its own should give you a boost in site performance — but there’s more you can do to improve your results with the plugin.
Enabling browser caching lets you store a cached version of your site in a visitor’s browser. This means that when a user returns to your site, it will load faster.
You can enable this option by navigating to General Settings > Browser Cache and checking the box next to “Enable.”
If you use a VPS or dedicated server, you can also enable object caching to speed up dynamic elements on your site.
This feature is also under your General Settings.
If you’re using a shared server, however, it is best to leave this option disabled. Object caching is a resource-intensive process and can end up slowing down your site — the exact opposite of what you want to accomplish with the plugin.
Once you’ve configured your settings, you should see improvements in your load times immediately. W3 Total Cache claims that its users have seen 10x improvements in Google PageSpeed results, and up to 80% in bandwidth savings after fully configuring the plugin.
If you have a static HTML site, you can enable caching by in your .htaccess file.
You can add lines of code that tell browsers what to cache and how long to store it, which will look something like this:
This lets you set the amount of time you want each type of file to be stored in a visitor’s cache.
In general, static resources should have a cache lifetime of at least a week. Third-party resources like ads or widgets should have a cache lifetime of at least one day.
For all cacheable resources like JavaScript and CSS files, image files, media files, and PDFs, set caching between a minimum of one week and one year.
11. Reduce image sizes
Images can play a major role in your site speed. They’re often very large files, which can slow down page load times.
But removing them altogether is not an option.
Consider this: Average eCommerce website conversions hover around 1-3%
But that number can rise as high as 5 percent for some sites, like NatoMounts — which sees an average conversion rate around five percent, with roughly 85% of those conversions on mobile.
One of the best ways to get your conversion rate to this level is including lots of helpful product images. In one survey, 66% of consumers said they wanted to see at least three product photos before buying.
That also means image compression is critical — and this is important whether your site includes an eCommerce store or not.
You can see how big of an impact images make on any of your pages with a tool like Pingdom. Run a page speed test, then look at the “Requests by content type.”
Reducing their size could likely have a big impact on how long the page takes to load.
In fact, in one study, resizing 22MB of images down to 300KB resulted in a 70% reduction in time to interact, or the amount of time a user needs to wait before they can interact with a site.
One of the easiest ways to reduce image file sizes is cropping your images to the correct size. For example, if you want an image to appear as 570px wide, resize the image to that width.
Don’t just upload an image that is 2000px wide and set the width parameter the size you want. This requires your page to load the full image, then adjust it to the appropriate size, slowing your page.
If you use the width parameter to make images appear smaller on your site, resizing those images should be a priority. It’s an easy way to reduce the total size of each page and can have a major impact on your site’s speed.
Next, you can compress your image files with a few different tools.
If your site runs on WordPress, WP Smush is a great option.
Check the box next to “Automatically smush my images on upload,” and all of your new images will be compressed without an extra second of work.
You can also use this plugin to automatically resize all of the new files you upload. Set a maximum width and height, and any images that exceed them will be “smushed.”
If you don’t use WordPress, you can use a non-WordPress tool like Compressor.io.
Before adding an image to your site, upload it into this tool and select whether you want lossy or lossless compression.
(If you’re not sure which is best, keep reading — we’ll get to that in just a minute.)
Then, you’ll be able to see information about how much the file was reduced, and be able to download the new, smaller file.
After you’ve saved the new image file, you can upload it to your site.
Next, you’ll also want to make sure you’re using the appropriate file types for each image. This may seem like a minor concern, but the file types you use can affect each file’s size.
You have a few different options and the most common are JPG, PNG, and GIF.
JPG is generally your best option for photos. It uses lossy compression, which means that some of an image’s data is lost when saved in this format.
This data loss is undetectable to viewers in photos, but results in a smaller file size than most image file types.
So if you’re uploading pages with lots of photos, making sure that they’re all JPGs can significantly decreasing load times, without impacting their appearance at all.
PNGs, on the other hand, use lossless compression. This means that when you save an image as a PNG, you don’t lose any data, and the resulting file size is larger than a JPG.
If you need to have clear lines and crisp detail, PNG is the way to go. This is the best option for logos, screenshots, line art, and other detailed graphics.
Finally, GIFs should only be used for small or simple graphics of less than 10×10 pixels, a color palette of 3 or fewer colors, and for animated images.
Once you’ve got your image sizes and formats right, you can make sure that the code you use to implement them is right, too. In particular, make sure to avoid empty image src codes.
In HTML, the code for an image includes this:
<img src=””>
When there’s no source in the quotation marks, the browser makes a request to the directory of the page or to the actual page itself. This can add unnecessary traffic to your servers and even corrupt user data.
Fortunately, this is an easy fix to make. Either add the file path of the image you want to include, or remove the extra tags altogether.
12. Use a CDN
Beyond the server that hosts your site, you can also use other networks of servers to decrease load times for your visitors.
When your site is hosted on one server, each user who visits it sends requests to that same server.
This means that when your site experiences high levels of traffic, the time it takes to process each request increases, slowing down load times for all of them.
When you consider that high-traffic times typically present a ton of growth potential for your business, this is far from ideal.
Plus, for users who are physically farther away from your server, load times are higher because the information has a farther distance to travel — even when you aren’t experiencing lots of traffic.
A CDN, or Content Delivery Network, can help you eliminate these issues.
With a CDN, you cache your site on a global network of servers. When a user’s browser requests files from your site, that request is routed to the closest server.
For example, let’s say your origin server is in California, but uses a CDN to host files globally. Your network might look something like this:
If a user from South Africa visits your site, thir browser could download files from a nearby server.
The content that user receives is identical, but can load much faster than it would if their browser were making requests to a server that was geographically far away. This eliminates loading lags and latency issues that users located far from hosting servers sometimes experience.
In one experiment, VentureHarbor reported decreases in load time ranging from 20-51% — for 20 minutes of work.
The exact improvements vary between page, with pages that have lots of large images benefitting the most from a CDN.
If you want to start using a CDN, your best options are MaxCDN and Cloudflare.
MaxCDN is a full CDN, meaning that it only offers CDN services. They have more data centers and focus solely on improving load times.
Cloudflare, on the other hand, combines CDN service with security and optimization features.
The one you choose depends on whether you want those extra features, or just want to focus on improving speed.
And either way, getting set up is a fairly quick process.
If you go with MaxCDN, you’ll start by creating a “pull zone.” Click “Zones” in the admin panel.
Then, click “Create Pull Zone.”
Here, you’ll need to enter your original server URL, as well as a name and label for your pull zone.
After you click create, you’ll see a URL for your CDN, like cdn.yourdomain.netdna-cdn.com. Copy this into notepad, or somewhere else that it’s easily accessible. (You’ll need it in a few minutes.)
Next, you’ll need to create a “content zone” by clicking the “manage” button next to your pull zone. Click “Settings” and enter multiple subdomains into the “Custom Domains” fields.
These should typically be cdn.yourdomain.com, cdn1.yourdomain.com, cdn1.yourdomain.com, cdn3.yourdomain.com, and so on.
(This naming format is standard practice and will be easiest to remember if you ever run into issues or need to consult a developer.)
You can add up to seven custom domains, then click “Update.”
Then, you’ll need to add your new CDN to your site through your hosting provider’s DNS editor. The exact location varies by provider, but in most cases, you can find the DNS editor under your “Domains” menu.
In Bluehost, this menu is called “Zone Editor.” If you use Bluehost, the fields you need will look like this.
Enter the URL that MaxCDN provided (copied and pasted from notepad), set the Type to “CNAME,” and one of the custom CDN domains you created (like cdn.yourdomain.com).
Then, repeat this process for all of your subdomains.
This take about one minute, and will how all of your DNS records, including any subdomains. You can decide which ones you want to enable.
Select the plan you want, then click “Process and continue.”
Then, you’ll see the Cloudflare nameservers for your domain. Next, you’ll need to update the nameservers for your domain.
You’ll need to do this through your domain registrar. Log into your registrar and navigate to your nameserver records.
This is different for each registrar. With Bluehost, for example, you can find it by going to “Domain Manager,” then clicking the “Name Server” tab.
Then, switch your preferences to “Use Custom Nameservers” and copy and paste the nameserver that Cloudflare provided.
Save your changes, then return to the Cloudflare dashboard to verify that you’ve installed your CDN correctly. Click the “Overview” tab, and if your CDN is running, you’ll see an “Active” status code.
If so, your CDN is up and running!
The final step you’ll want to take is to verify that your SSL records are in place. Click the “Crypto” tab to verify that the SSL records are in place. You should see one for your root domain, and one wildcard subdomain record.
If you don’t yet see these records, it may take 24 hours for them to appear.
But once they do, your CDN is serving the secure version of your site — exactly like your origin server.
13. Use external hosting platforms
In addition to hosting your site’s files on a CDN, you can also use external hosting platforms for some of your larger files.
This is particularly valuable for videos.
For example, let’s say you want to add a video tutorial to your site. You create, edit, and export the video file.
Now what?
Your first thought might be to upload the video directly to your site via your FTP or WordPress editor.
Don’t do this.
When you host videos on your own server, they take up a ton of space. Video files can easily take up over 100MB.
If you use a shared server, you have a limited amount of space. Videos can make you quickly exceed this limit.
In some cases, large video files may even violate your terms of Acceptable Use, which can end up getting your hosting account shut down altogether.
And even if you can upload large videos to your hosting provider, it will likely provide a poor user experience.
If multiple users attempt to watch a video on your site at the same time, your server will need to deliver that huge file to all of them. If your server has a limited amount of bandwidth, this can result in lags and pauses in playback.
If you’ve ever attempted to watch a video and had it pause every few seconds to load, you know how frustrating it can be.
Don’t do that to your visitors.
Instead, host your video on a third-party service like YouTube, Vimeo, or Wistia.
Then, embed the video on your site.
This process saves space, results in faster load times, and is extremely easy to do.
The most difficult part is just choosing which one you want to use.
YouTube
When most people think of online video, they think of YouTube. It’s one of the most well-known sites in the world, with a user base of over 1.5 million people that watch almost 5 billion videos per day.
This means it has more monthly users than every major social media platform but facebook.
It’s also completely free to use.
The biggest potential advantage to YouTube is that it can help you reach a larger audience. If you want to use video to grow awareness of your brand and send traffic to your site, it’s a great option.
If you just want to embed videos on your site, though, and don’t care about having them be discovered on another platform, this may not matter.
The one notable downside to YouTube is that it has a 15-minute limit for most videos. If you want to upload lengthier content, you’ll need to submit a request to increase your limit — so if this is something you’ll be doing on a regular basis, it may not be the best option for you.
So while it still has the potential to get your videos in front of a new audience, your potential audience smaller than it would be with YouTube.
On the upside, its standard video player looks a bit nicer than YouTube’s.
It’s important to note, though, that Vimeo has upload limits for content.
While a basic membership will allow you 500MB in uploads per week, and up to 5GB total, their three paid plans range from $7 to $50 per month, with storage from 250GB to 5TB.
Wistia
Wistia is a bit different from YouTube and Vimeo in that it’s designed with marketing in mind.
Users don’t generally browse Wista’s site for content — so if having your videos searched and found, this is not the option for you.
But if you’re focused on using video as a marketing tool, it could be exactly what you need.
The platform offers comprehensive analytics, including where your visitors come from, where they click, and how far into a video they stop watching.
It also lets you include calls to action directly in your videos, and even require them to sign up for your email list before watching.
Plus, Wistia’s video player is customizable, so you can give your videos a branded feel by changing the play button and other controls to your brand’s colors.
You can also customize your autoplay settings load settings, captions, and share options, and make it easy for users to skip to certain points in the video by adding chapters.
And if you use HubSpot or Marketo, it can be fully integrated with both of those platforms.
The biggest downside to Wistia is that its free plan only includes three videos.
Beyond that, paid plans are $99+ per month.
Once you’ve chosen your video platform and uploaded a video, adding it to your site is easy regardless of the platform you use.
Select “Embed,” and copy the HTML code that your platform provides.
Then, copy and paste the code into the page where you want it to appear.
For HTML sites, simply add it to your code in the location you want it to show up on the page.
For WordPress, switch to the text editor and do the same.
Here is an example of what a Wistia video looks like embedded in a WordPress blog post:
14. Optimize CSS delivery
CSS holds the style requirements for your page. Generally, your website accesses this information in one of two ways: In an external file, which loads before your page renders, or inline, meaning it is in the HTML document itself.
The external CSS is loaded in the head of your HTML with code that looks something like this:
Inline CSS is nested in your page’s HTML and looks like this:
As a general rule, avoid including CSS in HTML code (like in divs or your headings) like in the inline CSS pictured above. You’ll get cleaner code if you put all of your CSS in your external stylesheet.
This reduces the size of your code and creates fewer code duplications.
When setting up your styles, it’s also best to only use one external CSS stylesheet, since additional stylesheets increase HTTP requests.
If you’re not sure how your CSS is currently set up, you can use this CSS delivery tool to find out. Enter your URL, and you’ll see a report with all of external your CSS files.
Scroll down, and you’ll also see where that external file is located, as well as any inline CSS on the page and the total size of your CSS files.
If you have more than one external CSS file, each one adds to your page load time. In some cases, this is unavoidable — but in most, it’s best to combine them.
Fortunately, this is a simple process, and one that can usually be accomplished with nothing more than copy and paste.
Then, update your HTML to reference this new file, and remove all references for the old files.
Now, your visitors’ browsers only need to download one CSS file instead of multiple, which reduces the overall number of requests and decreases page load time.
Once you’ve done this, you can use PageSpeed Insights to make sure that you do not have any issues with render-blocking CSS.
If you have any blocking script resources, you’ll see them under “Optimization Suggestions.”
If you’re already using a plugin like WP Rocket or W3 Total Cache, this should not be an issue. If you still have render-blocking issues, double-check your plugin settings or follow Google’s recommendations for optimizing CSS delivery.
Having just recommended that you use only one CSS stylesheet and no inline CSS, there is one caveat you need to consider.
You can improve user experience by having your above the fold (top of the page) section load faster — even if the rest of the page takes a few seconds to load.
This is called lazy loading and is particularly helpful for pages with lots of content below the fold.
For example, let’s say you write a blog post that includes 20 photos. Normally, a user’s browser would need to download all of those images before displaying anything on the page.
With lazy loading, it can load the content within view first, then load all of those photos after.
This way, the user doesn’t have to wait to access the page, and the images will load as they come into view.
This can significantly reduce load times on posts with tons of images (like this one).
And if you run your site on WordPress, enabling it is as easy as installing a plugin. There are plenty of options you can use to start using lazy loading on your site.
Lazy Load
Lazy Load is an extremely simple plugin that uses jQuery.sonar to only load images when they are visible in a user’s browser.
All you need to do is install and activate it Then, the plugin will automatically detect when an image is visible for a user, and load it.
There are no settings or customization options to mess with — which, depending on your preferences, could either be a good thing or a bad one.
Either way: If you’re looking for a fast, simple solution, this is it.
BJ Lazy Load
BJ Lazy Load is another relatively simple plugin, but offers a few more options for customization.
First, you can determine which content on your site you want to lazy load. This can include content, thumbnails, gravatars, images, and iframes.
You can also set a standard placeholder image for content that hasn’t yet loaded, and skip images with certain classes.
So, for example, if you don’t want a specific image to lazy load, you could code it with something like:
<img src=”image.jpg” class=”no-lazy”>
This way, the plugin knows to load that image as normal.
You can also set a threshold for how close to a viewer’s screen an element should be before loading. This gives you more control over the speed and function of how your page loads.
The plugin is also compatible with infinite scroll.
If you’re looking for a plugin that’s easy to use, but gives a bit more control than Lazy Load, this is a great option.
WP Rocket
If you already use WP Rocket, you can also use the plugin to enable lazy loading.
Open your WP Rocket settings, then click the “Basic” tab. In the LazyLoad section, check the box next to “Enable for images.”
Once you’ve enabled this feature, there are a few customization options you can use.
For example, if you don’t want to use lazy loading on a specific post or page, you can simply disable it for that page.
Just open the page, then scroll down to the “Cache Options” box in the right sidebar. Then, uncheck the box next to “LazyLoad for Images,” and save your changes.
You can also use snippets of code to disable lazy loading for specific types of pages, like your home page or blog page.
For example, disabling lazy load for your home page would look like this:
If you want to disable lazy load for specific images, you can do that using the “data-no-lazy” attribute.
Just add it into your image’s code, and that image will load normally.
Finally, you can enable a fade in effect to make your images load more smoothly.
When images appear all at once, they can provide a jarring experience for visitors. You can make them appear more gradually by adding a snippet to your CSS file.
16. Reduce the number of plugins you use on your site
As you’ve likely gathered from this post so far, plugins can do a lot to improve your WordPress site. You can use them to add custom functionality, clean up your code, improve user experience, and more.
They also eliminate the need to mess with a lot of code, which makes for an extremely user-friendly experience when working on your site.
Plus, they’re extremely easy to install.
This makes it easy to continue adding and installing plugins, without considering the potential downside.
Unfortunately, having too many plugins installed can cause some issues.
They can slow your site, create security issues, and even cause crashes and other technical difficulties.
Plus, keeping up with maintenance and updates can be tedious when you have a lot.
And even if you don’t have a ton of plugins, it’s a good idea to evaluate the ones you have installed on a regular basis. Any that are outdated, inefficient, or incorrectly configured can have a negative impact on your site speed.
Deactivating and deleting any that are unnecessary can both improve your overall speed and make maintenance easier in the long run.
There are a few different ways you can evaluate the plugins on your site and weed out any that slow your site speed.
Test your plugins
When you’re looking to improve site speed, there are two different ways to determine which plugins are impacting it.
The first is to selectively disable plugins, then measure your site’s performance. This can be a tedious process if you have a lot of plugins, but will show you the difference each one makes.
First, run a speed test with all of your plugins enabled. You can do this with tools like GTmetrix, Pingdom, or any other site speed tool you prefer.
Then, experiment by deactivating your plugins one at a time and re-testing your speed.
Make a note of your page load times after each test, and which plugins you deactivated to achieve faster speeds.
If you have a lot of plugins, this process could take a while.
Fortunately, there’s an alternative: Installing another plugin.
… yes, I see the irony here.
But Plugin Performance Profiler is a solid option for identifying plugins that are causing issues on your site. Plus, it’s much faster and easier than manually deactivating plugins individually and running site speed tests (and you can always deactivate it as soon as you’re done using it).
Once you’ve installed the plugin, go to your settings page and run a site scan.
This will take a few minutes, then show you a report with a detailed breakdown of how each plugin on your site is performing.
The plugin load time at the top of the report tells you the cumulative load time for all of the plugins on your site, as well as the percentage of your total load time they make up.
You can also see a detailed timeline with information about every plugin, your theme, and the core for each page. This will help you identify exactly what the issue is on slow-loading pages.
Finally, you can keep a history of your performance scans directly in the plugin. This way, if you run into issues in the future, you’ll have a benchmark and a good starting point for identifying issues.
If you find any plugins during your evaluation that are slowing your site and aren’t necessary, simply deactivate and delete them.
One easy win to look for here is your contact form plugin, if you have one. Many site owners install a contact form plugin because they think it’s the only way to add a form to their site.
But today, many themes come with built-in contact form functionality.
If you notice that your contact form plugin is slowing your site down, double-check to see if this feature comes with your theme. If so, update your forms and delete the plugin.
Identify overlaps in functionality
In most cases, the plugins you’ve installed on your site serve a clear purpose. So even if the sheer volume is slowing your site, deleting them may not be an option.
Fortunately, there are many plugins that can accomplish more than one goal, and finding them can help you eliminate plugins that only serve one purpose.
For example, the WP Rocket and WP Total Cache plugins on this page are both extremely useful for improving site speed and they’re both great options.
But considering that they serve many of the same purposes, you most likely don’t need both. If you had both of them installed on your site, you could evaluate the features you use on each and see if either could do everything you need.
Then, enable all of those features in the plugin you choose to stick with, and deactivate the other.
If you have a lot of plugins installed, you may be surprised at how many of the simpler ones can easily be eliminated by enabling a feature in a more robust one.
Eliminate plugins for tasks you can do manually
Depending on your level of experience, you can also cut down on your amount of plugins by doing certain tasks manually.
For example, many site owners use a plugin to add their Google Analytics tracking code to their header. And while this makes the process extremely easy for users who aren’t comfortable editing code, it’s not necessary.
If you have the Insert Headers and Footers plugin (or a similar one) installed to edit other parts of your header tag, you can copy your Google Analytics code from your admin dashboard, then paste it here.
Save your changes, and your tracking code is installed.
If you don’t have a plugin for editing headers and footers installed, you can manually add it to your header through your site’s FTP.
Of course, this is a more advanced option, and only a good idea if you’re comfortable with basic code edits. But once you paste your code and re-upload the file, you’re all set to use Google Analytics — with absolutely no plugin required.
Another basic plugin you may have installed is a font plugin. These plugins are designed to make it easy to change your site’s fonts — but if you have one installed, you can eliminate it with a few lines of code.
Go to Google Fonts and select the font you want to use on your site. Under “Embed,” you’ll see the HTML and CSS codes for that font.
Add the HTML code to your header, and the CSS to your site’s CSS stylesheet wherever you want to use your chosen font.
You can do this with as many fonts as you want, too. So you can fully customize how all of the text on your site appears, without a single plugin.
17. Reduce redirects
Redirects are often necessary when you move and delete pages, and are the best way to eliminate issues with broken links.
But having too many of them can create additional HTTP requests, which can negatively impact speed, particularly on mobile devices.
This means it’s best to keep them to a minimum. In fact, Google says that ideally, site owners would eliminate them entirely.
Unfortunately, this is not realistic for most site owners who’ve ever eliminated or restructured their content.
Still, in most cases, there’s room for improvement.
You can start by using Screaming Frog to quickly identify all of the redirects currently on your site.
Run a site scan, then sort by the “Status Code” column to see all of the 301 redirects on your site.
You can look through these redirects to see what they’re accomplishing, and make sure that they serve a necessary purpose.
You can also use this opportunity to identify redirects chains, or redirects that point to other redirected pages. This creates unnecessary extra requests, which can slow down your load times.
If you find any redirect chains, you can edit your .htaccess file to point all of your redirected pages directly to the most recent versions of that page.
18. Reduce external scripts
As we mentioned above, the fewer requests your site makes to your server, the faster a page will load.
Though CSS and JavaScript files are often the main culprits of extra external scripts, they’re not the only ones — and eliminating any others can also have an impact on your speed.
There are many common third-party integrations you may have running on your site that you don’t really think about.
You can identify all of the external scripts that are adding requests by reopening the network tab in Chrome’s Developer Tools.
For example, if you use Gravatar for blog comments, you might notice that loading user images adds a significant amount to your load time.
Or, if your site is integrated with Twitter for easily sharing posts, this might also increase the number of HTTP requests your site makes.
Of course, some of these extra features are worth the milliseconds they add to your load times. In this case, you can leave them as-is.
But if they aren’t worth slowing your page speed, uninstall or remove them.
Knowing which features are adding to your load times will help you better understand your site’s speed. It can also help you make more informed decisions about the features you choose to add to your site in the future.
19. Monitor your speed over time
As you work to improve your site speed, it’s a good idea to monitor how it changes over time. This is important even after you’ve achieved an acceptable page load time.
As you can see from this post, there are tons of factors that affect your site’s speed — so it can change at almost any time.
Monitoring your load times on a regular basis can help you catch any issues early on, and keep your site in good shape.
How to do a website speed test
There are many tools you can do to accomplish this. One of the best for monitoring overall site performance is Pingdom’s Website Speed Test.
Simply enter your URL, then select where you want to test your site from. If you don’t have a location preference, you can leave this at the default — but if you’re worried about users who are geographically far from your servers, this lets you test your site from various locations.
Then, you’ll see a summary of your page’s load time and performance, including the page size, number of requests, and how it stacks up against other tested sites.
This information gives you an at-a-glance look at your site speed’s health, and tracking it over time is an easy way to monitor improvements or decreases in performance.
Below that, you’ll see a list of suggestions for improving your site’s performance. If you’re unhappy with your load time, this will help you identify the issues that are causing it.
This information is all included in the free version of the tool.
The paid version also provides page speed reports, which show your site’s speed over time. This can help you identify trends, and the precise time your site begins having issues — making it easy to get to the root of any problems.
The paid version also includes alerts and uptime monitoring, which monitor your site and automatically alert you of issues.
This includes a mobile app, which will notify you of server errors, downtime, and other critical problems. These features make it easy to catch issues as they happen and make sure your site is always loading quickly and functioning well.
20. Monitor mobile page speed
In addition to monitoring your load times on desktop, you’ll want to pay particular attention to how well your site loads on mobile devices.
As we mentioned above, mobile user experience now impacts all of your site’s rankings.
Plus, it’s in your best interest to provide a fast, user-friendly site to mobile users.
You can start by using Google’s Test My Site tool to audit your own page speed. To get started, just enter your URL.
First, your results will show you your site’s average load time on 3G, as well as how that stacks up to recommended best practices.
It also shows you the number of estimated visitors lost due to load times. If you have slow load times, this can be a startling number.
Next, Google provides an industry comparison to show where you stack up against other sites in your industry.
Given that many of these sites are your competitors’, you’ll want to work towards being a top performer within your industry.
If your site’s speed isn’t yet close to where you want it to be, this can feel like a lofty goal. But as you make the changes listed in this post, you can continue testing your site and moving up in the ranks.
Conclusion
Getting your page load times to where you want them to be is a challenging undertaking, but will have a significant positive impact on your overall site performance.
It’s also important to remember that while all of the tips on this page can help you achieve your site speed goals, you don’t need to implement all of them today.
Spend some time looking through your site’s speed test results and look for the issues that have the greatest impact on your load times. Focus on those high-impact factors and take the necessary steps to get them into shape.
From there, you can work your way through this list and look for other easy wins. While some of the tips here may require help from a developer, some of them can be done in under an hour.
And though some of them may seem minor, even small steps toward reducing load time can make a difference and when you consider the impact that even one second can have on your conversions and success, they’re entirely worth it.

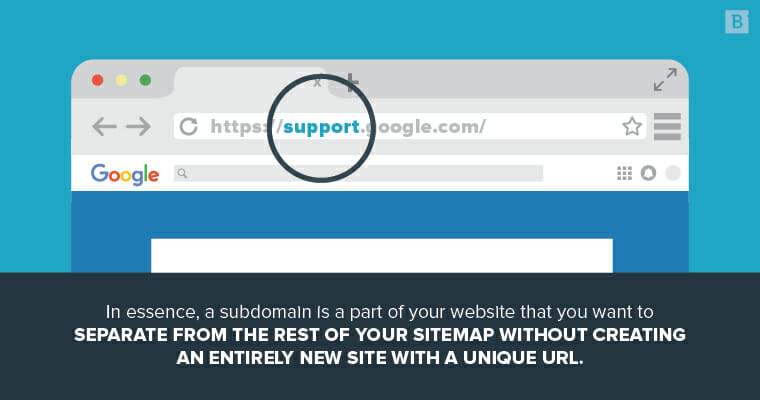




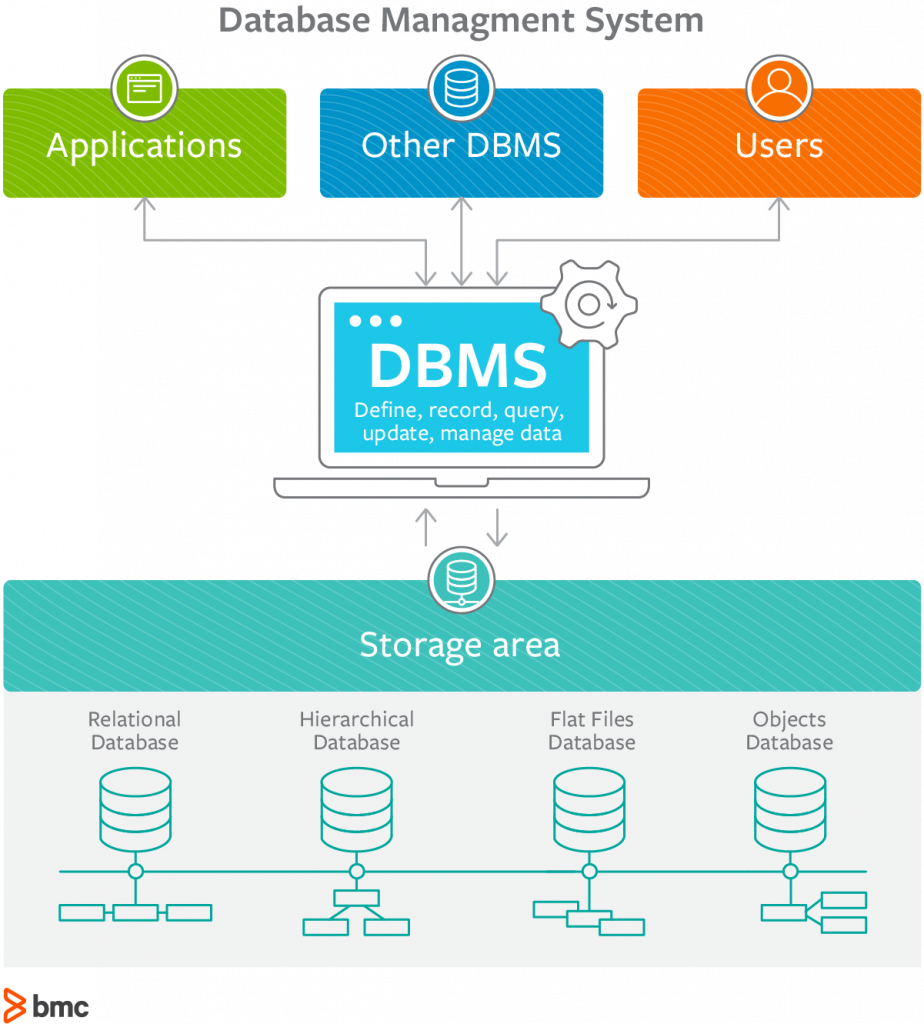
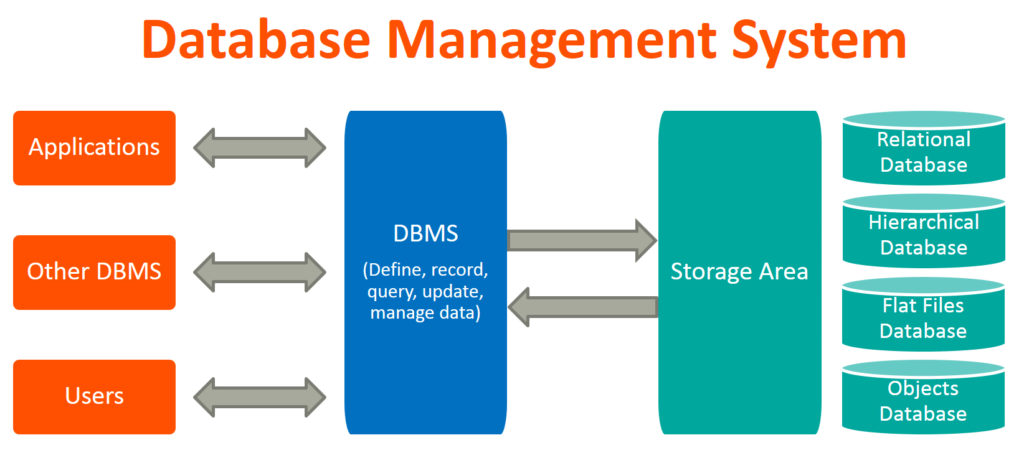

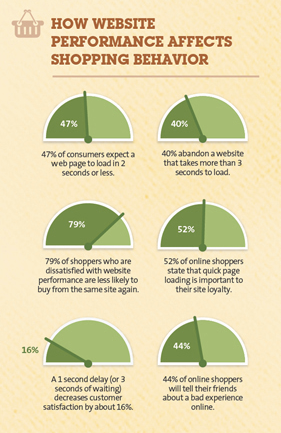
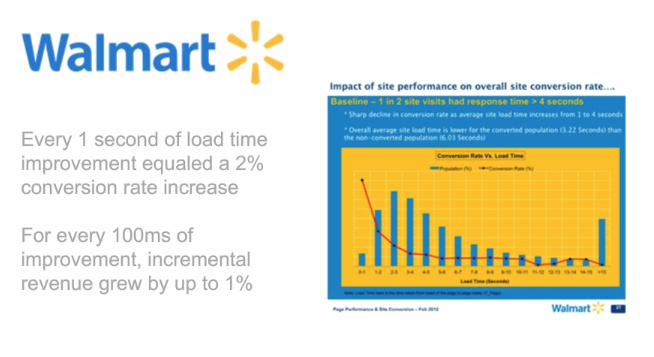
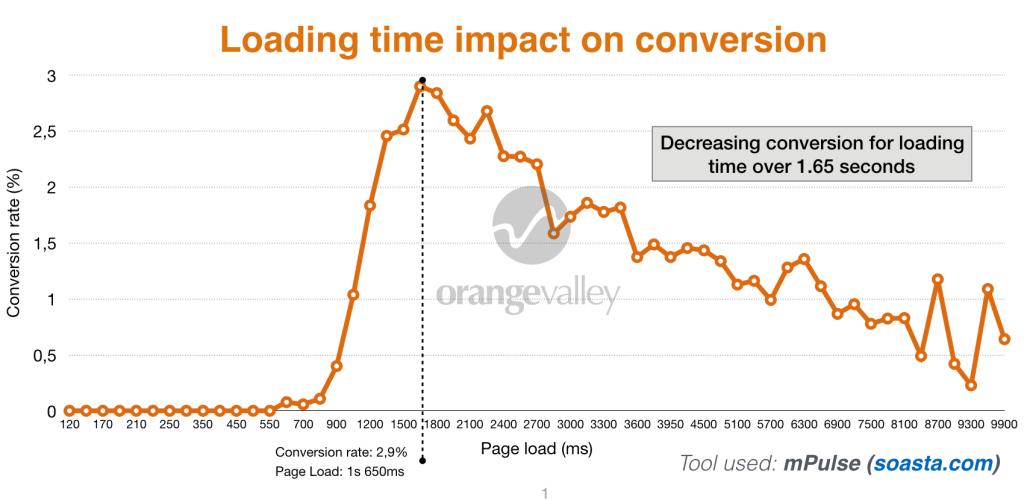
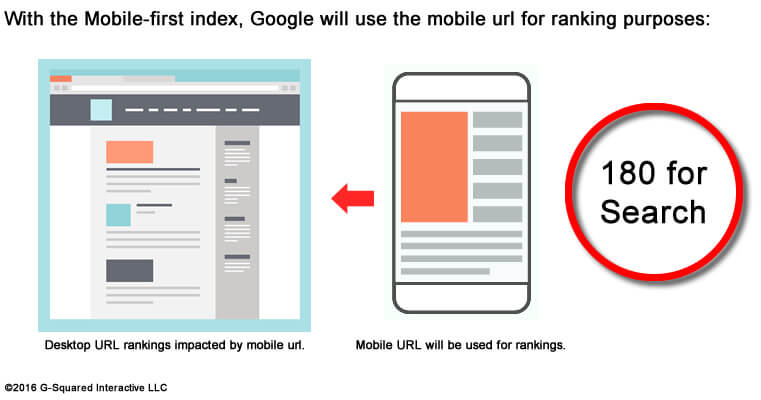
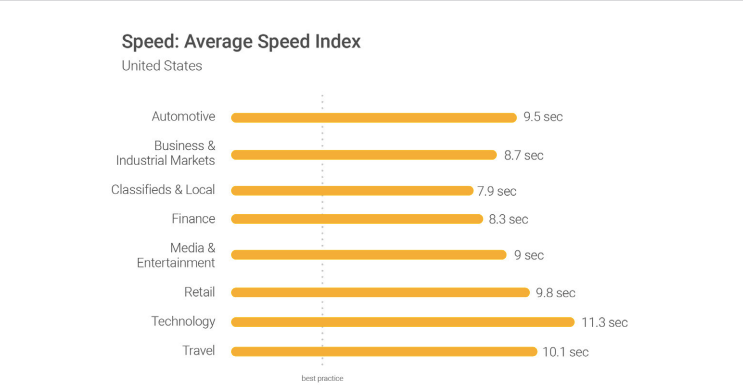
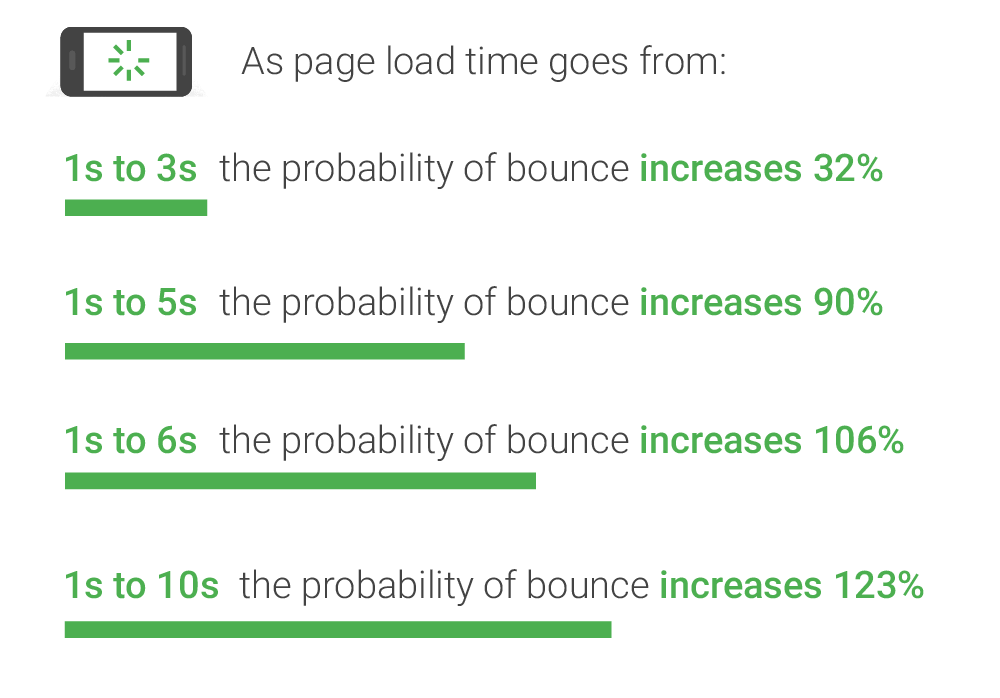
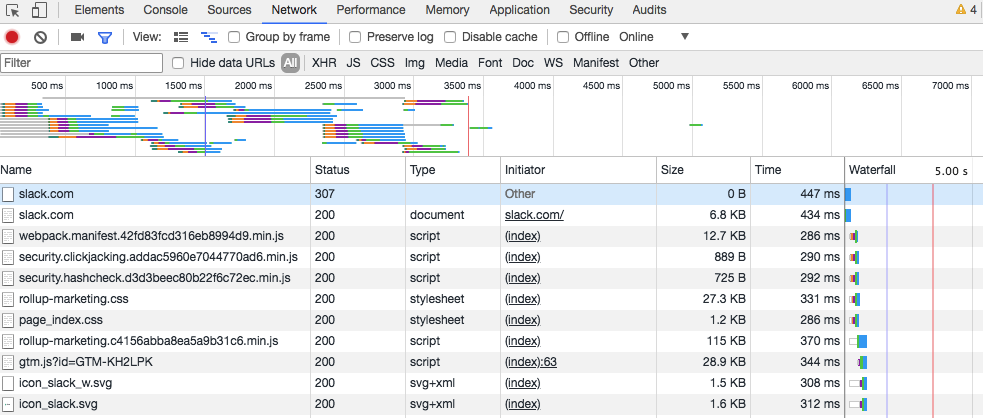
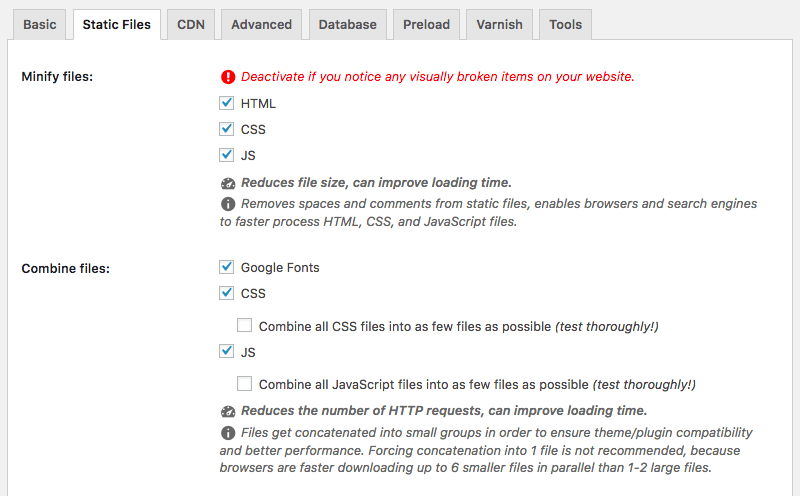
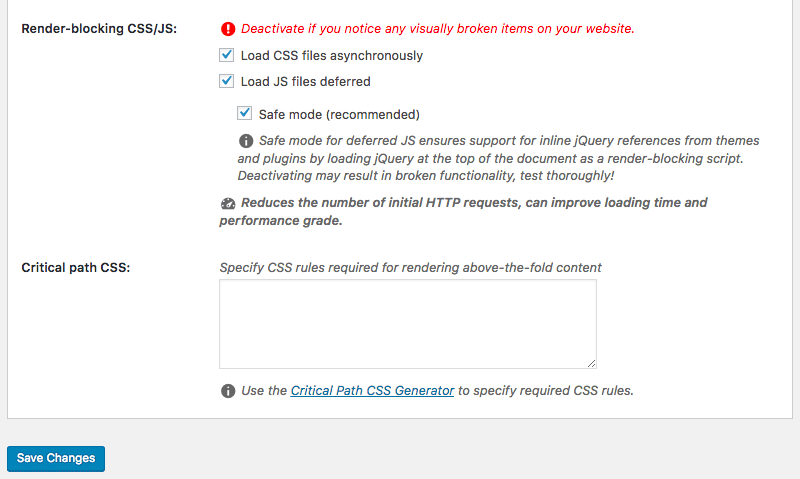
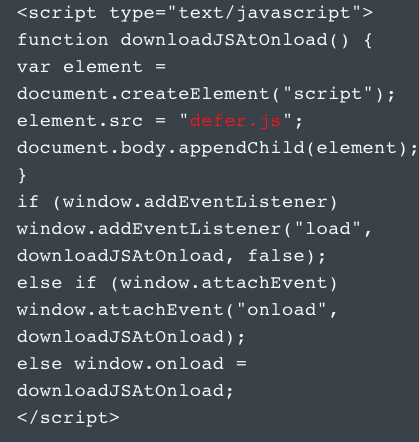
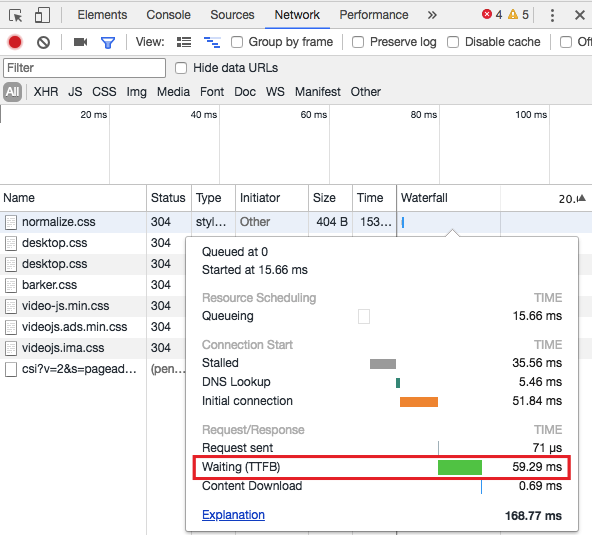
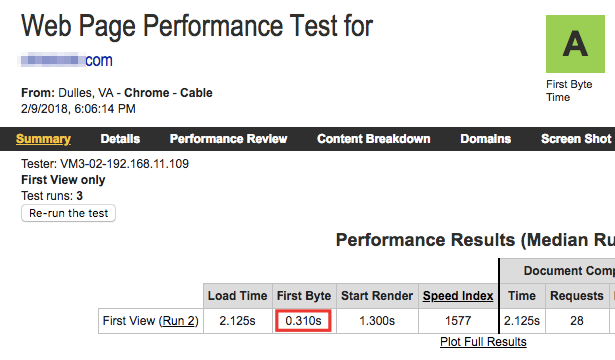
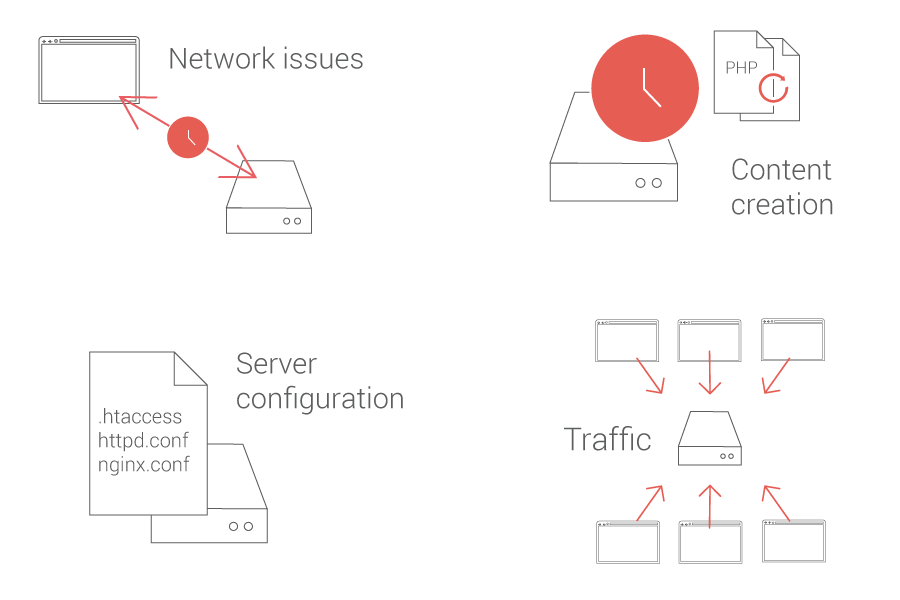
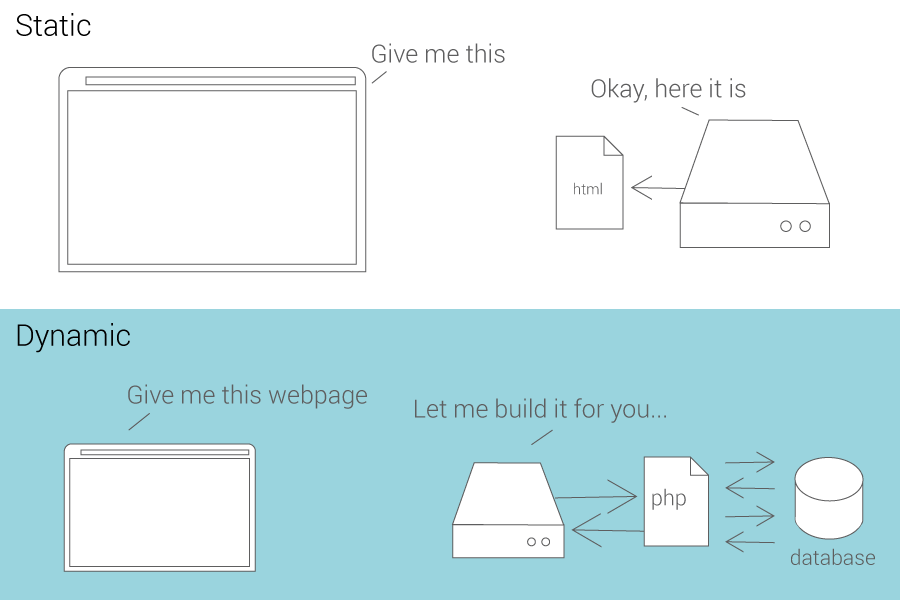
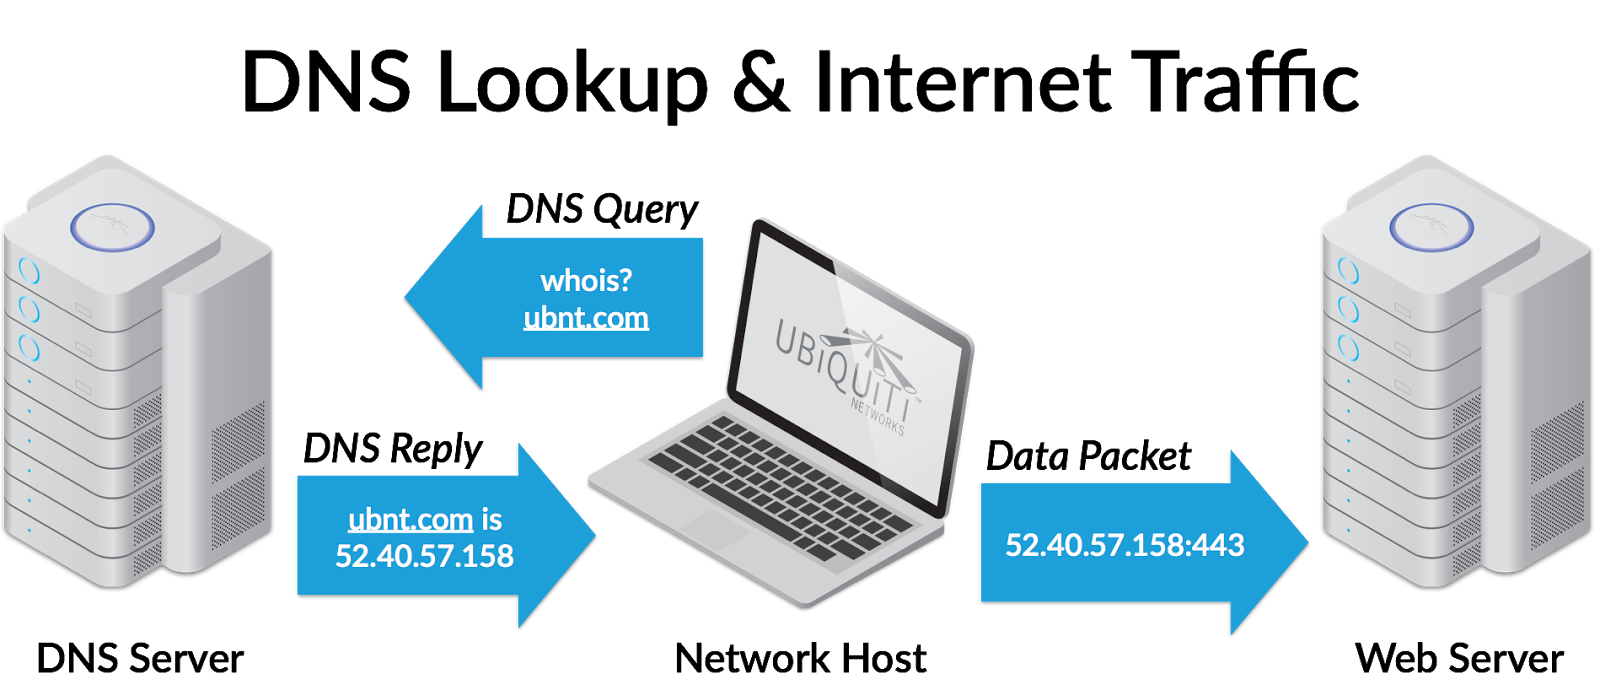
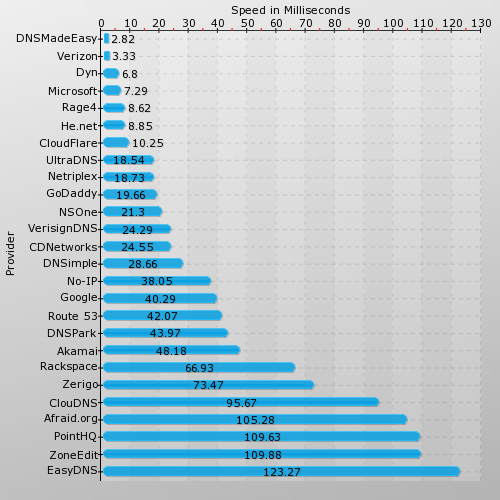
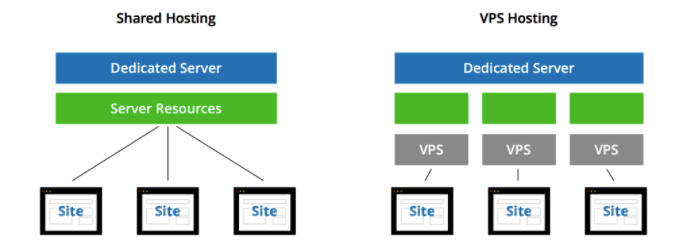
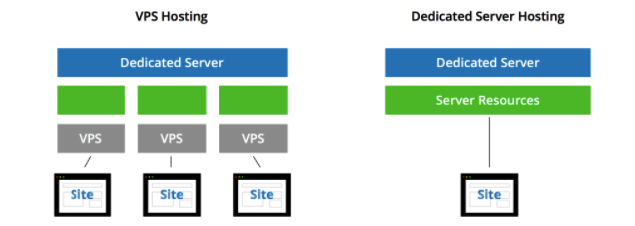
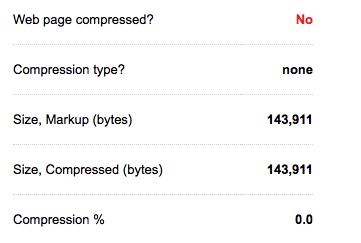
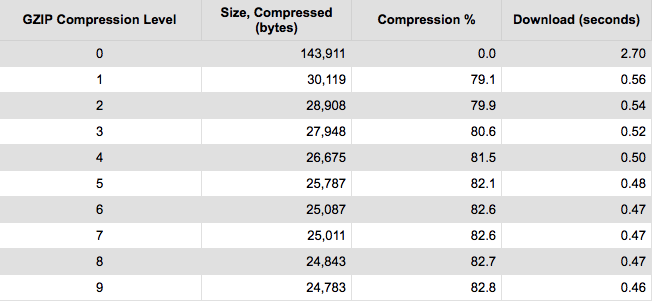
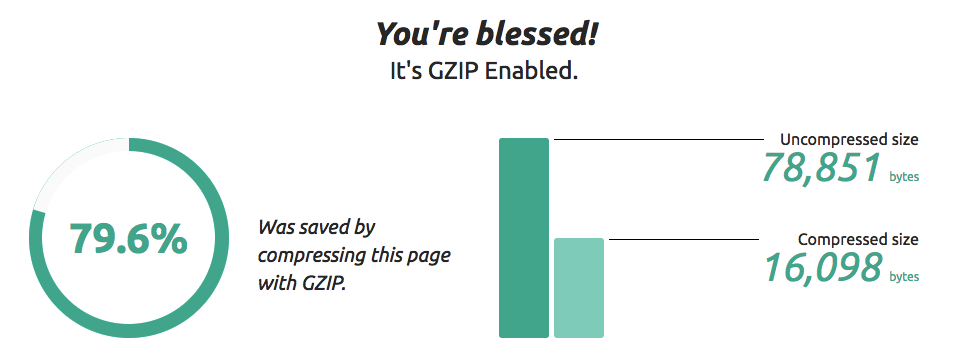
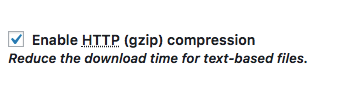
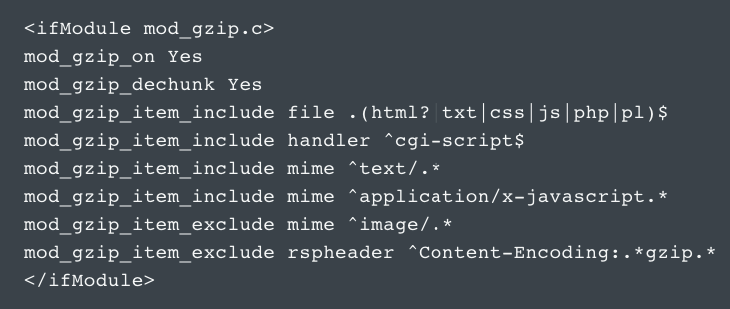


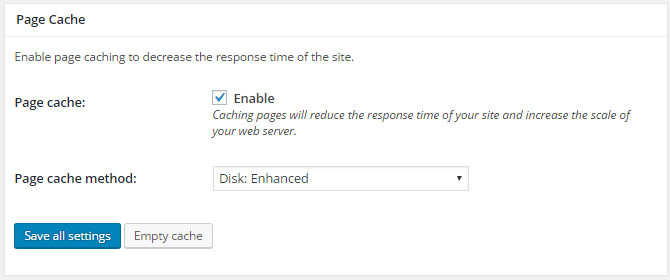
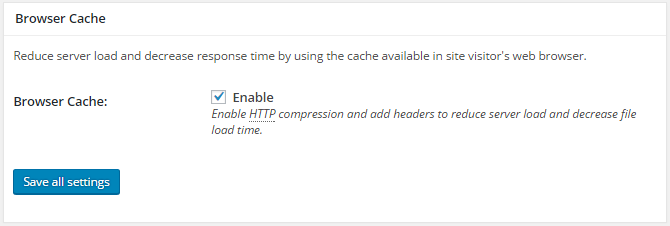
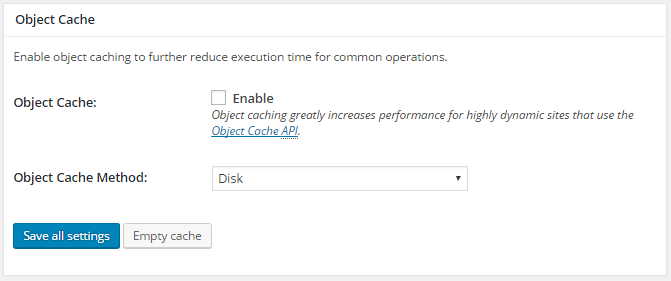
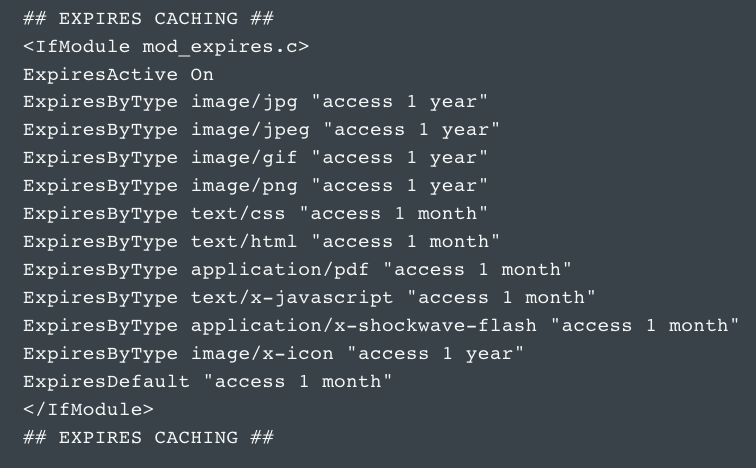
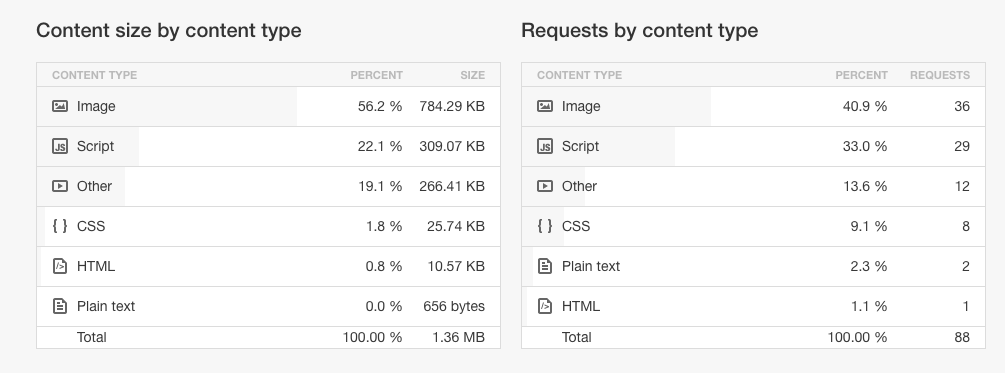
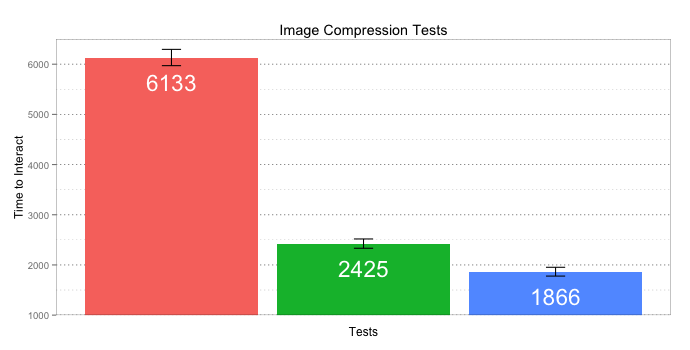
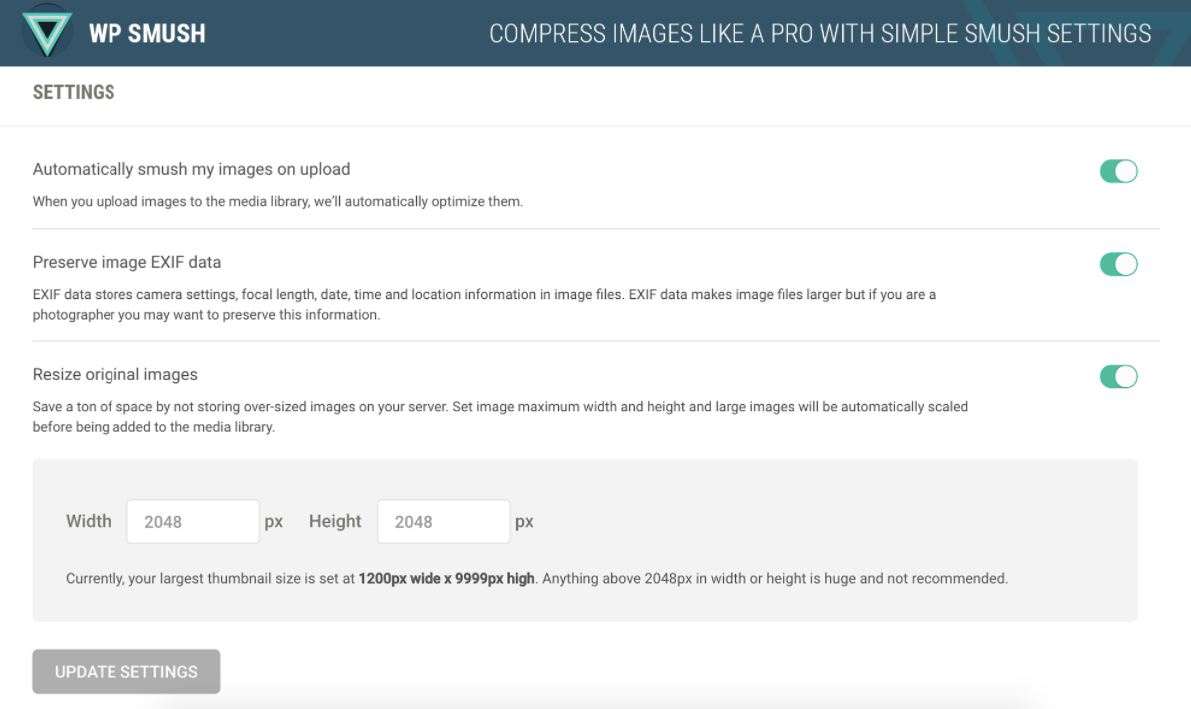
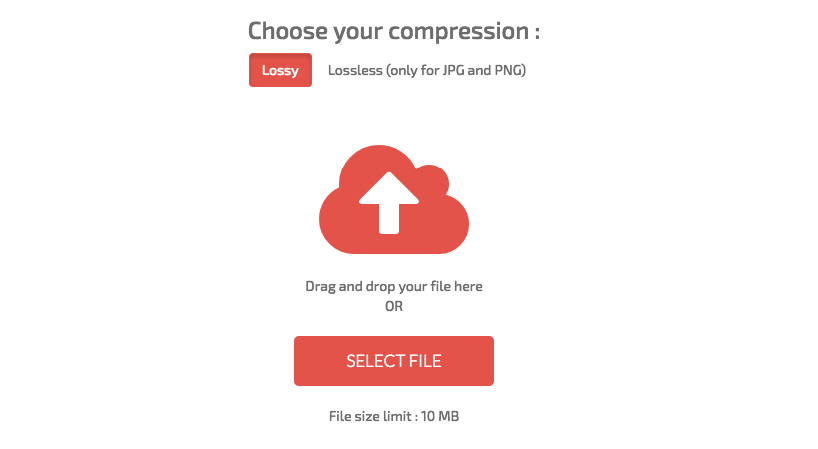
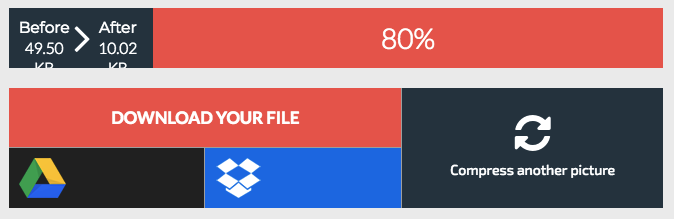
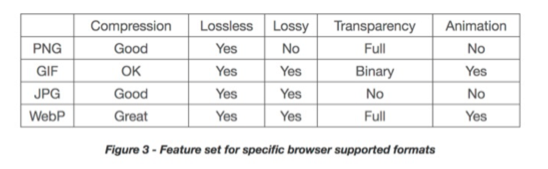
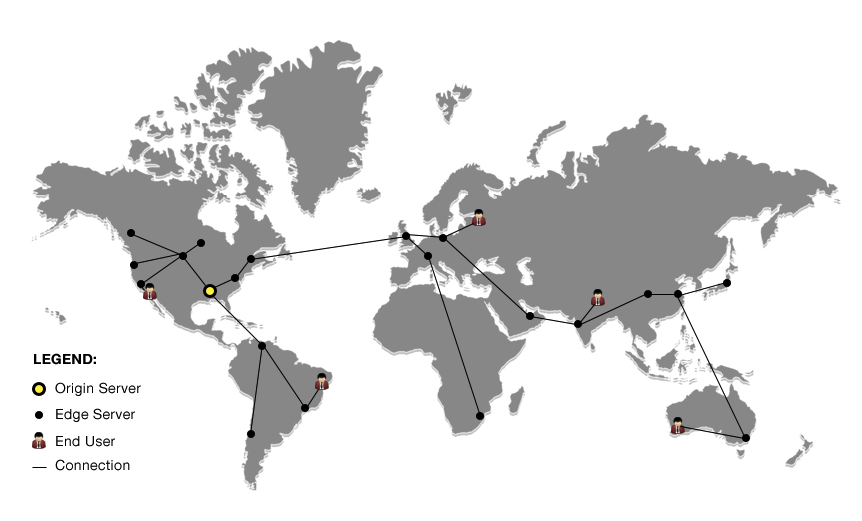
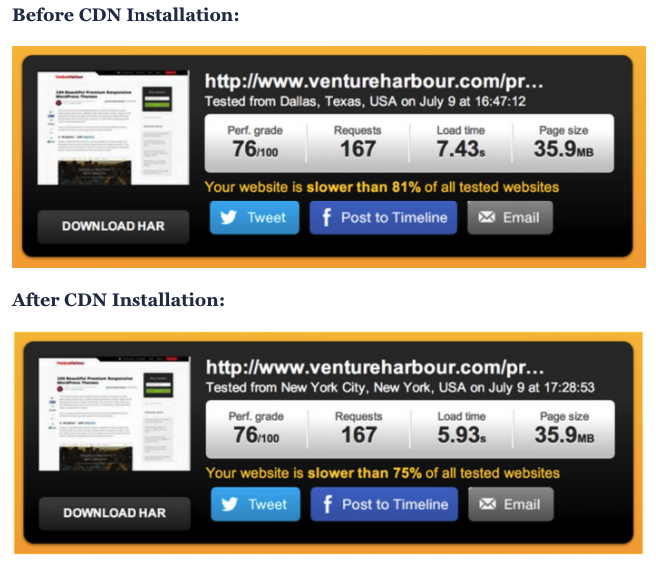
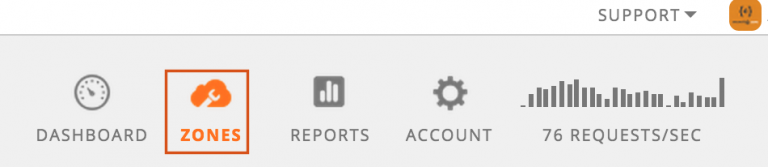
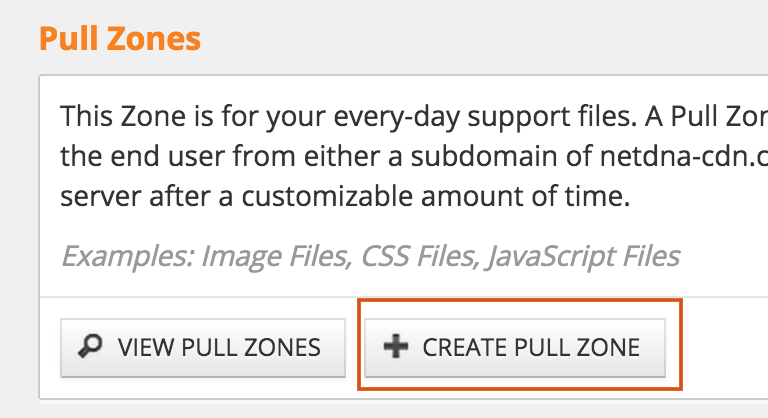
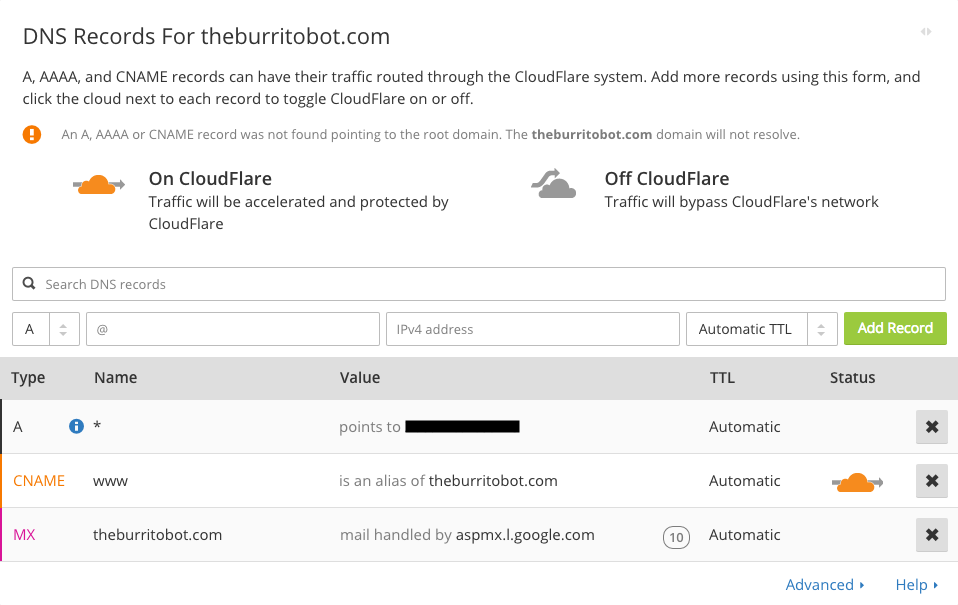
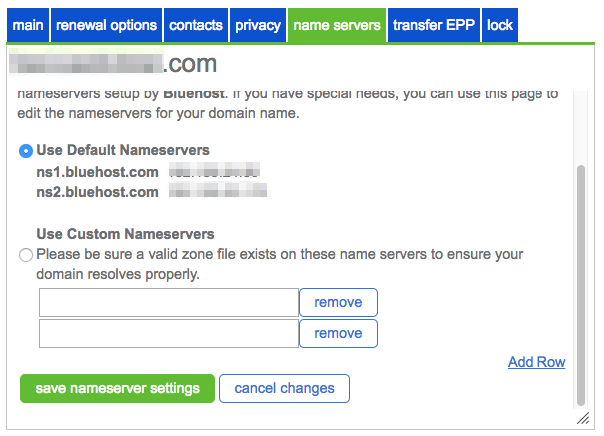




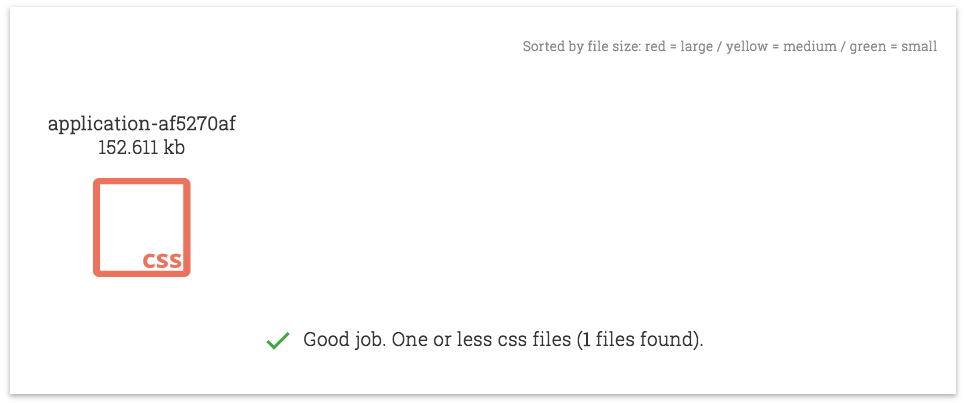
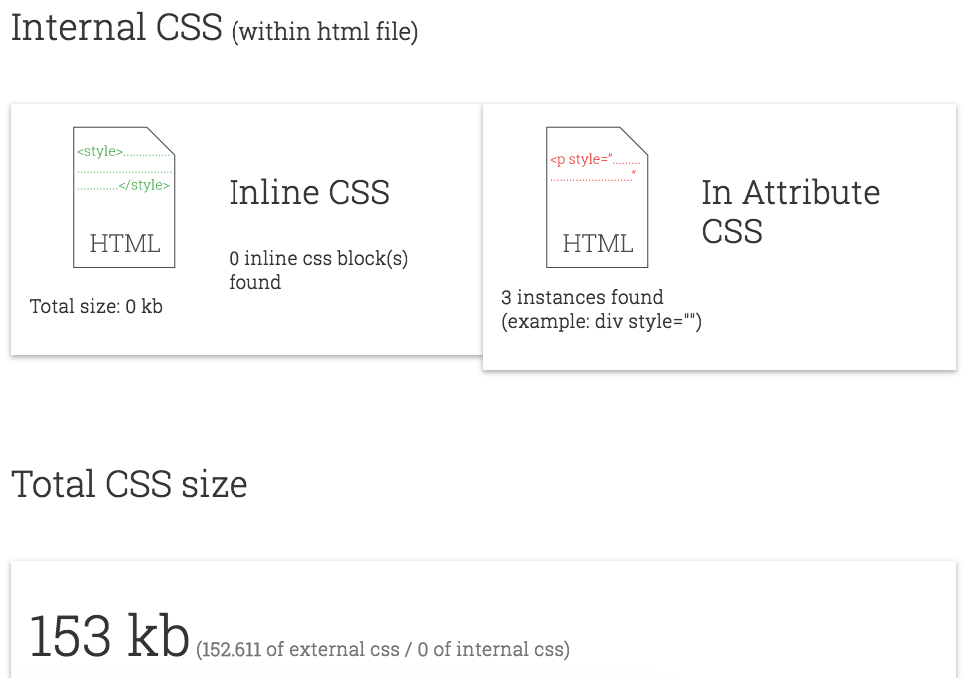
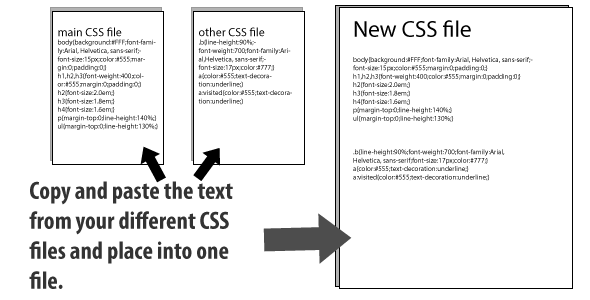
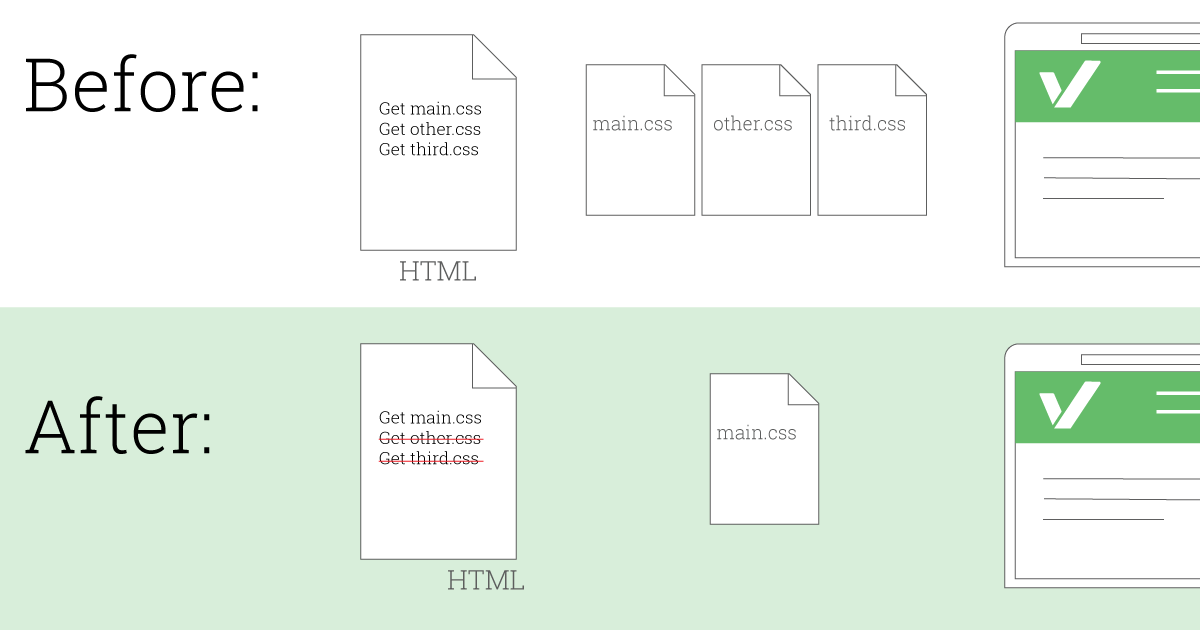
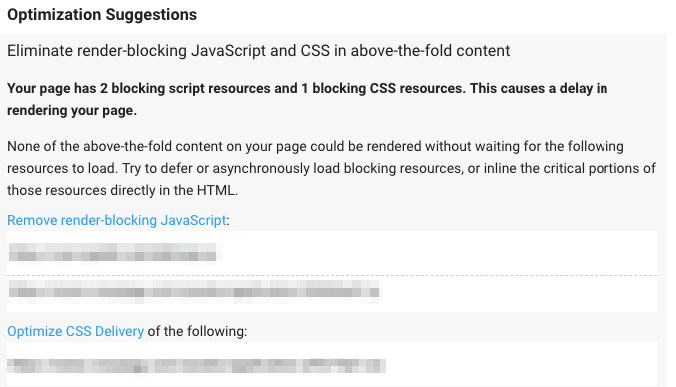
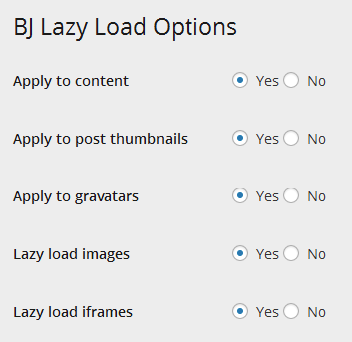
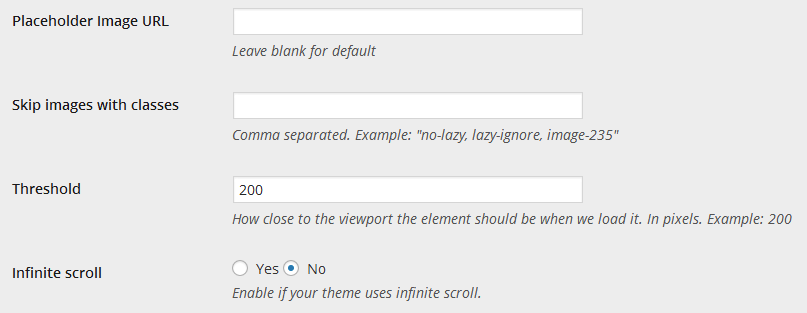
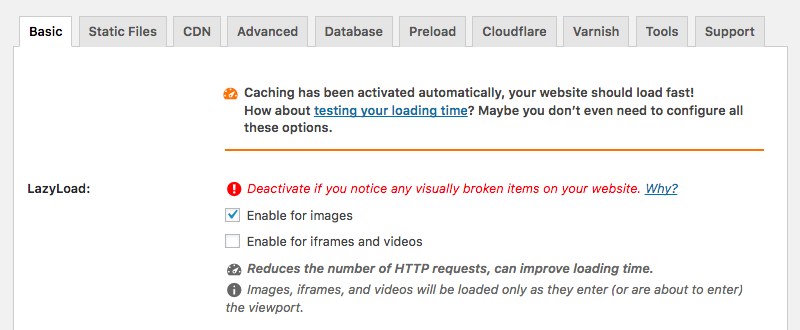
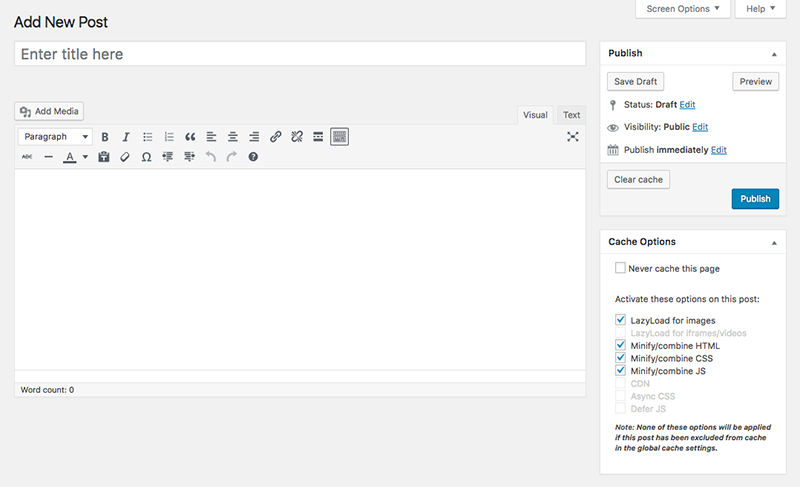
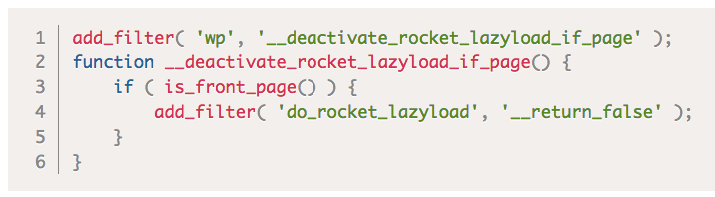

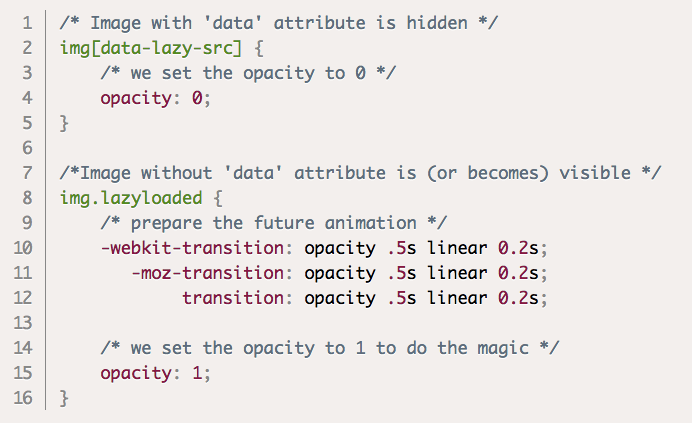

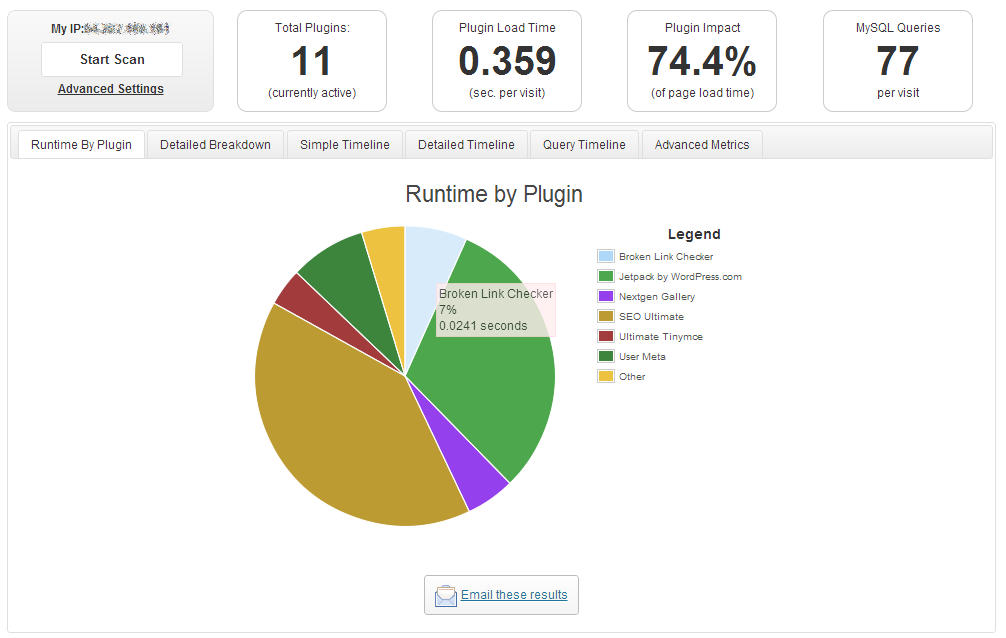
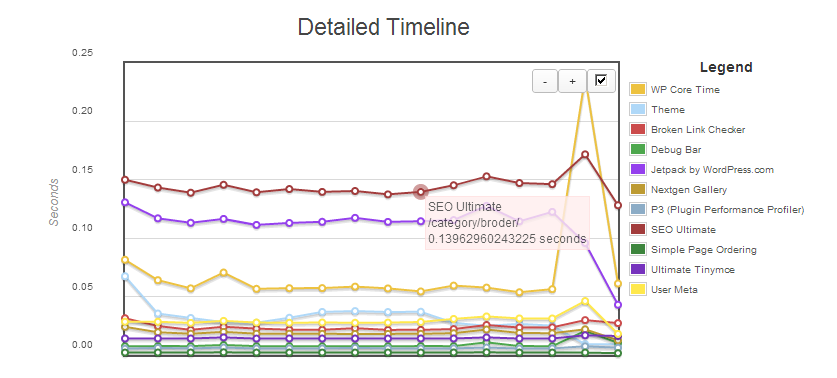
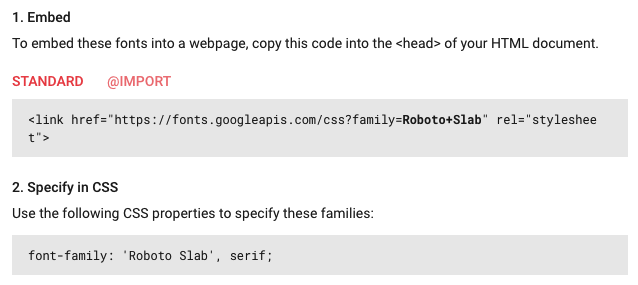
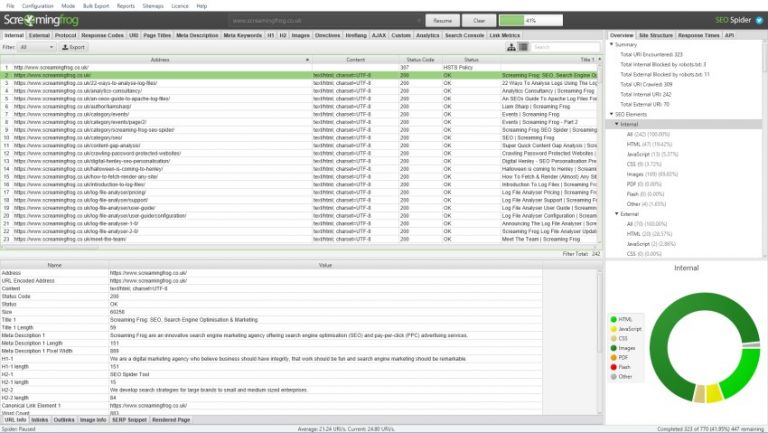
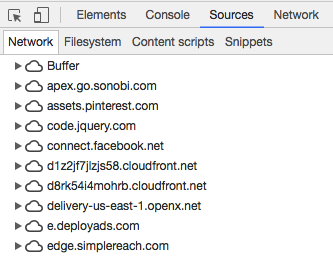

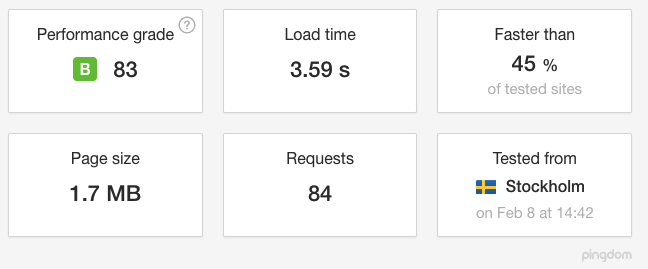
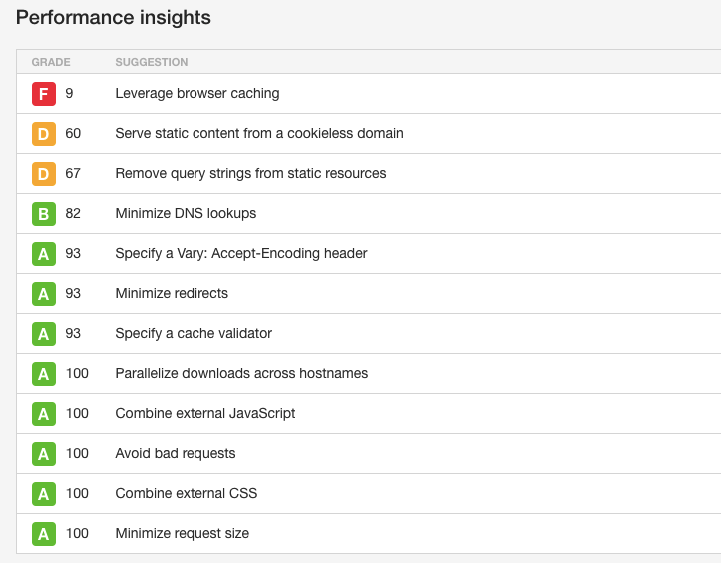
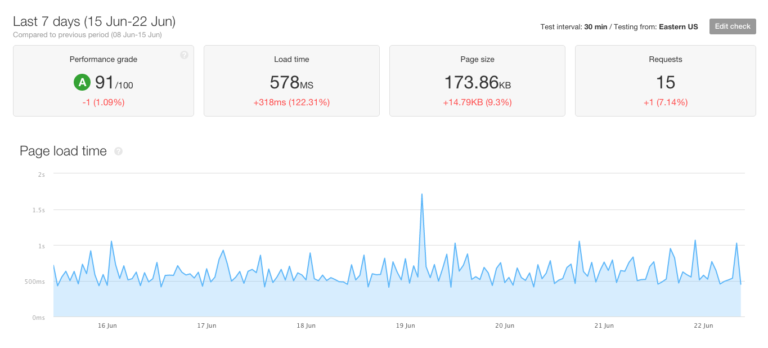

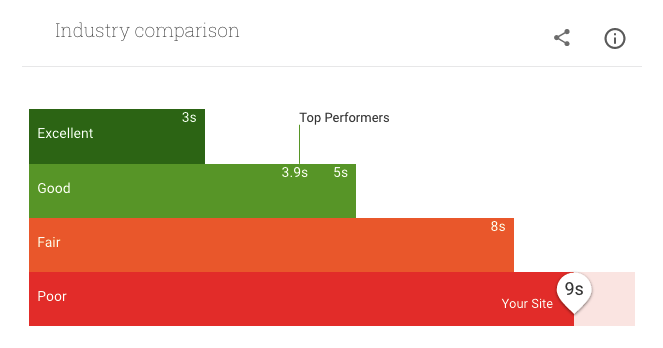

Recent Comments